Do you have a question about the Orion SMART PAN and is the answer not in the manual?
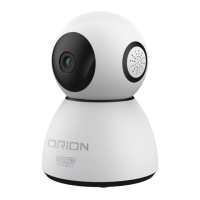
Allows camera capture both day and night image.
1080p HD resolution with a 100° field of view.
Audio output component of the camera.
Audio input component of the camera.
Use a micro SD memory card to record video.
Press for 5 seconds to reboot and clear all settings.
5V Power inlet for the camera.
Instructions for creating a new account or logging into the Grid Connect app.
Download the Grid Connect app from Google Play Store or Apple App Store.
Scan QR codes provided to download the GRID Connect App for free.
Follow prompts to create a new user account for the Grid Connect app.
Enter your login details to continue with an existing Grid Connect account.
Customize your home name and set up its geographical location within the app.
Assign devices to specific rooms for better organization and management.
Power on the camera and confirm status light is red and blinking for pairing.
Open Grid Connect app, navigate to security, and tap ready to pair.
Enter the correct Wi-Fi password for the camera to connect to the network.
Option to switch to a different suitable Wi-Fi network if needed.
Hold the camera 15-20cm from the mobile screen to scan the displayed QR code.
Press 'heard the beep' after hearing a sound from the camera during setup.
App connects to the camera automatically, indicated by a solid blue status light.
Confirmation screen displayed after successful device pairing in the app.
Customize device name and assign it to a specific room before finishing.
Tips for troubleshooting unsuccessful pairing, e.g., Wi-Fi, pairing mode status.
View live feed, switch video quality, access settings, and go full screen.
Review recorded video, pause playback, and navigate the timeline.
Controls for photo/video capture, talk function, pan/tilt, and sound.
Controls for photo/video capture, SD card access, and playback navigation.
Use mounting stand as template, drill holes, and insert wall plugs.
Attach the mounting stand to the ceiling using the provided mounting screws.
Install camera onto the stand and rotate anticlockwise to secure it properly.
Note on flipping screen in settings for correct orientation after ceiling mounting.
Troubleshoot pairing failures, 2.4GHz network problems, and password resets.
Address issues with scanning QR codes or not hearing the pairing beep.
Advice on router proximity for pairing and steps to enable pairing mode.
Information on 5GHz wireless support and recovering forgotten account passwords.
Details Arlec's warranty for materials and workmanship for 12 months from purchase.
Procedure for returning product and proof of purchase to claim warranty service.
Specific warranty rights and remedies for goods purchased in Australia and New Zealand.
Provides telephone numbers, addresses, and email for warranty claims and support.
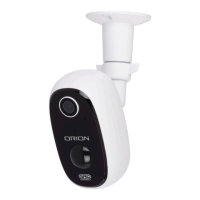
The ORION GRID CONNECT Smart Pan & Tilt Security Camera is a wireless device designed for monitoring homes, apartments, offices, garages, and sheds. It offers a comprehensive security solution by automatically detecting and tracking motion, allowing users to see and record everything that happens using their smartphone.
The camera captures both day and night images thanks to its infrared LEDs. It records in 1080p HD with a 100° field of view. The pan and tilt functionality allows for a 355° horizontal pan and a 65° vertical tilt, providing extensive coverage of the monitored area. The device includes a speaker and microphone for two-way audio communication. Video recordings can be stored on a micro SD memory card, with a 16GB Class 10 card included, and support for up to 128GB cards.
The camera is operated through the Grid Connect mobile app, available for both iPhone and Android devices. This app allows for remote monitoring from anywhere with an internet connection.
| Audio | Two-way audio |
|---|---|
| Night Vision | Yes |
| Motion Detection | Yes |
| Connectivity | Wi-Fi |
| Power Source | DC |
| Weather Resistance | No (Indoor use only) |