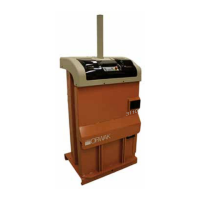
11
Read through the whole instructions before installing the machine!
If the instructions are not followed, this could result in personal injuries.
(The machine is packaged using recyclable plastic.)
Make sure that nobody except the qualifi ed and competent installation engineer is in the vicinity of the machine during the
installation process! Only one person is allowed to carry out the installation.
The installation must be carried out by an qualifi ed and competent person.
Some steps involve dangerous machine movements. Take every precaution, as there is a great risk of serious crushing injuries.
1: Note the installation dimensions!! The operator must have enough space to be able to stand on the right side of the
machine during baling. The height of the ceiling, the turning radius of the door and suffi cient space for service work etc. must also
be considered!
2: Electrical installation: A qualifi ed electrician should only ensure that the correct electrical power according to these instruc-
tions is available for the installation of the machine. The electrician or any other individual must not switch on the current to the
machine or start the machine. This may only be carried out by the qualifi ed and competent installation engineer in accord-
ance with the installation instructions.
3a: Take out 1 bale tool, 2 strap holders and 8 rubber tiles.
b: Place the strap holders in the strap holder mounts and hang the strap hook on the side of the machine
4: Place the machine on the rubber tiles and ensure that it is level.
5: Make sure that the machine’s main switch is set to 0 and that the emergency stop is pressed in.
6: Remove the remote control from the electrical box.
7: Connect the machine to the wall socket.
8: Turn the main switch to 1 and reset the emergency stop button. A white lamp lights up.
9: Dangerous machine movement!! Check the motor’s direction of rotation by briefl y pressing the remote control button.
NOTE! If the motor rotates in the wrong direction, call in an electrician to reverse the phases.
10: Dangerous machine movement!! Run the cylinder jerkily up towards the mounting beam by briefl y and repeatedly pressing
the remote control button.
11: Screw the cylinders in place from the upper side of the press plate (although do not tighten them until point 15).
12: Angle the hydraulic hoses down and ensure that they are not in contact with any sharp edges. Tighten the hydraulic couplings
on the cylinders.
13: Strap the hydraulic hoses as illustrated.
14a: Run up the press plate using the remote control button until it is approximately 200 mm from the uppermost position.
b: Turn the main switch to 0.
c: Disconnect the remote control by disconnecting the three cables from the logic unit. Tighten the screws on the logic unit again.
Store the remote control in a suitable location, separate from the machine.
When the cylinder has been run up and the installation completed, the remote control must be removed from the electrical
box! If the remote control is not removed, it is possible to bypass the machine’s entire safety system, with a very great risk of
personal injuries as a consequence.
15: Tighten the cylinder screws.
16: Screw the bale indication mount to the beam on the upper side of the machine. Tightening bracket screws seated as delivered
produces maximum bale size.
17: Install the covers.
18: Close the doors.
19a: Turn the main switch to 1.
b: Make sure that the emergency switch is not pressed in.
c: Run up the press plate using the ”up arrow”.
d: The green lamp lights up.
20: Check the oil level when the press plate is in its uppermost position.
When the cylinder has been run up and the installation completed, the remote control must be removed from the electrical
box! If the remote control is not removed, it is possible to bypass the machine’s entire safety system, with a very great risk of
personal injuries as a consequence.
INSTALLATION TEXT FOR THE PICTURES ON THE LAST DOUBLE-PAGE SPREAD
English
5

 Loading...