EasyManua.ls Logo

Ozito Power X Change PXCCSS-018 - User Manual

Ozito Power X Change PXCCSS-018
8 pages
Print Icon
To Next Page IconTo Next Page
Loading...
SPECIFICATIONS
Input: 18V
Bar Length: 250mm (10”)
Cutting Length Max.: 230mm
Chain Speed: 4.3m/s
Chain Pitch: 9.53mm (3/8”)
Chain Gauge: 1.1mm (.043”)
Oil Tank Capacity: 200ml
Weight: 3.0kg
WHAT’S IN THE BOX
Chainsaw
Battery & Charger
sold separately
CORDLESS
CHAINSAW
INSTRUCTION MANUAL
ozito.com.au
Guide Bar Cover
Screwdriver
PXCCSS-018
IN ORDER TO MAKE A CLAIM UNDER THIS WARRANTY YOU
MUST RETURN THE PRODUCT TO YOUR NEAREST BUNNINGS
WAREHOUSE WITH YOUR BUNNINGS REGISTER RECEIPT. PRIOR TO
RETURNING YOUR PRODUCT FOR WARRANTY PLEASE TELEPHONE
OUR CUSTOMER SERVICE HELPLINE:
Australia 1800 069 486
New Zealand 0508 069 486
WARRANTY
TO ENSURE A SPEEDY RESPONSE PLEASE HAVE THE MODEL
NUMBER AND DATE OF PURCHASE AVAILABLE. A CUSTOMER
SERVICE REPRESENTATIVE WILL TAKE YOUR CALL AND
ANSWER ANY QUESTIONS YOU MAY HAVE RELATING TO THE
WARRANTY POLICY OR PROCEDURE.
OZITO
Australia/New Zealand (Head Ofce) 1-23 Letcon Drive, Bangholme, Victoria, Australia 3175.
The benets provided under this warranty are in addition to other rights and
remedies which are available to you at law.
Our goods come with guarantees that cannot be excluded at law. You are entitled to
a replacement or refund for a major failure and for compensation for any other
reasonably foreseeable loss or damage. You are also entitled to have the goods
repaired or replaced if the goods fail to be of acceptable quality and the failure
does not amount to a major failure.
Generally you will be responsible for all costs associated with a claim under this
warranty, however, where you have suffered any additional direct loss as a result of
a defective product you may be able to claim such expenses by contacting our
customer service helpline above.
0316
WARNING
The following actions will result in the warranty being
void.
• If the tool has been operated on a supply voltage other
than that specied on the tool.
• If the tool shows signs of damage or defects caused
by or resulting from abuse, accidents or alterations.
• Failure to perform maintenance as set out within the instruction manual.
• If the tool is disassembled or tampered with in any way.
5 YEAR REPLACEMENT WARRANTY
Your Product is guaranteed for a period of 60 months from the original date of
purchase and is intended for DIY (Do It Yourself) use only. If a product is defective it
will be replaced in accordance with the terms of this warranty. Lithium Ion
batteries and chargers are covered by a 36 month
warranty Warranty excludes consumable parts, for example: guide bar, chain
and included accessories.
Question and Answer IconNeed help?

Do you have a question about the Ozito Power X Change PXCCSS-018 and is the answer not in the manual?

Summary

Specifications

Whats In The Box

Warranty Information

5 Year Replacement Warranty

Details the 5-year replacement warranty and exclusions for consumable parts.

Warranty Voiding Conditions

Lists actions that will void the product warranty, such as misuse or improper maintenance.

Know Your Product

Setup and Preparation

Battery and Charging

Instructions for charging the lithium-ion battery and understanding charger LED indicators.

Inserting and Removing the Battery

Steps for installing and removing the battery pack from the chainsaw.

Operation Guide

Chain Oiling

Guide to filling the chain oil tank and checking the lubrication system functionality.

Switching On and Off

Procedures for activating and deactivating the chainsaw, including chain brake operation.

Cutting Techniques

Instructions for proper cutting, including safety tips for beginners.

Applications

Felling a Tree

Safety guidelines and techniques for felling trees, intended for trained operators.

Limbing Branches

Process of removing branches from a fallen tree, with cutting tips.

Bucking Logs

Techniques for cutting logs into shorter lengths for easier handling.

Pruning Tree Limbs

Methods for removing limbs or branches from a standing tree.

Maintenance and Troubleshooting

Adjusting Chain Tension

Steps to adjust and check the chain tension for optimal performance.

Guide Bar Maintenance

Instructions for cleaning, checking, and maintaining the guide bar.

Chain Sharpening

Guidelines and techniques for sharpening the chainsaw chain.

Troubleshooting Common Issues

Guidance for cleaning, storing, battery protection, and charger LED issues.

Spare Parts Information

Symbol Descriptions

Battery and Charger Safety Warnings

Electrical Safety

General Power Tool Safety Warnings

Chainsaw Specific Safety Warnings

Kickback Prevention

Guidance on avoiding kickback through proper grip, stance, and maintenance.

Overview

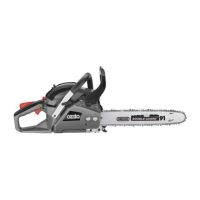
This document describes the Ozito 18V Lithium Ion Cordless Chainsaw, a power tool designed for DIY (Do It Yourself) use. It is part of the Ozito Power X Change range, meaning it is compatible with other Ozito Power X Change batteries and chargers, which are sold separately.

Function Description

The Ozito Cordless Chainsaw is designed for cutting wood, such as felling trees, limbing, bucking logs into lengths, and pruning branches from standing trees. It operates on an 18V lithium-ion battery, providing cordless convenience. The chainsaw features a chain brake for safety, which activates automatically in the event of kickback or can be operated manually. It also includes an automatic oiling system to ensure the chain and guide bar are properly lubricated during operation.

Important Technical Specifications

  • Input: 18V
  • Bar Length: 250mm (10")
  • Cutting Length Max.: 230mm
  • Chain Speed: 4.3m/s
  • Chain Pitch: 9.53mm (3/8")
  • Chain Gauge: 1.1mm (.043")
  • Oil Tank Capacity: 200ml
  • Weight: 3.0kg
  • Chain File (for sharpening): 3.96mm (5/32")
  • Battery & Charger: Sold separately, compatible with Ozito Power X Change range. Lithium-ion batteries and chargers are covered by a 36-month warranty.

Usage Features

The chainsaw is designed for ease of use and safety, with several features to assist the operator:

Battery and Charging:

  • The device uses an 18V lithium-ion battery (sold separately).
  • Batteries are shipped in a low charge condition and require charging before first use. Optimal performance is achieved after several charge/discharge cycles.
  • Fast Charger: Connects to mains power. A flashing green LED indicates standby, a red LED indicates charging (low or mid charge), and a green LED indicates fully charged. If both LEDs illuminate or flash, it indicates a battery pack temperature issue (too hot/cold) or a defective battery.
  • Eco Charger: Similar LED indicators for standby, charging, and fully charged states. It also indicates battery/charger faults or temperature issues.
  • Battery Charge Indicator: A button on the battery pack allows checking the charge state via LED lights (red for immediate charging, orange for low charge, yellow for mid charge, green for full charge). The battery must be removed from the tool to check its charge state.
  • Battery Protection System: Automatically cuts off power if the tool is overloaded or the battery capacity is low, protecting the tool and battery.

Inserting & Removing the Battery:

  • Installation: Align battery ribs with the recess below the handle and slide until it clicks into place.
  • Removal: Press and hold the battery release tab, then slide the battery out.

Oiling System:

  • Filling: Remove the chain bar oil cap and fill the 200ml tank with "CHAIN BAR OIL" only. Do not overfill.
  • Oil Level Window: Always fill the oil tank when the oil level is below the minimum mark.
  • Lubrication Check: Before starting work, switch on the chainsaw and hold it over light-coloured paper. A steady oil spray indicates the lubricating system is working.
  • Storage Note: Chain bar oil may leak if the tool is left unused for extended periods. It is recommended to drain the oil before long-term storage and refill before next use.

Switching On/Off:

  • Switching ON: Pull the hand guard/chain brake towards you. Hold the front handle with your left hand and the rear handle with your right hand. Press the lock-off button with your thumb, then squeeze the trigger switch. The chainsaw starts after a short delay.
  • Switching OFF: Release the trigger switch; the chain and motor will quickly stop.
  • Running in the Chain: New chains should be run in for 2-3 minutes, then tension checked and adjusted.

Chain Brake:

  • The chain brake operates automatically in the event of kickback, stopping the chain within a tenth of a second.
  • It can also be operated manually by pushing it forward.
  • Kickback occurs when the guide bar tip touches an object or when the wood pinches the chain. The hand guard/chain brake is designed to be engaged by the operator's hand jerking forward during kickback.

Cutting Operations:

  • General Practice: First-time users should practice cutting logs on a saw-horse or cradle.
  • Starting a Cut: Press bucking spikes against the timber, ensuring the chain is not contacting the material. Hold the chainsaw by the front handle and raise the rear handle to start cutting.
  • Completing a Cut: For single-stroke cuts, apply light pressure. For thicker timber, apply light pressure, draw the chainsaw back, apply bucking spikes lower, and finish the cut by raising the rear handle.
  • Withdrawal: Withdraw the chainsaw from the cut while the chain is still running.
  • Hints & Tips:
    • Do not force the saw; apply light pressure.
    • If the chain gets caught, do not twist the guide bar; use a lever or wedge to free it.
    • Keep your left arm with the elbow locked in a "straight arm" position to resist kickback.
    • Always run the motor at full speed for safer operation.
    • Position your body to the left of the chainsaw to avoid injury from kickback.
    • Maintain a firm grip with both hands, thumb securely below the handle.

Applications:

  • Felling a Tree: Only by trained operators. Consider wind, branches, tree lean, and ease of limbing/bucking.
  • Limbing: Removing branches from a fallen tree. Cut on the opposite side of the bending direction to avoid pinching. For large limbs, make an initial cut from the bent side and finish from the opposite direction. Do not remove supporting limbs until the tree is cut into lengths.
  • Bucking: Cutting logs into lengths. For logs on the ground, saw halfway, roll, and cut from the opposite side. For logs supported off the ground, saw up from the bottom one-third, then finish from the top. For logs supported at both ends, saw down from the top one-third, then finish from the bottom. Avoid cutting into the ground.
  • Pruning: Removing limbs from a standing tree. Do not use an unstable foothold or ladder, do not overreach, and do not saw above shoulder height. Always use both hands. First cut up from the bottom, then finish down from the top.

Safety Warnings:

  • Keep all body parts away from the saw chain when operating.
  • Always hold the chainsaw with the right hand on the rear handle and the left hand on the front handle.
  • Hold the tool by insulated gripping surfaces to avoid electric shock if the chain contacts hidden wiring.
  • Wear safety glasses, hearing protection, and other protective equipment (head, hands, legs, feet).
  • Do not operate in a tree.
  • Operate only when standing on a fixed, secure, and level surface.
  • Be alert for spring back when cutting limbs under tension.
  • Use extreme caution when cutting brush and saplings.
  • Carry the chainsaw by the front handle with the saw switched off and away from the body, with the guide bar cover fitted.
  • Follow instructions for lubricating, chain tensioning, and changing accessories.
  • Keep handles dry, clean, and free from oil and grease.
  • Cut wood only; do not use for unintended purposes.
  • Kickback Prevention: Maintain a firm grip, do not overreach, do not cut above shoulder height, use specified replacement bars and chains, and follow sharpening/maintenance instructions.

Maintenance Features

Regular maintenance is crucial for the chainsaw's performance and longevity.

General Cleaning and Storing:

  • Keep handles free of grease for a firm grip.
  • Clean the device with a damp cloth and mild washing-up liquid.
  • For extended storage, remove chain oil from the tank, briefly immerse the chain and cutter rail in an oil bath, and wrap them in oil paper.
  • Ensure the guide bar cover is in place during storage.
  • Safety Precaution: Always disconnect the battery before cleaning or performing maintenance. Never immerse the unit in water or other liquids. Store the chainsaw in a safe, dry place out of reach of children.

Adjusting the Chain Tension:

  • Procedure: Loosen the guide bar locking knob slightly. Adjust the chain tension screw (clockwise to increase, counter-clockwise to decrease) until the bottom tip of the links just stays in the track when pulling up on the chain from the top and middle of the exposed guide bar.
  • Ideal Tension: A 3-4mm gap is the ideal tension.
  • Importance: Proper chain tension is extremely important and must be checked before and during cutting operations for improved performance and prolonged chain life.

Maintaining the Guide Bar:

  • Remove sawdust from the guide bar, including the groove, to prevent burning smells from oil and sawdust buildup.
  • Ensure the oil port is not clogged.
  • Grease the nose sprocket at the tip of the guide bar.
  • Check for oil leakage and loose fastenings, especially on handles and the guide bar.
  • Reverse the guide bar every 8 working hours to ensure uniform wear. Check guide rails frequently and remove burrs using a flat file if necessary.

Chain Sharpening:

  • Tools: Use a round 3.96mm (5/32") chain file.
  • Signs of a Dull Chain: Powder-like sawdust, extra force required for cuts, non-straight cuts, and increased vibration.
  • Procedure: Sharpen each cutter with outward strokes, keeping the file level with the top plate of the tooth and maintaining a 30° angle between the chain and file.
  • Professional Sharpening: After every 3-4 uses, it is recommended to have the chain professionally sharpened at an authorized repair center to ensure correct cutting angles and depths.

Spare Parts:

  • Replacement chains can be purchased through Ozito spare parts or local Bunnings Warehouse. Match the pitch (9.53mm/3/8"), gauge (1.1mm/.043"), and number of links (40 Links).
  • Other spare parts can be ordered from the Special Orders Desk at Bunnings Warehouse or via www.ozito.com.au.

Warranty:

  • The product comes with a 5-year replacement warranty for DIY use from the original purchase date.
  • Lithium-ion batteries and chargers are covered by a 36-month warranty.
  • Warranty excludes consumable parts like the guide bar, chain, and included accessories.
  • The warranty is void if the tool is operated on incorrect voltage, shows signs of abuse, accidents, or alterations, lacks maintenance, or is disassembled/tampered with.
  • To make a claim, return the product to your nearest Bunnings Warehouse with the register receipt. Customer service helplines are available for Australia (1800 069 486) and New Zealand (0508 069 486).

Ozito Power X Change PXCCSS-018 Specifications

General IconGeneral
BrandOzito
ModelPower X Change PXCCSS-018
CategoryChainsaw
LanguageEnglish

Related product manuals