Do you have a question about the Ozito PXCCSS-018 and is the answer not in the manual?
Details chainsaw specifications, warranty terms, initial setup, and battery handling procedures.
Covers safe operation, lubrication, cutting techniques, applications like felling, and safety features.
Instructions for chainsaw maintenance, including chain tension, guide bar care, and chain sharpening.
Details sharpener specifications, assembly, mounting, and key adjustment procedures.
Covers sharpener operation, battery handling, maintenance tasks, and safety warnings.
Details battery specifications, safety warnings, and the 36-month replacement warranty.
Provides charger specifications, safety warnings, operating instructions, and warranty information.
This document provides comprehensive instructions and safety guidelines for two distinct Ozito Power X Change 18V Lithium Ion tools: a Cordless Chainsaw and a Cordless Chainsaw Sharpener, along with their associated battery and charger.
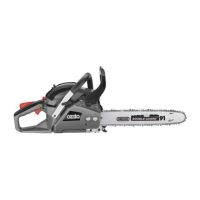
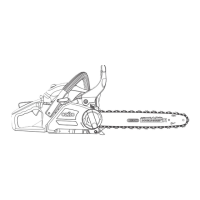
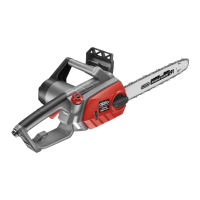
The Ozito Cordless Chainsaw is a portable, battery-operated tool designed for DIY cutting tasks. It offers the convenience of cordless operation, making it suitable for various outdoor applications without the need for a power outlet.
The chainsaw is equipped with a rear handle, a trigger switch for activation, and a lock-off button for safety, preventing unintentional starting. An oil level window and chain oil tank cap are provided for monitoring and refilling chain lubrication, which is crucial for smooth operation and chain longevity. The front handle and chain brake are designed for user control and safety, with bucking spikes to aid in cutting. The guide bar and chain are the primary cutting components, and the motor cover protects the internal mechanisms. Battery seating ensures a secure connection for the 18V Lithium Ion battery.
To operate the chainsaw, a battery must first be inserted. The battery aligns with ribs in the recess below the handle and slides in until it clicks. To remove, the battery release tab is pressed and held, allowing the battery to slide out.
Before starting, it's critical to fill the chain oil tank with "chain bar oil." The tank has a 220ml capacity and should not be overfilled. After refilling, the cap must be refitted, and any spillage cleaned. The oil tank should always be filled when the oil level is below the minimum mark on the oil level window. A lubrication check is recommended before use: switch on the chainsaw and hold the guide bar and chain above light-colored paper. A steady oil spray stain indicates the system is working.
Switching the chainsaw ON involves pulling the hand guard/chain brake towards the user, holding both the front and rear handles, pressing the lock-off button with the thumb, and then squeezing the trigger switch. The chainsaw starts after a short delay. Releasing the lock-off switch allows the chain to run for cutting. To switch OFF, simply release the trigger switch, which quickly stops the chain and motor.
A new chain requires a "running in" period of 2-3 minutes, after which its tension should be checked and adjusted.
The chainsaw features an automatic chain brake that activates in the event of kickback, stopping the chain within a tenth of a second. Kickback occurs when the nose or tip of the guide bar touches an object, or when the wood pinches the chain. The chain brake can also be manually engaged by pushing it forward. In a kickback event, the operator's hand on the front handle pushes the guard forward, engaging the brake.
When cutting, the bucking spikes should be pressed against the timber, ensuring the chain is not touching the material initially. Cutting begins by holding the chainsaw with both hands and raising the rear handle. For cuts that cannot be completed in a single stroke, light pressure should be applied to the front handle, the chainsaw drawn back slightly, bucking spikes applied lower, and the cut finished by raising the rear handle. The chainsaw should be withdrawn from the cut while the chain is still running.
Tips for effective and safe cutting include: not forcing the saw, applying light pressure, and running the motor at full speed to reduce pull-in or kickback. If the chain gets caught, a lever or wedge should be used to free it, rather than twisting or pulling. Maintaining a straight arm position with the left arm helps withstand kickback. The operator's body should be positioned to the left of the chainsaw, never in the cutting line. A firm grip on the front handle, with the thumb securely below, is essential.
For felling trees, trained operators should decide the fall direction based on wind, branches, tree lean, and subsequent limbing/bucking. Limbing involves removing branches from a fallen tree, cutting on the opposite side of the bending direction to prevent pinching. Supporting limbs should remain until the tree is cut into lengths. Bucking involves cutting logs into lengths. For logs on the ground, cut halfway, then roll and cut from the opposite side. For logs supported off the ground, cut one-third from the bottom, then finish from the top. For logs supported in the middle, cut one-third from the top, then finish from the bottom. Avoid cutting into the ground to prevent dulling the chain.
Regular maintenance is crucial for the chainsaw. Before any cleaning or maintenance, the battery must be removed to prevent accidental starting. Gloves should always be worn when handling the chain due to its sharpness.
Chain tension adjustment involves loosening the guide bar locking knob, then rotating the chain tension screw clockwise to increase tension or counter-clockwise to decrease it. Correct tension is achieved when the bottom tip of the links just stays in the track when pulled up from the top and middle of the exposed guide bar, with a 3-4mm gap being ideal. After adjustment, the guide bar locking knob is tightened. Proper chain tension is vital for performance and chain life.
Guide bar maintenance includes removing sawdust from the groove, ensuring the oil port is not clogged, greasing the nose sprocket, and checking for oil leakage and loose fastenings. The guide bar should be reversed every 8 working hours for uniform wear, and guide rails checked for burrs.
Chain sharpening is also detailed. Signs of a dull chain include powdery sawdust, increased force required for cutting, cuts not tracking straight, and increased vibration. A round 3.96mm (5/32") chain file should be used, keeping it level with the top plate of the tooth, using outward strokes, and maintaining a 30° angle. All cutters should have the same width and length. Professional sharpening is recommended every 3-4 uses.
The chainsaw is equipped with a battery protection system. It automatically cuts off power if overloaded (release trigger, remove overload, restart) or if battery capacity is low (recharge). This system protects the tool and battery.
For storage, the chainsaw should be kept clean and free of grease. If unused for extended periods, the chain oil should be removed from the tank, and the chain and cutter rail immersed in an oil bath, then wrapped in oil paper. The guide bar cover should be in place. The chainsaw should be stored in a safe, dry place, out of reach of children.
The Ozito Cordless Chainsaw Sharpener is a battery-powered tool designed to sharpen chainsaw chains effectively and conveniently.
The sharpener features a lowering hand piece, a sharpening wheel cover, and a direction of rotation indicator. An LED light aids visibility. The sharpening wheel is the primary component. Depth of grind is controlled by a knob and locking knob, with a depth of grind pin. A guide clamp lever and chain (tooth) stop secure the chain. The adjustable table has bench mounting holes, a sharpener base, a chain stop adjusting locking knob, and a table scale.
Assembly involves inserting the table bolt through the base hole and securing it with the table locking knob. For safe operation, the sharpener base must be fitted to a flat, solid, secure surface like a workbench. The base is designed in two halves, with the rear half fitting flat and the front protruding over the edge. It can be fixed with 6mm bolts (not supplied) or clamped with a G-clamp.
Before sharpening, several adjustments are necessary: angle of cut, chain (tooth) stop, and depth of cut. The battery must be disconnected before making adjustments.
Adjusting the angle of cut: The slide guide groove is opened by rotating the guide clamp lever anti-clockwise. The lever is spring-loaded for repositioning. If the chain angle is unknown, set the table angle to 35°. The hand piece is lowered, and the table moved until the cutting face of the tooth is parallel with the wheel. Common angles are 30-35°. The chain may need slight adjustment to allow the wheel to enter the tooth face. Once the correct angle is achieved, the table locking knob is tightened. The hand piece is lowered again to align the wheel with the tooth, confirming the angle. The guide is locked by rotating the clamping lever clockwise. If the chain is not firmly clamped, the lever can be pulled outwards, rotated anti-clockwise 1/4 turn, pushed back in, and rotated fully clockwise again.
Adjusting the chain (tooth) stop: With the chain clamped, rotate the chain stop behind the chain tooth, aligned with the sharpening wheel. Adjust the chain stop firmly behind and at the bottom of the tooth using the chain stop adjustment knob. Secure it by rotating the chain stop adjusting locking knob clockwise.
Adjusting the depth of cut: Ensure the chain is locked and the chain stop is in position. Rotate the depth adjustment knob clockwise as far as it will go to expose the pin. Rotate the locking knob towards the tool housing. Lower the wheel towards the tooth face; the depth pin should meet the depth stop platform, preventing the wheel from travelling too far. While applying downward pressure, slowly rotate the depth adjustment knob anti-clockwise, watching the wheel approach the tooth. The wheel should cover the full face of the tooth but NOT touch the tooth body. Alternatively, lower the wheel onto the tooth body, then rotate the depth adjustment knob 1/2 turn clockwise to lift it slightly away from the body, preventing damage to the chain link. Once the depth adjustment is correct, hold the depth adjustment pin and rotate the locking knob clockwise.
To turn the sharpener ON, press the green 'I' button. To turn OFF, press the red 'O' button. When starting, stand to one side and wear safety glasses.
Using the sharpener involves turning it on and slowly lowering the hand-piece. If settings are incorrect, turn off the tool and remove the battery before adjusting. A successful grind is gradual and smooth. If the sharpener speed slows down, raise the hand-piece slightly to allow the motor to return to full speed before continuing. It's important not to overload the sharpener; it should run at almost full speed.
The sharpening process involves two operations: sharpening teeth facing one side, then sharpening teeth facing the opposite side. Ensure the tooth is correctly located against the chain stop, the chain is locked, initial setup is correct, and safety gear is worn. Start the tool, allowing the motor to run for several seconds. Lower the sharpening wheel to the tooth face; it should be a light, even pass. Avoid heavy passes. If the pass is too heavy, stop, allow the hand-piece to rise, turn off the tool, and adjust the chain stop adjusting knob slightly anti-clockwise.
After sharpening a tooth, rotate the guide clamp lever fully left to unlock the chain clamp. Slide the chain right, allowing the chain stop to ride over links and teeth until the next tooth (same orientation) rides under the stop. Slide the chain left so the stop engages and locates the tooth. Lock the clamping lever and repeat the cutting test. If the wheel isn't grinding enough, adjust the chain stop adjustment knob clockwise. Lower the hand-piece fully until the wheel reaches the bottom of the tooth, ensuring it hasn't cut into the chain link. If it touches the chain link, re-set the stop by adjusting the depth of grind knob clockwise.
For sharpening teeth in the opposite direction, ensure the sharpener is off and the wheel is not rotating. Check the table angle, loosen the angle locking knob, and rotate the table to the opposite side with the same corresponding angle. Lock the angle locking knob firmly. Use the same method to release the clamping lever and move the chain right, locating the first chain tooth with the opposite orientation. The settings should be the same, but care must be taken to check the amount being cut off and the depth of the cut.
General maintenance for the sharpener includes keeping it clean and free of dust, metal debris, and dirt. The sharpening wheel should be checked before each use for damage. A metallic sound when tapped indicates good condition; a dull sound indicates a crack. The wheel should be replaced when it grinds down to a diameter of 3 inches.
If the chain has been repeatedly sharpened, the chain depth limiting gauges (depth gauge) may need to be filed down with a flat file. The depth of the depth gauges should be no more than 0.5mm below the cutters. The battery must be disconnected before any adjustments or maintenance. Replacement wheels must be rated at 6,500/min or higher. All nuts, bolts, and fixings should be periodically checked and tightened.
To remove the sharpening wheel, first remove the battery. Then, remove the three screws holding the wheel cover and lift off the cover. Hold the wheel with one hand and turn the knob at the center of the wheel anti-clockwise to remove it. Remove the old wheel and replace it with a new one. To fit a new wheel, place it over the spindle, replace the locking knob and screw it clockwise (holding the wheel), replace the cover, and secure it with the three screws.
The Ozito Power X Change 18V Lithium Ion battery and charger are integral to the cordless tools.
The battery is shipped in a low charge condition and requires charging before use. Several charge/discharge cycles are needed for optimum performance. The battery is compatible with Ozito Power X Change chargers.
To charge the battery, insert the charger's power plug into a mains socket outlet; the green LED will flash. Insert the battery pack into the charger. Once fully charged, remove the battery and disconnect the charger. The battery pack may become warm during charging, which is normal. If the battery fails to charge, check the socket voltage and charger connection.
The battery has a charge indicator. Pressing the charge indicator button illuminates LEDs to show the charge state:
The charger unit has a charging unit LED.
The battery protection system ensures longevity by cutting off power if the tool is overloaded or battery capacity is low. This system does not damage the tool or battery. The indicated capacity may be lower than the actual level during use or immediately after use.
For the charger, keep it clean and free of dust. If the supply cord is damaged, it must be replaced by a qualified electrician or power tool repairer. The charger is double insulated, meaning no earth wire is required. The insulation system provides added protection against electrical insulation failure. The power supply should be protected by a residual current device (RCD) rated at 30mA or less.
Read all safety warnings and instructions to prevent electric shock, fire, and serious injury. Keep the work area clean and well lit. Do not operate in explosive atmospheres. Keep children and bystanders away.
Electrical safety: Power tool plugs must match outlets. Avoid body contact with earthed surfaces. Do not expose tools to rain or wet conditions. Do not abuse the cord. Use an outdoor-suitable extension cord when operating outdoors. Use an RCD-protected supply in damp locations.
Personal safety: Stay alert, use common sense, and do not operate while tired or under the influence. Wear personal protective equipment, including eye protection. Prevent unintentional starting. Remove adjusting keys or wrenches before turning on the tool. Do not overreach; maintain proper footing and balance. Dress properly; keep hair, clothing, and gloves away from moving parts. Use dust extraction and collection facilities if provided.
Power tool use and care: Do not force the tool. Do not use if the switch doesn't turn it on and off. Disconnect the plug/battery pack before making adjustments, changing accessories, or storing. Store idle tools out of reach of children. Maintain tools; check for misalignment, binding, or breakage. Keep cutting tools sharp and clean. Use the tool, accessories, and bits according to instructions and working conditions.
Battery tool use and care: Recharge only with the specified charger. Use only designated battery packs. Keep battery packs away from other metal objects when not in use to prevent shorting. Avoid contact with liquid ejected from the battery; flush with water and seek medical help if contact occurs.
Service: Have tools serviced by qualified repair persons using identical replacement parts.
Power tools that are no longer usable should be disposed of in an environmentally friendly way, not with household waste. Recycle where facilities exist. Recycling packaging reduces landfill needs and pollution.
| Type | Cordless Chainsaw |
|---|---|
| Battery Voltage | 18V |
| Bar Length | 200mm (8") |
| Chain Speed | 4.3 m/s |
| Weight | 2.4kg |
| Oil Tank Capacity | 220ml |
| Power Source | Battery |
| Chain Pitch | 3/8" |