EasyManua.ls Logo

OZtrail FAST FRAME 6 PERSON - User Manual

OZtrail FAST FRAME 6 PERSON
2 pages
Print Icon
To Next Page IconTo Next Page
Loading...
WARNING
AVOID CONTACT WITH OPEN FLAMES:
This tent is manufactured to meet CPAI-84 Fire Retardant
standards. The fabric may burn if in continuous contact with
open flame sources.
CONDENSATION IS NOT LEAKING:
Minimise condensation by ensuring your tent is well
ventilated through windows, doors or vents.
STITCH LINE
TENT OWNERS MANUAL
FAST FR AME 6 PER S ON
BEFORE YOU BEGIN
This tent requires a minimum of two people to set up
Read all the instructions before setting up your tent.
Check parts list to ensure you have full contents
Find a Flat area for your tent, free from rocks, potholes
and branches
Ensure that you use all pegs, ropes and additional poles only
as instructed
If conditions are windy, arrange tent as to have narrowest
side of tent facing into the wind
Keep away from Open Flames, DO NOT USE Stoves
or Burning Appliances inside the tent
STORAGE
To maximise the life of your tent, always ensure it is clean of
dirt and debris.
Never store if wet or damp. Consider airing your tent at home
after your trip and allow to completely dry before storing
between trips
Continued exposure to sunlight can degrade the polyesters
used to make tents. Always store your tent in its storage bag,
away from direct light in a cool, dry space
CONTENTS
Inner Tent x 1
Rain Fly x 1
Duraplus Rain Fly Vestibule Pole x 1
Awning Poles x 2
Pegs x 23
Guy Ropes x 6
WARRANTY - For details see www.oztrail.com.au/warranty
SEE OTHER SIDE FOR PITCHING INSTRUCTIONS
DuraPlus Vestibule Pole x 1:
Steel Awning Pole x 2:
OZtrail
®
is a registered trademark of
Adventure Trading Australia Pty Ltd
Designed & Imported by:
Adventure Trading Australia Pty Ltd
71 Charles Ulm Place,
Eagle Farm, QLD 4009
AUSTRALIA
Made in Bangladesh
Question and Answer IconNeed help?

Do you have a question about the OZtrail FAST FRAME 6 PERSON and is the answer not in the manual?

Summary

Tent Setup Guide

Layout the Inner Tent

Unfold the inner tent and outstretch over a flat, clear area. Arrange the door so it is facing your desired area for entry & exit.

Erect the Inner Tent Frame

Locate the Lower Leg section of the frame, raise to near vertical orientation. Extend the leg section until the locking button clicks.

Put on the Fly

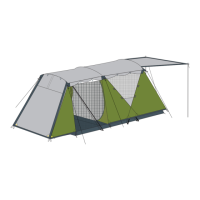
Place rainfly over the Inner tent so red webbing on the fly faces the rear. Place Vestibule pole through sleeve above the door.

Secure Fly to Inner Tent

Secure rain fly to tent with Velcro tabs. Connect the fly to the tent using red and grey buckles on tent corners.

Assemble the Awnings

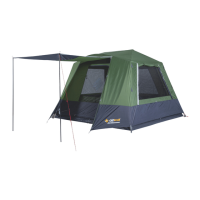
Use awning poles and additional ropes to suspend the door panel overhead. Peg out the tent and fly around the perimeter.

Peg Out and Use Guy Ropes

In windy/rainy conditions, dismantle awnings, close doors, and set out guy ropes. Ensure tent is securely pegged.

Tent Storage

Maximising Tent Lifespan

Ensure tent is clean of dirt and debris. Never store wet or damp. Air at home to completely dry before storing.

Sunlight Exposure

Continued exposure to sunlight degrades polyester. Store tent in its bag, away from direct light, in a cool, dry space.

Overview

This document is a user manual for the Oztrail Fast Frame 6 Person Tent, providing instructions for setup, usage, and maintenance.

Function Description:

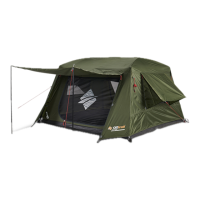
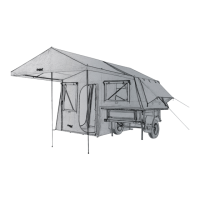
The Oztrail Fast Frame 6 Person Tent is a portable shelter designed for outdoor use, accommodating up to six people. Its primary function is to provide a secure and weather-resistant living space during camping or other outdoor activities. The "Fast Frame" designation implies an emphasis on quick and easy setup, a key feature for user convenience. The tent is designed with an inner tent and a separate rain fly, offering protection against various weather conditions. It also includes an awning feature, providing additional shaded or sheltered space outside the main tent.

Important Technical Specifications:

The manual lists the components included with the tent, which serve as an indirect specification of its structure and features:

  • Inner Tent: 1 unit, forming the primary living space.
  • Rain Fly: 1 unit, providing an outer waterproof layer.
  • DuraPlus Vestibule Pole: 1 unit, likely for supporting a vestibule area or an extended entry point.
  • Duraplus Rain Fly Vestibule Pole: 1 unit, specifically for the rain fly's vestibule. The use of "DuraPlus" suggests a focus on durability for these poles.
  • Awning Poles: 2 units, for supporting the awning feature.
  • Steel Awning Pole: 2 units. The distinction between "Awning Poles" and "Steel Awning Pole" might indicate different types or materials for the awning support, with steel implying greater strength.
  • Pegs: 23 units, essential for securing the tent to the ground.
  • Guy Ropes: 6 units, for additional stability, especially in windy conditions.

Safety and Compliance:

  • Fire Retardancy: The tent is manufactured to meet CPAI-84 Fire Retardant standards. However, it explicitly states that the fabric "may burn if in continuous contact with open flame sources," emphasizing the importance of keeping away from open flames.
  • Ventilation: The manual highlights that "CONDENSATION IS NOT LEAKING," advising users to "Minimise condensation by ensuring your tent is well ventilated through windows, doors or vents." This indicates that condensation is a natural phenomenon and not a sign of a faulty tent.

Usage Features:

The manual provides a step-by-step guide for setting up the tent, highlighting several key usage features:

Setup Process (Fast Frame System):

  1. Layout the Inner Tent: Unfold and outstretch the inner tent on a flat, clear area, positioning the door as desired.
  2. Erect the Inner Tent Frame: This is where the "Fast Frame" system comes into play. Users locate the Lower Leg section of the frame, raise it to a near vertical orientation, and extend the leg section until a locking button clicks into place. This process is repeated for all legs, suggesting a pre-attached, articulated frame system that simplifies erection compared to traditional pole-threading designs.
  3. Put on the Fly: Place the rainfly over the inner tent, aligning red webbing on the fly with the rear of the tent.
  4. Secure Fly to Inner Tent: The rainfly is secured using Velcro tabs on its underside and connected to the tent with red and grey buckles on the tent corners. A vestibule pole is threaded through a sleeve on the underside of the rainfly and its ends are inserted into eyelets on the inner tent's webbing clips.
  5. Assemble the Awnings: Awning poles and additional ropes are used to suspend the door panel overhead, creating a sheltered area.
  6. Always Peg Out and Use Guy Ropes: The tent and fly must be pegged out around the perimeter. Guy ropes are crucial for stability, especially in windy and rainy conditions, where awnings should be dismantled and doors closed.

Important Usage Guidelines:

  • Two-Person Setup: The manual explicitly states that "This tent requires a minimum of two people to set up."
  • Site Selection: Users are advised to "Find a Flat area for your tent, free from rocks, potholes and branches."
  • Full Use of Components: "Ensure that you use all pegs, ropes and additional poles only as instructed."
  • Wind Orientation: "If conditions are windy, arrange tent as to have narrowest side of tent facing into the wind."
  • Safety Precautions: "Keep away from Open Flames, DO NOT USE Stoves or Burning Appliances inside the tent." This reinforces the fire retardancy warning.
  • Pack Up: The packing up process is simply described as "TO TAKE DOWN THE TENT, REVERSE THE PREVIOUS STEPS," implying a straightforward reversal of the setup.

Maintenance Features:

The manual provides clear instructions for storage to maximize the tent's lifespan:

  • Cleanliness: "To maximise the life of your tent, always ensure it is clean of dirt and debris."
  • Dry Storage: "Never store if wet or damp. Consider airing your tent at home after your trip and allow to completely dry before storing between trips." This is crucial to prevent mold and mildew.
  • Protection from Sunlight: "Continued exposure to sunlight can degrade the polyesters used to make tents. Always store your tent in its storage bag, away from direct light in a cool, dry space." UV degradation is a common issue for tent fabrics, and this advice helps mitigate it.

Brand and Support Information:

  • Manufacturer/Importer: Designed & Imported by Adventure Trading Australia Pty Ltd, located in Eagle Farm, QLD 4009, AUSTRALIA.
  • Manufacturing Location: Made in Bangladesh.
  • Trademark: OZtrail® is a registered trademark of Adventure Trading Australia Pty Ltd.
  • Support: For spare parts and assistance, users are directed to www.oztrail.com.au.
  • Warranty: Warranty details are available at www.oztrail.com.au/warranty.

In summary, the Oztrail Fast Frame 6 Person Tent is a user-friendly, family-sized tent designed for ease of setup and durability in various outdoor conditions, with clear instructions for safe use and proper maintenance to ensure longevity.

OZtrail FAST FRAME 6 PERSON Specifications

General IconGeneral
BrandOZtrail
ModelFAST FRAME 6 PERSON
CategoryTent
LanguageEnglish

Related product manuals