Do you have a question about the OZtrail SEAVIEW 9+3 and is the answer not in the manual?
Lists all components included with the tent, detailing quantities and specifications.
Guidance on selecting a suitable and safe location for pitching the tent.
Instructions for correctly positioning the inner tent before pole assembly.
Steps for anchoring the tent to the ground using pegs at correct angles.
Detailed guidance on connecting tent poles securely before installation.
Procedure for inserting poles into sleeves and raising the tent structure.
Instructions for fitting the roof poles into their designated sleeves and hubs.
Steps for inserting side wall poles to provide structural support and shape.
Guidance on fitting the outer fly sheet over the tent structure for weatherproofing.
Instructions for installing the rear halo pole into its designated sleeve and pockets.
How to attach and tension guy ropes and pegs for stability and wind resistance.
Releasing guy ropes, Velcro tabs, and disconnecting the rear halo pole.
Instructions for removing the outer fly sheet and folding it correctly.
Taking down the tent by removing and disassembling poles in reverse order.
Advice on safely removing pegs from the ground without damaging the tent.
Spreading the tent flat to fold it efficiently.
Instructions on folding the tent into a manageable size.
Method for rolling the folded fly and inner tent together firmly.
Placing the rolled tent, poles, and accessories into the carry bag.
Essential safety practices for using the tent, including fire prevention.
Warnings against using fuel-burning devices inside the tent to prevent poisoning.
Precautions to avoid fire hazards near or inside the tent.
Guidelines for safe use of electricity and lighting within the tent.
Advice on choosing a safe pitch location to avoid hazards like flooding or falling debris.
Instructions for conditioning the tent before its first use to improve waterproofing.
Explanation of condensation inside the tent and how to reduce it.
How wind-driven rain can affect zips and methods to minimize water ingress.
How water can enter through the floor due to ground conditions or pressure.
How pitching and maintenance affect tent structure and waterproofing.
Techniques for operating zippers to prevent fabric jamming.
Steps to take when a zipper becomes caught or stuck.
How to crimp a zip slider to ensure it closes the teeth properly.
This document is an owner's manual for the OZtrail Seaview 9+3 tent, providing comprehensive instructions for its assembly, disassembly, maintenance, and safe use.
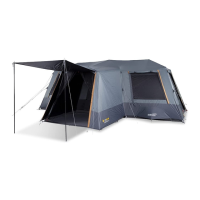
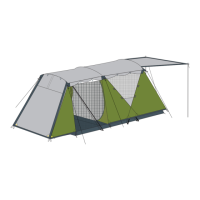
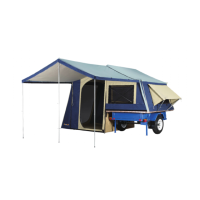
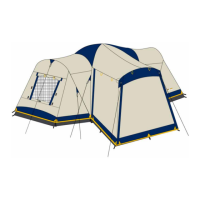
The OZtrail Seaview 9+3 is a recreational tent designed for camping and outdoor shelter. It provides a temporary living space, offering protection from the elements. The tent features multiple rooms, including a mesh sunroom, and is designed for easy setup and takedown. It is intended for temporary use and is not suitable as a permanent dwelling.
The assembly process begins with selecting a suitable campsite that is sheltered from wind and free of stones or twigs, ensuring a level area where water will not pond. The inner tent is then laid out in the desired direction, ensuring doors are correctly positioned. The corners of the inner tent are pegged down firmly but not tightly, using the peg points indicated in Figure 1 and inserting pegs at a 45-degree angle as shown in Figure 2.
Poles are assembled by securely connecting each junction, then laid out side-by-side for easy identification (Figure 3). A helpful hint advises against forcing poles through sleeves to prevent damage and to check for snagging.
The main poles are installed next. Two "grey fibreglass main poles with yellow stickers" are selected and slid diagonally across the central apex of the tent from corner to corner through the pole sleeves with yellow trim (Figure 4). These poles are tied off where they cross.
Following this, four "grey fibreglass middle poles with blue stickers" are used. Starting from the rear, these poles are placed from front to back across the sides of the central area of the tent, sliding them through the pole sleeves with blue trim located above the room dividers and bedroom windows, ensuring they extend into the mesh sunroom area (Figure 5). With assistance, the pole ends are connected to the corresponding pin and ring assemblies at the base of the tent (Figure 2). The poles are allowed to bow naturally. The J-Hooks of the inner tent are then clipped onto the poles, starting from the base and working towards the apex (Figure 6), which will cause the central tent to stand up. Opening the tent doors before this step can help air enter, making it easier to raise the tent.
Roof poles are installed by first selecting the "grey fibreglass roof front pole with the green sticker" and sliding it through the pole sleeves across the top of the mesh sunroom's front entry. Its ends are inserted into the narrow opening of the pre-attached 2-way hubs. The "grey fibreglass roof centre pole with the grey sticker" is then slid through the sleeve with grey trim across the top of the mesh sunroom's rear, closest to the tent's center. Its ends are also inserted into the narrow opening of the pre-attached 2-way hubs. Next, one of the "grey fibreglass roof side poles with blue sticker" is slid through the sleeve with blue trim above a side door, and its ends are inserted into the narrow opening of the 2-way hubs. This process is repeated for the remaining "grey fibreglass roof side pole with blue sticker" on the opposite side.
Wall poles are installed by selecting a "black steel side wall pole" and inserting one end into a remaining opening of a 2-way hub, and the opposite end onto the corresponding Pin and Ring assembly at the base of the tent (Figure 2). The manual notes that the correct pin is not always directly below, and these poles above the side doors and front mesh sunroom door are inclined at approximately 45 degrees. This process is repeated for the remaining three "black steel side wall poles," which helps the rest of the tent stand up (Figure 7). The J-Hooks attached to the inner tent are connected to the poles, and all remaining peg points around the tent base are pegged out.
The rain fly is installed by unfolding it on the ground, ensuring the front and back are correctly aligned with the tent. It is then carefully raised and drawn over the top of the tent to avoid snagging or damage. Once positioned, all Posibrace™ Velcro™ reinforcing points on the fly's underside are securely attached to the corresponding poles (Figure 8).
The rear Halo pole is installed by selecting the "grey fibreglass with black end caps" pole and locating the webbing pocket on the fly's underside (Figure 9). The pole is slid through the pole sleeve sewn onto the fly, and its ends are inserted into the webbing pockets. Finally, the hooks along the fly's base are connected to the corresponding rings around the inner tent's base (Figure 10).
Guy ropes and pegs are then utilized. A loop (30-50cm long) is made with a slider on the rope's end, and it is pegged out as far as possible from the tent (Figure 11). All peg down points must be used, and all guy ropes attached firmly and remain firm (Figure 12). If needed, remaining steel awning poles can be used to set up front, side, or rear awnings. The manual advises dismantling the tent in severe conditions.
Disassembly begins by unzipping all fly windows, awnings, and doors. Guy ropes and Posibrace™ Velcro™ tab points that attach the fly to the poles are released, and all base hooks are unhooked. The rear Halo pole is disconnected and removed from the fly.
The fly is then removed from the tent, laid flat on the ground, and folded in half, third, or quarters, ensuring its width does not exceed the pole bag's length (Figure 13).
Next, the doors and windows are unzipped, and the tent is collapsed by removing and disassembling the poles in the reverse order of assembly. The poles are placed in the pole carry bag and tied shut.
Pegs are removed using a claw hammer or peg puller, avoiding pulling them from the ground by the tent base, which could cause damage.
The tent is spread out flat with all loose fabric folded within the edges of the tent base. It is then flattened as much as possible.
The tent is folded in half, third, or quarters, ensuring its width does not exceed the pole bag's length (Figure 13).
Finally, the folded fly and inner tent bundle are rolled forward firmly, allowing trapped air to escape. Using the pole bag as a rolling pin can help ensure the tent edges are kept straight.
The tent bundle is then rolled up, tied around it, and placed into the tent carry bag with the peg bag, instruction booklet, and other miscellaneous parts. If the tent does not fit into the carry bag, it should be unrolled and rolled again more tightly.
The tent fabric may burn if exposed to continuous flame. Applying foreign substances can reduce its flame-resistant properties. To prevent gas poisoning or suffocation, fuel-burning, oxygen-consuming devices (candles, gas lanterns, kerosene lamps, stoves, cooking, and heating appliances) should not be used inside the tent. Gas appliances of any kind should also be avoided inside the tent/shelter. To prevent fire injury, the tent should not be pitched near campfires or other flame sources. Candles, matches, or any flame source (including stoves, cooking, lighting, and heating appliances) should not be used in or near the tent. Only recommended water-repellent compounds should be used on the tent/shelter fly, and insecticides should not be sprayed on tent fabrics. To prevent injury from the camping environment, the tent should not be pitched in areas prone to flooding, near cliffs (due to collapse or rockfall), or under trees with dead branches or those known to drop branches. In strong winds, the tent/shelter should be collapsed onto the ground, and refuge sought in a vehicle. To prevent electrical injury, care should be exercised when using electricity and electric lighting in and near tents/shelters. Only 12-volt lighting should be used.
Before first use, it is important to condition the tent. This involves pitching the tent and wetting it thoroughly with a garden hose, paying close attention to the seams. The thread will swell when wet, blocking needle holes, which also shrink around the thread. The fabric benefits from this process as the fibers swell into the weave, and the waterproof treatment settles within the fabric. The tent should be allowed to dry completely before repeating the process a second time. Always pack the tent away dry.
The tent is for temporary use only. Continuous exposure to sunlight will degrade the fabric, with color fading being an early warning sign. OZtrail products are not designed as permanent dwellings. During rain, awnings should always be lowered to prevent water ponding. A wet or soiled tent/shelter should never be stored, as mildew and corrosion can form within days, which is not covered by warranty. The tent must be completely dry before packing. If mildew occurs, it should be cleaned with a soft bristle brush or sponge and mild detergent. After beach use or wet weather, all zips, poles, and pegs should be treated with silicon spray. The elastic shock cord in poles is for easy assembly but is not structurally necessary. Failure of the shock cord due to age, overstretching, or mishandling is not covered by warranty but is easily replaceable. If a zipper coil bursts open or does not close, it may be due to wear or metal fatigue. This can often be fixed. A roll of heavy-duty tape should always be carried for simple repairs to rips, cuts, and ash burns, as it blocks holes and prevents further tearing. It is also useful for emergency pole repairs and other camp site uses. When removing pegs, the webbing or tent corner should not be used as a handle. Instead, another peg, a peg remover, or a hammer claw hooked under the peg should be used.
OZtrail tents use waterproof and water-repellent fabrics, but due to seams, zips, and other features, they are not as waterproof as a car or house. Common ways water can enter include:
Reducing the risk of jamming fabric: When using the zip, hold the pull-tab between your thumb and forefinger, with your thumb facing you. As you close the zip, clear the fabric in front and under the zip slider with the back of your hand, and cup the slider underneath with your remaining three fingers. Use this action for both opening and closing, keeping the fabric clear and operating the zip slowly. What to do if the zipper gets caught: Pull the fabric out of the slider bit by bit; do not try to pull all the fabric at once or force the slider or fabric. If the slider does not close the zipper properly: With use, the slider's jaws can open slightly, preventing it from compressing the zip teeth or coil tightly enough, causing the zip to burst open or not close. To fix this, undo the zip, and with the slider at the end, lightly crimp the slider's jaws together using pliers. Start with the top-to-bottom axis, then side-to-side. The most common reason for burst zips is that the slider doesn't close the coil tightly enough, often due to wear causing a gap (marked A in Figure 15). Crimping the slider at points B & C with pliers usually solves the problem. If B & C don't work, crimping in other planes is worth trying. This should be done while the zip slider is still attached to the zip in the open position.
OZtrail warrants this product against defects for two years from the purchase date. They will repair or replace the product at their discretion. If the exact model is unavailable, an equivalent model will be substituted. The warranty excludes faults from improper use, abuse, fair wear and tear, or failure to follow care and maintenance instructions. Products used commercially are not covered. A warranty claim requires returning the product to the place of purchase with detailed proof of purchase. OZtrail Leisure Products can also be contacted by phone, mail, or email. The warranty benefits are in addition to other rights under Australian Consumer Law. Consumers are entitled to a replacement or refund for major failures and compensation for foreseeable loss or damage, and to have goods repaired or replaced if they are not of acceptable quality and the failure is not major. Important: The tent should be assembled once before camping to ensure all parts are present and to familiarize with the assembly. The product should be insured against loss or damage. During strong winds and storms, collapse the tent flat onto the ground and seek refuge in a vehicle. Damage caused by storms and strong winds is not covered by warranty.
Extreme Caution: Gas, fumes, or lack of oxygen within the tent/shelter could result in unconsciousness, brain damage, and even death.
| Capacity | 9+3 people |
|---|---|
| Material | Polyester |
| Inner Fabric | Polyester |
| Windows | Yes |
| Ventilation | Yes |