WARNING
AVOID CONTACT WITH OPEN FLAMES:
This tent is manufactured to meet CPAI-84 Fire Retardant
standards. The fabric may burn if in continuous contact with
open flame sources.
CONDENSATION IS NOT LEAKING:
Minimise condensation by ensuring your tent is well
ventilated through windows, doors or vents.
STITCH LINE
TENT OWNERS MANUAL
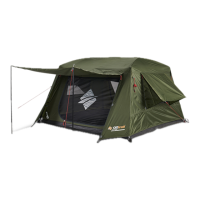
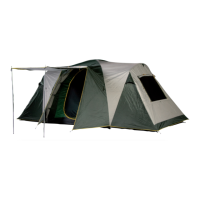
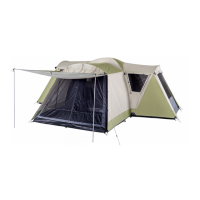
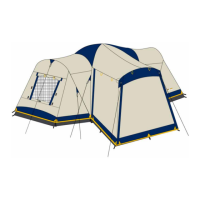
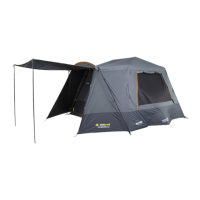
LUMOS FAST FR AME 6 P ER S ON
BEFORE YOU BEGIN
• This tent requires a minimum of two people to set up
• Read all the instructions before setting up your tent.
Check parts list to ensure you have full contents
• Find a Flat area for your tent, free from rocks, potholes
and branches
• Ensure that you use all pegs, ropes and additional poles only
as instructed
• If conditions are windy, arrange tent as to have narrowest
side of tent facing into the wind
• Keep away from Open Flames, DO NOT USE Stoves
or Burning Appliances inside the tent
STORAGE
• To maximise the life of your tent, always ensure it is clean of dirt
and debris.
• Never store if wet or damp. Consider airing your tent at home after
your trip and allow to completely dry before storing between trips
• Continued exposure to sunlight can degrade the polyesters used
to make tents. Always store your tent in its storage bag, away from
direct light in a cool, dry space
• Remove D-Cell batteries from battery box prior to storing
CONTENTS
• Inner Tent x 1
• Rain Fly x 1
• Front Vestibule Pole x 1
• Rear Vestibule Pole x 1
• Steel Portico Poles x 2
• Steel Awning Poles x 2
• Pegs x 26
• Guy Ropes x 8
• 3 D-Cell Battery Box x 1
(Batteries not Included)
WARRANTY - For details see www.oztrail.com.au/warranty
OZtrail
®
is a registered trademark of
Adventure Trading Australia Pty Ltd
Made in Bangladesh
DuraPlus Front Vestibule Pole x 1:
Steel Awning Pole x 2:
Steel Portico Pole x 2:
DuraPlus Rear Vestibule Pole x 1:
Operating the Lumos LED Lighting System:
Slide battery pack into
pocket located inside
the tent.
Add 3-D batteries to
empty battery pack.
(Batteries not included)
Zip up pouch, then plug
in battery pack cord
into lighting connector.
C
A
B
I
N
N
IG
H
T
L
IG
H
T
Press buttons
on switch box
located on
either inside
or outside of
tent to turn on
lighting.
Alternatively: Lumos System can run from a rechargable battery pack, Not Exceeding 5V, 1A output