16
4. Mount the unit.
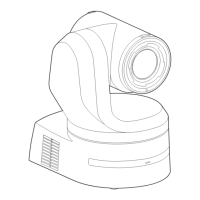
Align the position of the hole for checking the positioning with the status display lamp.
Align the holes on the camera main unit used to insert the bottom panel with the protrusions on
the mount bracket used for inserting the camera, push the camera to the bracket firmly, and
rotate the main unit about 15 degrees counterclockwise.
Secure the unit to the mount bracket using the main unit mounting screw (M4) as supplied.
Attach the mount bracket securely with the prescribed tool using the clamping torque below.
Be absolutely sure to verify that none of the screws are loose.
Insert the 3 holes
on the camera bottom panel
i
nto the 3 protrusions
on the mount bracket for
installation surface.
Status display lamp
Attach the
drop-prevention wire.
Hole for
checking the positioning
3 protrusions on the
mount bracket for
installation surface

 Loading...

