24
(EN)
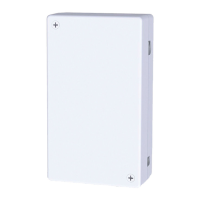
2
Remove the top case.
(Case-xingscrews:2)
3
Mount the bottom case to the wall.
4
Connect the RAC connection
wiring (supplied).
• Arrange the wires
along the groove.
5
Connect the inter-unit
control wiring
(shield wiring).
• Arrange the wires
along the groove.
6
Only when connecting external equipment
Connect the external I/O wiring.
(P.25)
• Cut here with a nipper
and remove the burr
with a le.
• As shown in step 4 or 5, pass
the clamper (supplied) through
the hole, and x the wiring.
z When the settings are complete (P.26),
attach the top case.
Case-xing screws
Top case
Bottom case
Clamper
(supplied)
Pass
through
the hole.
Clamper (supplied)
Functional ground (FG)
Pass
through
the hole.
Screw (supplied)
Wall to which the
controller is xed
Top case
 Loading...