Do you have a question about the Panasonic CQ-4400U and is the answer not in the manual?
Keep volume low to be aware of road and traffic conditions.
Avoid exposing the equipment to water or excessive moisture.
Allow vehicle interior to cool before switching on unit in direct sunlight.
Unit operates on a 12-volt, negative ground battery system.
Keep magnets away from tape mechanism and head.
Do not disassemble; refer to Servicenter list for service.
Install in a horizontal position with front end up, not more than 30°.
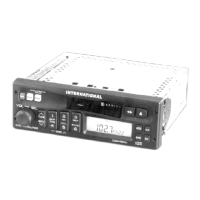
Turn on the unit by pressing the [PWR] button.
Adjust volume by pressing the knob and turning it.
Unit slowly raises volume after power is switched back on.
Press [SEL] knob to switch between Volume, Bass, Treble, and Fade.
Adjust bass/treble levels by selecting mode and turning the knob.
Adjust sound volume distribution between left and right speakers.
Adjust sound volume distribution between front and rear speakers.
Enhance bass/treble at low/medium volumes by holding [BAND].
Press [MUTE] to mute sound; press again to cancel.
Press [MODE] to switch between Radio, Cassette, and CD Changer modes.
Press [MODE] to switch to tuner mode from CD or Tape.
Press [BAND] to cycle through FM1, FM2, W/B, and AM bands.
Use [TUNE ∧] or [TUNE √] to tune to higher or lower frequencies.
Press and hold [SEEK ∧] or [SEEK V] to automatically seek the next station.
Save and tune to preset radio stations using numerical buttons.
Manually save stations by pressing and holding preset buttons.
Automatically scan and save the 6 strongest stations.
Press numerical buttons [1]-[6] to access preset stations.
Access preset weather band channels using numerical buttons.
Information on NOAA Weather Radio broadcasts and frequencies.
Insert cassette with exposed side facing right; play starts automatically.
Use [V] for REW and [∧] for FF; press [ ] to stop.
Press [ ] to reverse the tape playback direction.
Press [A] to eject the tape; power must be on.
Press [5 MTL] for metal/CrO2 tapes; press again to cancel.
Press [2 NR] to activate Dolby B NR mode; press again to cancel.
Search for programs by pressing [4 TPS] and using [V]/[A].
Press [3 REP] to repeat current program; press again to cancel.
Press [1 SKP] to skip unrecorded portions; does not work if repeat is on.
Change to CD changer mode using [MODE]; play starts automatically.
Select discs in ascending/descending order using [DISC ∧]/[DISC V].
Advance to next track with [A], start track from beginning with [V].
Press and hold [A]/[V] for fast forward/reverse; release to resume play.
Press [3 REP] to repeat current selection; 'REPEAT' indicator lights.
Press [6 RAND] to play all tracks randomly; press again to cancel.
Press [SCAN] to play first 10 seconds of each track; press again to cancel.
Explains error codes like E1, E2, E3, and 0000.
Set initial time by pressing and holding [CLK] and using [V]/[A].
Reset the time by repeating the initial time setting steps.
Press [CLK] to display current time; it stays on even if power is off.
Set alarm time by pressing and holding [ALM] and using [V]/[A].
Reset alarm time by repeating the alarm time setting steps.
Toggle alarm ON/OFF with [ALM]; alarm sounds at set time.
Alarm sound turns off automatically after 90 seconds or by pressing [ALM].
Select alarm volume level (VOL 1/VOL 2) by pressing [ALM].
Display shows 'TAPE CLN' after 100 hours; clear by holding [◄►].
Installation is for experienced installers; guidance provided for self-installation.
Lists included items like Mounting Collar for in-dash installation.
Steps for securing mounting collar and the unit.
Instructions on how to remove the unit using Dismounting Pins.
Operate with 12V negative ground; insulate wires; do not insert power connector until wiring is done.
Shows wiring for antenna, remote, CD changer, power, speakers, dimmer.
Clean exterior with soft cloth; avoid solvents.
Check charts for possible causes and solutions.
Recommend authorized Servicenter for unresolved issues.
Use pencil to take up tape slack to prevent tangling.
Table listing problems, possible causes, and probable solutions.
Power supply, output, impedance, dimensions, weight.
Frequency range and usable sensitivity for AM reception.
Frequency range, sensitivity, response, selectivity, separation.
Frequency range, sensitivity, and signal/noise ratio.
Reproduction system, speed, frequency response, wow/flutter, S/N ratio.
Unit manufactured under Part 15 FCC Rules; no unauthorized changes.
| Type | Receiver |
|---|---|
| Model | CQ-4400U |
| Tuner | AM/FM |
| CD Player | Yes |
| MP3 Playback | Yes |
| Display | LCD |
| Channels | 4 |
| USB Port | Yes |
| Auxiliary Input | Yes |
| Bluetooth | No |
| Detachable Face | Yes |
| Remote Control | Yes |
| Max Power Output | 50 Watts x 4 |
| RMS Power Output | 22 Watts x 4 |
| Peak Power Output | 50W x 4 |
| Presets | 18 FM, 6 AM |