Span adjustment in rising differential mode or trailing differential mode
● This mode is used to cancel the gradual changes in the measured value, and to
only detect sudden changes.
● When performing rising differential mode or trailing differential mode, preset “Ris-
ing differential mode” or “Trailing differential mode” in the sensing output setting of
the PRO mode. For the setting method, refer to “
12
PRO MODE SETTING.”
● Thethresholdcanbesetbyusing the threshold value ne adjustmentfunction.
Forthethresholdvalueneadjustmentfunction,referto“
8
THRESHOLD VAL-
UE FINE ADJUSTMENT FUNCTION.”
1. Press the TEACH key.
3. Press the TEACH key to set.
2. Press the UP key or DOWN key to select the span.
Short span Long span
8 THRESHOLD VALUE FINE ADJUSTMENT FUNCTION
● Fine adjustment of the threshold can be performed in the measurement display.
● Fine adjustment of the threshold can be performed even after teaching.
<Normal sensing mode, rising differential mode or trailing differential mode>
Automatically
set after about 3
seconds.
Press the UP / DOWN key Press the UP / DOWN key Press the TEACH key
Conrmed
<Window comparator mode>
● When the sensing output is set to window comparator mode, the display of
“
” and “
” can be changed by pressing the TEACH key for 1 second.
Change the thresh-
old value Measurement display
Press the TEACH
key for 1 second
Automatic
● Whenperforminganeadjustmentofthethresholdof“
” or
”, press
the UP key or DOWN key. After “
” or “
”isdisplayed,theneadjust-
ment of the threshold can be performed.
(Automatically set after about 3 seconds.)
Press down UP /
DOWN key
Press down UP /
DOWN key
Press the TEACH
key
Conrmed
Automatic
or
9 PEAK / BOTTOM HOLD FUNCTION
●
The peak / bottom hold function, is for displaying the peak value and bottom value.
● Whenthezerosetfunctionisexecutedwhile the peak / bottomholdfunctionis
set to “Peak hold” or “Bottom hold”, the held measured value will be reset.
Digital Display Description Function
Hold function
release
Releases the hold status,
and outputs the current
measured value
Peak hold
Holds maximum mea-
sured value
Bottom hold
Holds minimum measured
value
Press the TEACH key
and UP key simultane-
ously for 3 seconds. Press the TEACH key
Press down UP /
DOWN key
ConrmedSelect
Automatically set after
about 3 seconds.
or
or
or
10
ZERO SET FUNCTION
●
Thezerosetfunctionisthefunctiontocompulsorilysetthemeasuredvalueto“zero”.
● Thezerosetindicator(yellow)willturnONwhenthezerosetisvalid.
● Whenthezerosetfunctionisexecutedwhile the peak / bottomholdfunctionis
valid, the held measured value will be reset.
● WhenthedisplaysettingissettoOffset,thezerosetfunctioncannotbeset.
<Zero set setting>
Press the UP key and DOWN key
simultaneously for 3 seconds.
Conrmed
<Zero set release>
Press the UP key and DOWN key
simultaneously for 6 seconds.
Automatic
“
“ will be dis-
played during this
period.
● Thesettingorreleasingofthezerosetfromanexternalinputoperatesasinthe
followinggure.
Zero set setting Zero set release
10ms or more
1 sec.
Zero set valid period
OFF
ON
● WhenthepoweristurnedONagain,zerosetfromexternalinputcanbereleased.
Atthistime,thezerosetwillnotbesaved.
● Evenwhenthezerosetissetinthesensor,thezerosetcanbesetorreleased
fromanexternalinput.However,whenthepoweristurnedONagain,thezeroset
set in the sensor will be displayed.
11
KEY LOCK FUNCTION
● The key lock function is to prevent acceptance of key operations, so that the con-
ditions set in each setting mode are not changed accidentally.
● When key operation is performed after the key lock is set, “
”
will be displayed
on the digital display.
<Key lock setting>
Press the TEACH key and DOWN
key simultaneously for 3 seconds.
Automatic
<Key lock release>
Press the TEACH key and DOWN
key simultaneously for 3 seconds.
Automatic
12
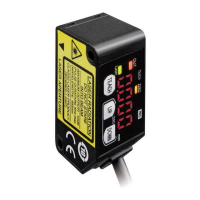
PRO MODE SETTING
Part description
TEACHkey(Conrmed)
UP key (Select)
DOWN key (Select)
PRO indicator (Yellow)
Arrowdescriptioningures
: Press UP key or DOWN key
: Press DOWN key
: Press the TEACH key
● The PRO indicator (yellow) will turn ON when the PRO mode is set.
● When the DOWN key is pressed for 3 seconds or more in the middle of the PRO
MODE setting, the display returns to the measurement display.
Item Default setting Description
Response speed
setting
Set the response time.
“ ”: High precision 10ms, “ ”: Standard 5ms
“ ”: High speed 1.5ms
Output operation
setting
Select the control output operation mode.
“ ”: Light-ON, “ ”: Dark-ON
Sensing output
setting
Set the sensing output.
“ ”: Normal sensing mode
“ ”: 1-point teaching (Window comparator mode)
“ ”: 2-point teaching (Window comparator mode)
“ ”: 3-point teaching (Window comparator mode)
“ ”: Trailing differential mode
“ ”: Trailing differential mode
Hysteresis setting
<HG-C1030>
<HG-C1050>
Set the hysteresis width.
HG-C1030: 0.001 to 5.00mm
HG-C1050: 0.01 to 15.00mm
HG-C1100: 0.02 to 35.00mm
HG-C1200: 0.1 to 80.0mm
HG-C1400: 0.2 to 200.0mm
<HG-C1100>
<HG-C1200>
<HG-C1400>
External input
setting
Set the external input.
“ ”: Zero set function, “ ”: Teaching function
“ ”: Light emitting stop function, “ ”: Trigger function
Timer setting
Setthetimeroperation.Thetimertimeisxedat5ms.
“ ”: No timer, “ ”: OFF-delay timer
“ ”: ON-delay timer, “ ”: One-shot timer
Display setting
The display of the measured value can be changed.
“ ”: Normal, “ ”: Invert, “ ”: Offset
Hold setting
Set the control output and the analogue output operation when
ameasurementerroroccurs(insufcientlightintensity,satura-
tion of light intensity, out of measurement range).
“ ”: Hold OFF, “ ”: Hold ON
ECO Setting
The digital display can be set to go OFF when key operation is not
performed for 30 seconds. Current consumption can be reduced.
“ ”: ECO OFF, “ ”: ECO ON
Reset setting
Return to the default setting (factory setting).
“ ”: Reset NG, “ ”: Reset OK

 Loading...