— 25 —
NC-HU301P, NC-HU401P
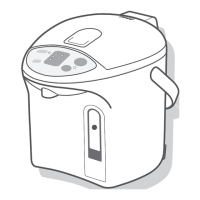
4.7. Insulation panel A comp.
1. Remove Heat shield material A comp. from Container
comp. (Directly remove upward while thermistor comp.,
thermal fuse comp. and lead wire D comp. are attached.)
Point when working
• Be careful not to scratch Heat shield material A comp.
(Vacuum state cannot be maintained.)
Point when assembling
• Let the connection of Heat shield material A comp.
(A point) fit with the rib of holder B.
4.8. Thermal fuse comp. and Thermistor comp.
Point when assembling
• Do not force thermal fuse comp. such as pull, bend or twist.
• Be careful for inclination while assembling thermistor comp.
• Do not omit the application of lubrication agent while
assembling thermistor comp.
• When insert the orange, blue and yellow lead wires into
heater terminals, maintain the initial bend angle.
(Do not force the terminals and deform them.)
Fig-11
1. Take out 2 screws of the Heat shield panel
2. Disconnect wires of orange, blue and yellow at the
center (Color of leas wires is different depending on
capacity).
3. Remove Heat shield panel from the Container comp.
4. Remove Thermal fuse from the Heat shield panel.
5. Remove Holddown springs from Heat shield panel.
6. When removing thermistor comp. from holddown spring,
remove it after turning 90 degree.
Fig-12
Caution
If application of Lubrication
agent A to the thermistor is
omitted while assembling
thermistor, the sensitivity
of thermistor is worsened.
Apply contained Lubrication agent
while thermistor assembling.
Thermal
fuse comp.
Heater
terminal
Themister
comp.
Hooks for
holddown spring
Heat shield plate
4x8 pan head Del Tite screw
Insulation
panel A comp.
A-point
Rib of holder B
Heat insulation
A comp.
 Loading...