14/1/98 Page 11 Issue H
7. Operation and Setting
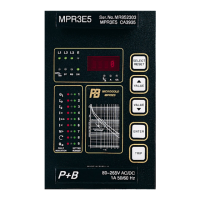
7.1 Layout of the control elements
All control elements required for the operation and adjustment of the MPR 3E5 are located on the
front panel. They are divided according to function into the three following groups:
• Alphanumeric Display: Indication of parameter set values, actual measured
values and recorded fault data.
• LED's: Indication of selected parameters and measured quantities.
• Push Buttons: Selection of parameter to be adjusted, quantity to be measured
and adjustment of parameter values. Where;
<SELECT / RESET> Selection of the parameter to be set and the relay quantities to
be measured. Press for 3 seconds to reset.
<UP> Increment of the setting values for the parameter selected.
<DOWN> Decrement of the setting values for the parameter selected.
<ENTER> Storage of the setting values for the selected parameter.
<TRIP> Testing of the output relay circuits.
With the front cover in place, it is only possible to press the <SELECT/RESET>
push button. this allows display of parameters or a relay reset following a trip. Should the cover be
opened, the <UP>, <DOWN>, <ENTER> and <TRIP> , buttons are inactive and it is not possible
to alter the protection settings without putting the relay into the setting mode(2), which requires entry
of a password. By pressing the <SELECT/RESET> push button, it is possible to step through the
parameters. The corresponding LED illuminates, and the measured or present set value of the
selected parameter is indicated on the display. This set value may then be increased or decreased by
pressing the <UP> or <DOWN> buttons respectively. The selected set value is only stored after
pressing the <ENTER> push button and inputting the correct password. This means that adjustment
of the unit is only possible by authorised users. In addition by pressing the button for 3 seconds or
more the relay may be reset after a trip, providing the thermal capacity has reduced to a value
sufficient to enable a restart.
7.2. Relay Display and Setting Procedure.
7.2.1. Display mode(1)
In this subset of parameters the data is for viewing and are accessed using the <SELECT/RESET>
push-button in a cyclic manner. Pressing for longer than 1 second returns to the start of the cycle.
7.2.2. Setting Mode (2)
In order to enter this mode the user must be in display mode (1), by use of the <SELECT/RESET>
Push button move through the indications until “P&B” is shown on the display, then enter the correct
password ( default “∧
∧∧
∧∧
∧∧
∧∧
∧∧
∧∧
∧∧
∧“). When the password is entered correctly, the display shows “∂∂∂∂“ with
the accents flashing to confirm relay is in setting mode. In order to change the setting in mode(2),
cycle through the setting parameters by pressing the <SELECT/RESET> button until the required
parameter is reached. Then increase or decrease the setting by using the <^ VALUE> or <∨
∨∨
∨
VALUE> buttons followed by <ENTER> to store the new value. To return quickly to the start of
the cycle i.e. the t6x setting, press the <SELECT/RESET> key for longer than 1 second. To return