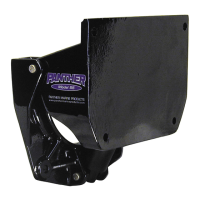
INTRODUCTION
Congratulaonsyouhavejustpurchasedoneofthefinestoutboardmotorlisavailabletoday.Withproper
installaonandcare,thismotorliwillprovideyouwithyearsoftroublefreeuseandperformance.
Pleasetakeafewmomentstoreviewtheinformaoncontainedinthisbooklettofamiliarizeyourselfwith
theinstallaonproceduressuggestedtosuccessfullymountyournewmotorli.Installaoniseasy
parcularlywhenyouknoweachstepaheadofme.
BEFOREUSINGYOURMOTORLIFTREADTHEOPERATINGTIPS(PG.12)FORPRECAUTIONSWHENUSING
YOURMOTORLIFTONTHEWATERANDWHENTRAILERINGYOURBOAT.
GETTING STARTED
Hereisalistofthetoolsandhardwarethatyouwillneed:
Tools and Equipment:
1. Electricdrillwith1/8,3/16,and1/2inchdrillbits
2. Two3/4inchwrenches
3. APhillipsheadscrewdriver
4. Forheaviermotors,ahoisttolithemotorwhileinstallingthebracket
Hardware and Supplies: (not included)
4–½inchdiameterstainlesssteelHexCapScrewsoftheappropriatelength*
4-½inchstainlesssteelNyloninsertnuts
8–½inchstainlesssteelflatwashers
1–TubeofclearRTVsiliconforsealingthetransommounngholes(recommended)
1–Tubeofdielectricgreasefortheelectricalconnecons(recommended)
2–Securityboltsthatmatchtheclampbracketonyourmotor(recommended)
Forproperboltlengthseleconseetheinformaononthefollowingpage.