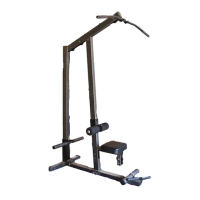
FIGURE 4
//
STEP 4:
¯ Attach eight 1X 1" GLIDES (15) to the ends the CARRIAGE (6) as sho~l in FIGURE 4 using the follo~4ng steps:
¯ Thorougltly clean Ml surfaces where the 1 X 1" GLIDES (15) are to be attached.
¯
Remove the 1 X 1" GLIDES (15) from the paper backing and firmly apply" them to all sho~-n surfaces.
¯ Attach one 1-1/4" SQ. RUBBER BUN~PER (17) to the underside of the angle on the CAP,~AGE (6) as shown in FIGURE
FIGURE
STEP 5:
¯ CAREFULLY slidethe CARRIAGE (6) over the UPRIGHT (1) as sho,~,min FIGURE
¯ Insert one 3 X 2" END CAP (13) imo the end oft.he UPRIGHT (1). See FICAJRE
0
1
1
I
3 4
 Loading...