Parker Hannin Corporation
Hydraulic Pump and
Power Systems Division
Marysville, Ohio USA
Bulletin HY28-2665-02/SVC/EN
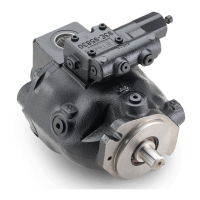
Medium Pressure Axial Piston Pumps
P1/PD Maintenance
32
Compensator Procedures
COMPENSATOR DISASSEMBLY
NOTES:
Access plugs on end of compensator spool bores are hardened plugs. Do
not interchange with other plugs in the control.
For rotation change, the complete compensator assembly will need to be
replaced.
Compensator Disassembly:
1. Measure and record the extension of the two pressure adjusting
screws.
2. Carefully remove the main compensator spring cap. Remove the two
springs. Remove the seal piston and spring seat. Remove the o-ring
boss access plug on the opposite side of the compensator. Remove the
compensator spool. NOTE: the compensator spool and inner spring are
not interchangeable with the load sense compensator spool and spring.
3. For “L” series compensators: Carefully remove the load sense com-
pensator spring cap with spring seat/seal piston. Remove the spring.
Remove the spring seat. Remove the o-ring boss access plug on the
opposite side of the compensator. Remove the load sense compensa-
tor spool. NOTE: the load sense compensator spool and spring are not
interchangeable with the main compensator spool and inner spring of
the main compensator.
4. Remove all SAE o-ring boss access plugs.
NOTE: The compensator is supplied as an assembly. Individual parts
are not available. If there is signicant damage to any of the parts, the
complete compensator will need to be replaced.
1. Inspect the main compensator spool and the load sense spool for
scratches or other damage.
2. Inspect the springs for proper free extension length (see chart below).
3. Inspect the spool bores for damage. Apply a light oil lm on the
appropriate spool and check its t in the bore. The spool should t
snugly in housing and not have any radial play.
COMPENSATOR SPRING FREE LENGTH
Type
Item
Number
Component Tolerances
C*/L* 5 Main compensator spring - inner Free height: 25.9±0.5mm (1.020±0.020 in.)
C0/L0/L2 4 Main compensator spring - outer Free height: 39±0.7mm (1.535±0.028 in.)
L* 17 Load Sense spring Free height: 14±0.4mm (0.551±0.016 in.)
R* 6 Bias spring
Reference item numbers on page 26.
COMPENSATOR INSPECTION

 Loading...