Page 8 – Bulletin 30-21
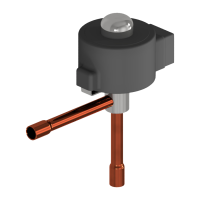
10G79B and
10G711B
Item Part Name
Q
10G79 Body Assembly
10G711 Body Assembly
W
Valve Spring
E
Tetraseal (641-6) or Gasket 14000-5*
R
Locknut
T
Piston
Y
Enclosing Tube Assembly
U
Plunger Assembly
I
Bottom Cap Assembly
O
Tetraseal (641-1) or Gasket 14000-1*
P
Enclosing Tube Locknut
{
Seat Assembly
}
Coil Assembly (MKC-1)
q
Pushrod
w
Pilot Tube
e
Pilot Assembly
*Part is available separately.
Evaporator
Suction
Q
Discharge
W
R
E
e
T
w
q
E
O
P
Y
}
U
{
R
10G711C
Suction
Discharge
Evaporator
Q
R
O
{
E
e
P
R
T
q
U
w
W
E
}
Y
I
1.64”/ 42 mm
Optional 1/2”
Conduit Boss
SERVICE
Service parts for these valves may be ordered through your
local Sporlan whole sal er.
If a pilot assembly kit is required, note that they – unlike
the internal parts kits – are not in ter change able. For a list of
replacement part kits, see table on page 13.
DISASSEMBLY
1. Disconnect the coil lead wires and remove the coil
assembly }.
2. Remove the enclosing tube locknut P to inspect the
plung er assembly U.
3. Loosen and disconnect the pilot tube w at the flare nut.
4. Loosen the suction end locknut R us ing a pipe wrench or
other suitable wrench. Remove the pilot assembly e from
the body.
5. Loosen the discharge end lock nut R, but use care to pre-
vent damaging the parts. Re move the locknut R, bottom
cap assem bly I, valve spring W and seat as sem bly {.
6. Slide the piston T up and out of the valve body bore.
7. Inspect the piston T and seat assembly { for dam age.
Re place all tetraseals or gaskets E O if valve has been in
ser vice.
NOTE: OIL TETRASEALS and GASKETS BEFORE
INSTALLATION.
REASSEMBLY
1. As a unit, install from the bottom of the body as sem bly Q:
10G79B, 10G711B – pushrod q, seat assembly {, valve
spring W, tetraseal E, bottom cap assembly I.
10G711C – pushrod q, piston T, bottom cap assembly I.
Check center shaft adjustment by looking into the body
from the top. Push down on the pushrod q to re align if
nec es sary.
2. Install the bottom locknut R and tighten with a pipe
wrench or torque wrench to 50-60 foot-pounds torque.
This must be leak tight. Do not over tight en.
3. From the top of the body assembly Q install:
10G79B, 10G711B – piston T in body bore, compress the
piston ring and slide the piston T all the way into the bore.
10G711C – seat assembly {, valve spring W.
4. Install the pilot assembly e on the body assembly Q and
tight en the top locknut R with a pipe wrench or torque
wrench to 50-60 foot-pounds torque. This must be leak
tight. Do not over tight en.
5. Connect the pilot tube w flare nut(s) and tighten to 80
inch-pounds torque. This must be leak tight. Do not over-
tight en.
6. Install the plunger assembly U, enclosing tube as sem bly
Y, and enclosing tube locknut P. Tighten the enclosing
tube lock nut to 10-15 foot-pounds torque.
7. Reinstall the coil assembly } and connect the lead wires.
I
 Loading...