Parker Hannifin Corporation
Instrumentation Valve Division
Jacksonville, Alabama
MI-104
4
REASSEMBLY
Make certain all parts are free of dirt or other contamination before starting reassembly of the Valve.
1.Clamp the Body in a vise.
2.U16 only: Install the Metal O-Ring into the o-ring groove in the Valve Body
3.Insert the three packing components into the Bonnet in the following order with the first item being placed at the
bottom of the Bonnet:
Packing Washer
Stem Packing
Packing Washer
4.Insert the Stem Guide into the Bonnet, use it to push the packing components to the bottom of the Bonnet. Insert
the Stem Guide hex into the hex-shaped slot at the top of the Bonnet.
5.Apply a liberal amount of lubricant, as consistent with the Valves service requirements, to the Stem Sub-Assembly
threads. Always contact your authorized Parker representative is questions arise.
NOTE: Every thread must be covered with lubricant.
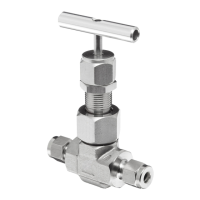
6.Refer to Figures 2 and 3. Carefully install the Stem Sub-Assembly into the Bonnet from the lower end until hand-
tight.
7.Apply a liberal amount of lubricant, as consistent with the Valves service requirements, to the Body threads, as well
as to the surface area where the Bonnet fits up against the interior of the Bonnet Nut. Always contact your
authorized Parker representative if questions arise.
8.Place the hand-tight Bonnet and Stem Sub-Assembly from Step 6 into the Body. Torque the Bonnet Nut onto the
Body using the hex wrench size and torque specified in Table IV.
9.This Step only applies to Valves with an optional Panel Nut, else proceed to Step 10.
Insert the Body into its panel mounting hole. Thread the Panel Nut clockwise onto the Bonnet until the Valve is
secure in the mounting panel.
10. Place the Lube Seal over the Stem to the top of the Stem Guide.
11. Apply a small amount of lubricant, as consistent with the Valves service requirements, to the Bonnet upper threads
and the top of the Stem Guide.
NOTE: A minimum of the upper four (4) Bonnet threads must be covered with lubricant !
12. Place the Locknut on the Bonnet and thread it down near the Panel Nut. Place the Packing Nut over the Bonnet.
Tighten in accordance with Table II.
13. Tighten the Locknut against the Packing Nut. Tighten in accordance with Table III.
14. Re-install the Handle with the Set Screw onto the Stem.
15. Install the Handle on the Stem Sub-Assembly. Secure the Handle with the Set Screw, and tighten the Set Screw
to 15 In-lbs torque, using a 3/32 inch allen wrench. Verify the Handle is tightly fastened.
16. Turn the Bar Handle through at least one (1) Open and Close cycle to verify proper operation of the Stems
threads.
17. Reject and rebuild any Union Bonnet Valve exhibiting rough or irregular Stem operation. Always contact your
authorized Parker representative if questions arise.
 Loading...