Parker Hannifin Corporation
Instrumentation Valve Division
Jacksonville, Alabama
MI-104
3
DISASSEMBLY
MAKE CERTAIN THE SYSTEM IN WHICH THE VALVE IS INSTALLED IS DRAINED AND/OR EXHAUSTED OF ALL
PRESSURES BEFORE VALVE DISASSEMBLE OR REMOVAL OCCURS.
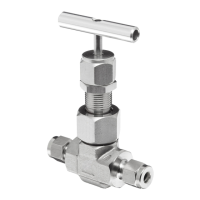
1.Verify that the Union Bonnet Valve Maintenance Kit being used is appropriate for the Valves size, handle, stem
packing configuration and service requirements. Always contact your authorized Parker representative if any ques-
tions arise.
2.Remove the Handle by unthreading the Set Screw in the side of the Handle with the following size allen wrench.
U6 model 3/32 inch
U12 model 3/32 inch
U16 model 1/8 inch
3.Loosen the Locknut, located directly under the Packing Nut, by turning clockwise with the following size hex
wrench:
U6 model 3/4 inch
U12 model 15/16 inch
U16 model 1-1/4 inch
4.Remove and save the Packing Nut, located directly under the Handle, by turning counter-clockwise with the follow-
ing size hex wrench:
U6 model 3/4 inch
U12 model 15/16 inch
U16 model 1-1/8 inch
5.Remove and save the Locknut from the Bonnet
6.Remove and discard the Lube Seal from within the Packing Nut.
7.If applicable, remove the Valve Body from its panel mounting hole by turning the Panel Nut counter-clockwise and
removing it from the Bonnet.
8. Remove and save the Bonnet Nut, located directly above the Body, by turning counter-clockwise with the following
size hex wrench:
U6 model 15/16 inch
U12 model 1-1/4 inch
U16 model 1-1/2 inch
9. Remove the Bonnet/Stem Assembly from the Valve Body.
10. Press the Stem UP to disengage the Stem Guide hex from the Bonnet.
11. While carefully securing the Valve Stem, remove the Stem Guide from the Bonnet using the following size hex
wrench:
U6 model 3/8 inch
U12 model 9/16 inch
U16 model 11/16 inch
12. Slide the Valve Stem from the Bonnet by applying a minimal amount of force (i.e. hand pressure) on the Handle
end of the Valve Stem and pushing towards the seat end.
13. Remove the Packing Washers and the Packing from within the Bonnet. The Upper Packing Washer should fall out
easily. The Packing must be pushed out with a thin probe or wire. After this is removed the lower Packing Washer
should also fall out.
NOTE: If the valve is Grafoil® packed make certain the entire packing is removed since it may break-up during removal.
14. Discard the appropriate components from the valve consistent with the new components within the Valve Kit.
Additional Step (U16 only)
15. Using a pick or thin flat headed screwdriver remove the metal o-ring from within the Valve Body. Insure care not
to damage the o-ring groove.
 Loading...