8
• Protective equipment may never be removed.
• Ensure that the product is standing firmly and
keep your balance.
• Always work away from your body and not
towards it.
• Maintain your concentration when guiding the
piece to be cut.
Extra caution – risk of injury to
children!
• Children must not be allowed play with the
product.
• Point out to children specifically that the prod-
uct is not a toy.
• The product is not a toy or a climbing appa-
ratus! Ensure that persons, especially children,
do not pull themselves up on the product.
• The product is not suitable as play equipment
and must be stored somewhere that is inacces-
sible to children when not in use.
• Cleaning and maintenance must not be car-
ried out by children.
Preventing damage to the
product!
• Use the correct jigsaw blade for the material
to be processed. Enquire at a specialist shop
if necessary.
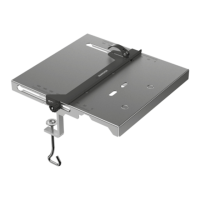
Assembly
To assemble the product you require the follow-
ing tools (not included in the package contents):
a suitable spanner (spanner width 10) and a
jigsaw.
1. Make sure that the package contents are
complete and that all parts are undamaged.
2. Attach the mounting accessories (5–9) to
the worktop (1) (Fig. B).
Note: use a suitable spanner to tighten the
nuts (6). Make sure that you do not fasten the
wing nuts (8) too tightly, so that the clamping
jaws (9) can still move.
3. Choose a side of the worktop that you
would like to attach the jigsaw to.
4. Guide the jigsaw blade through one of the
two openings on the worktop and place the
jigsaw on the worktop (Fig. C).
5. Position the jigsaw blade in the centre and
straight within the opening (Fig. C).
6. Attach the clamping jaws to the jigsaw and
tighten the wing nuts (Fig. C).
7. Place the stops of the worktop so that they
are flush with your work table (Fig. D).
8. Slide the clamps (2) onto the brackets and
tighten the clamps (Fig. D).
9. Guide the screw (10a) of the clamping lever
(10) through the opening of the worktop and at-
tach the clamping lever with the screw (Fig. E).
10. Mount the locking screw (4) together with the
washer (4a), by pushing the parallel stop (3)
out past the edge of the work table (Fig. E).
11. Screw the locking screw tight to the parallel
stop and to the worktop (Fig. E).
Note: make sure not to fasten the locking screw
too tightly, so that the parallel stop can still move.
12. Use the measuring scale on the worktop to
align the parallel stop (Fig. E).
13. Once the correct alignment has been
achieved, press the clamping lever down
and tighten the locking screw (Fig. E).
Use
WARNING
Risk of injury!
When the jigsaw is in operation, improper use
can lead to serious injuries to body parts.
• Read the operating instructions for the jigsaw
carefully before use and follow the manufac-
turer’s instructions.
• Cut the power supply to the jigsaw before
unmounting or changing parts.
• Make sure to use the correct jigsaw blade for
the material to be processed.
• Never touch the free-standing jigsaw blade.
• Use a push rod when using the product (not
included in the package contents) to protect
yourself from potential injuries.
GB/IE