PWT 11 A1
■ 8
│
GB
│
IE
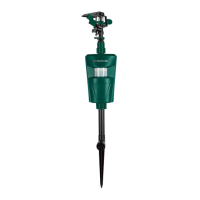
Assembling and connecting the appliance
♦ Screw the extension tube t clockwise onto the ground spike u.
♦ Screw the main unit 8 clockwise onto the extension tube t.
♦ Screw the connecting piece 6 clockwise onto the main unit 8.
♦ Screw the sprinkler unit 3 clockwise onto the connecting piece 6.
♦ Use a quick coupler or adapter to connect a suitable garden hose
to the 13 mm ( ) garden hose connection z.
NOTE
► If you unscrew the water stop i you will have the option to
connect another appliance to the 26.44 mm ( ) connection.
► Keep the water tap closed until all the settings have been
completed.
Requirements for the installation site
The installation location must meet the following requirements to
ensure safe and error-free operation of the appliance:
■ Ensure that no uninvolved persons are affected by the appliance.
■ Ensure that the safety and limiting devices are not rendered unusable.
■ The ambient temperature must be between +5°C and +30°C.
■ Use only clear fresh water.
■ The motion sensor 9 reacts more effectively when animals to be
driven away walk past the appliance instead of walking directly
towards the unit.
■ The field of view of the motion sensor 9 must not be obscured.
■ The surface of the motion sensor 9 must be kept clean.
■ The appliance must be stable and secure; otherwise, the recoil of
the water jet may knock the appliance over.
IB_360872_PWT11A1_LB8.indb 8 04.02.2021 15:16:25
 Loading...