87
8 -
INSTALLATION INFORMATION AND INSTRUCTIONS
FOR DRAIN COUPLING, DRAIN-BOA
TM
MODEL DC9700
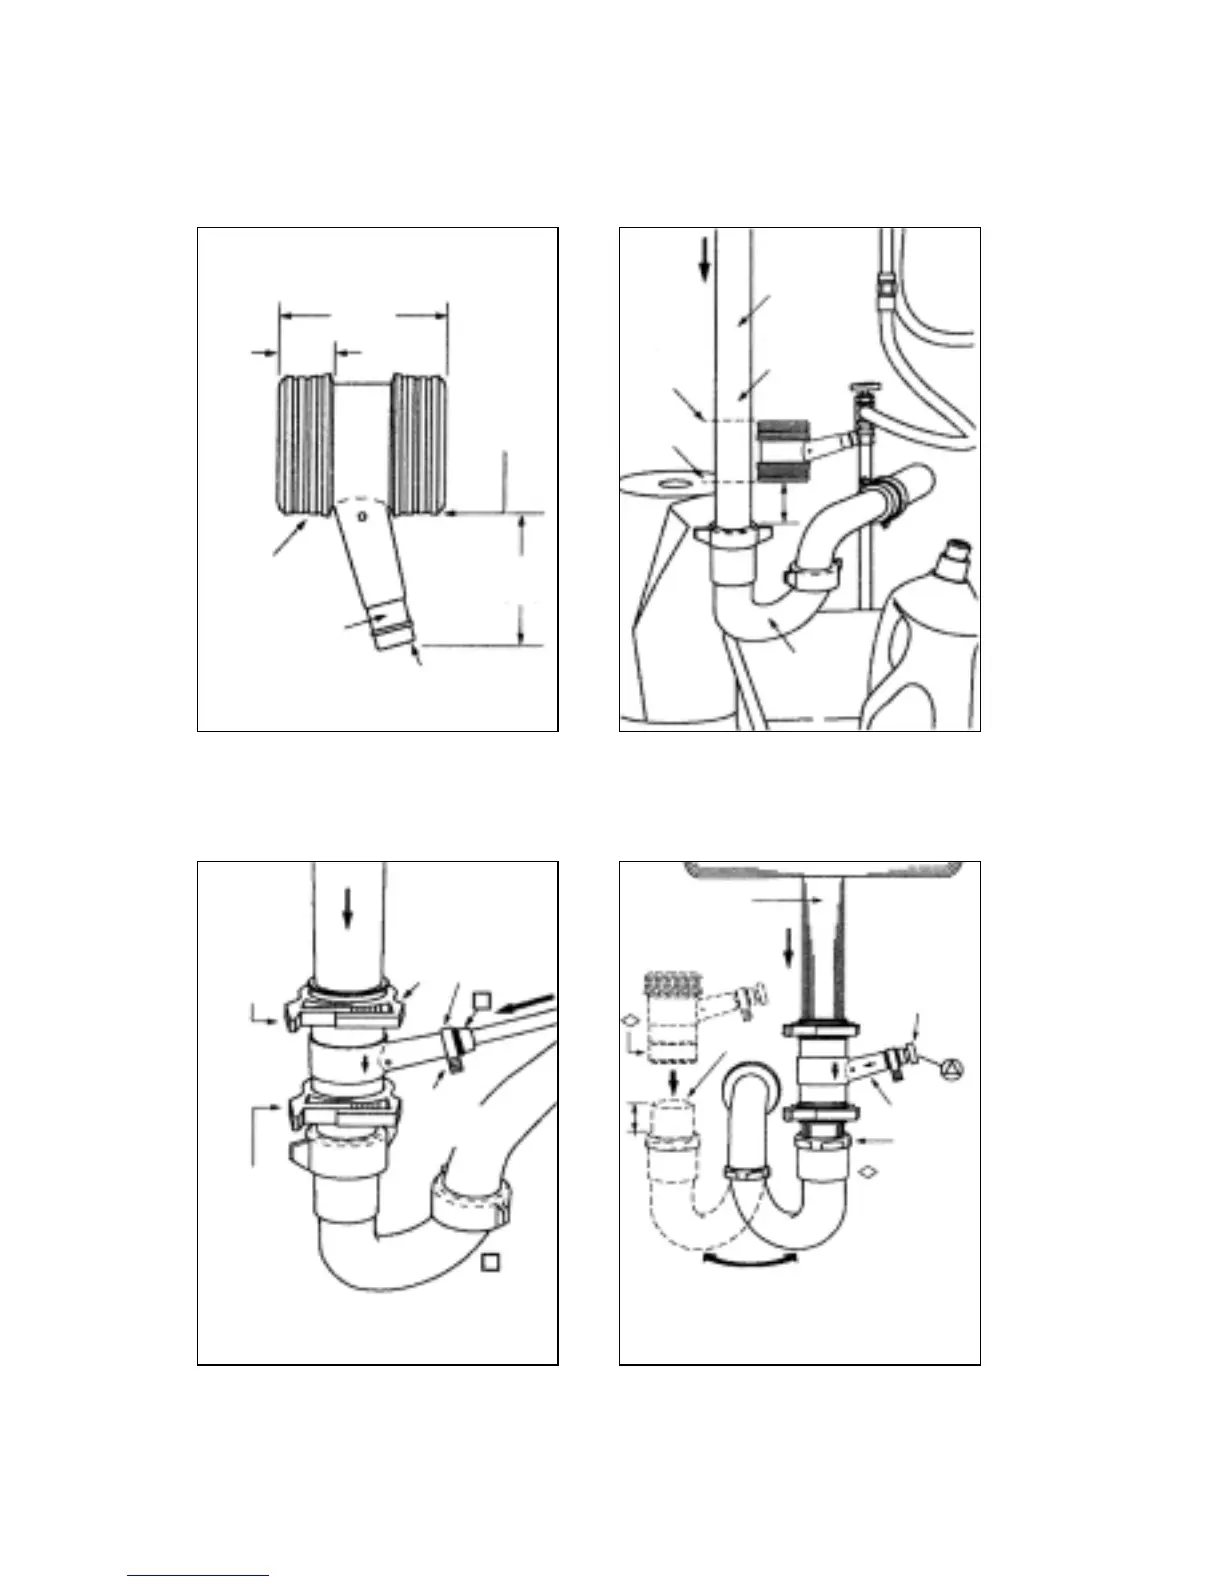
Fig. 1
Drain-BOA™ Rubber Coupling folded back on itself
at each end and ready to be installed in the kitchen
sink tailpiece
(Measures just over 2.125“ when fully folded
back as shown).
Fig.3
Typical view of (Fig.2) plastic tailpiece after installing
the Drain-BOA™ Rubber Coupling
(Polyethylene drain tubing from air gap properly
inserted to inner stop and clamped). (Note: Wet tubing
only with water before installation).
Fig.2
Typical view under kitchen sink with 1.5“ dia.
plastic tailpiece and sink trap.
(Use very fine teeth hacksaw blade, recommend
32 teeth per inch. Use folded coupling as a template
to mark tailpiece for cuts (A) and (B). Discard item (C).
Fig.4
Depicts metal 1.5“ kitchen sink tailpiece
with Drain-BOA™ properly installed.
(Solid plug depicted here in lieu of the typical 3/8“ O.D.
Polyethylene tubing as if the “R.O.“ system has been
removed). Solid plug (97002) must be installed at all
times when tubing is not installed.
Thoroughly wet coupling in water before folding ends
back and before installing over pipes ends (A) and (B)
as shown in Fig. 2
2.15“
(5.46cm)
1.975“
(5cm)
1.50“ (3.8cm) dia.
Can be metal
or plastic
Cut should
be straight
We suggest
make cut (A)
first
Cut (A)
Cut (B)
(C)
2“
Trap
(4) ribs for
sealing at
each end
When istalling (and
if necessary) slight
bending of port is
acceptable.
This inlet port
designed to receive
3/8“ or 1/2“ drain
tubing from upstream
air gap on top of sink
(Ref. Fig.8)
Note
When properly
centered then
all four ribs
should be
resting over
pipe ends (A)
and (B).
About 0.70“
(1.78cm)
Use ”water
pump style“
pliers with
nylon snap
clamps and
tighten 3 or 4
clicks beyond
hand tight
Plastic “snap clamps“
depicted (3) places are
furnished with each
coupling. (Clamps
reusable many times if
removed and installed
carefully).
May be brass and
may be chrome
plated. Plastic is
common also.
Cut (B)
Inlet port
Trap top nut
With trap swiveled,
no need to fold
lower end of
coupling to install.
With the coupling
centered then
rotate so that inlet
port is pointed in
the optimum
direction
During installation, can
swivel trap to this position
if desired.
2“
(97002) Special
design plug.
Always keep plug
for use when no
tubing is installed.
(This custom plug
also included with
each coupling).
Clamps
N700 for 3/8“ tube
N800 for 1/2“ tube
Port accepts 3/8“
and 1/2“ poly tubing
After installation then center coupling over cuts
(A) and (B) by working it back and forth.
Stainless
screwdrive
clamps not
furnished. They
can be
purchased
commercially if
owner desires.