16
SUPERFLO® VST, SUPERFLO
®
VS and SUPERMAX® VS Variable Speed Pumps Installation and User’s Guide
Pump Reassembly
1. Place the seal plate onto the motor assembly,
ensuring the side marked “UP” is at the top.
2. Using a 9/16" wrench, secure the seal plate
to the motor with the four (4) motor bolts.
Tighten to 75-80 in-lbs. (86-92 kg/cm).
3. Hold the motor shaft in place at the rear
of the motor and hand tighten the impeller
clockwise onto the motor shaft.
4. Continue to hold the motor shaft in place and
reinstall the impeller screw.
Note: The impeller screw is reverse thread
and tightens counter-clockwise.
5. Secure the diuser to the seal plate using the
three (3) diuser screws.
6. Inspect the diuser seal and seal plate O-ring
for damage and replace if necessary. Grease
both before continuing.
7. Using a 9/16" wrench, secure the strainer
pot to the motor assembly with the four (4)
washers and bolts.
Note: Ensure the seal plate O-ring is not
pinched between the two pump halves.
8. Reinstall the both drain plugs into the bottom
of the strainer pot.
9. To restart the pump, continue to Restarting
the Pump on the next page.
Shaft Seal Replacement
The Shaft Seal consists of two halves, a rotating spring seal
and a xed ceramic seal. The shaft seal may occasionally
become damaged and require replacement.
1. Ensure you have completed all pump disassembly instructions
on the previous page.
2. Remove the old Spring Seal from the impeller shaft with a pair
of pliers.
Note: When removing the spring seal the inner sleeve of
the seal may stick to the shaft. Ensure it is removed before
installing the new spring seal.
3. Place the seal plate face down on a at surface and tap out
the old ceramic seal with a at-blade screwdriver.
4. Flip the seal plate over and thoroughly clean the seal cavity.
5. Lightly lubricate the outside rubber surface of the new
ceramic seal with a silicone lubricant.
6. With the White Face upwards, rmly press the ceramic
seal into the seal plate cavity with your thumbs.
7. Thoroughly clean the seal face with a clean cloth.
8. Using a 9/16" wrench, secure the seal plate to the motor with
the four (4) motor bolts. Tighten to 75-80 in-lbs. (86-92 kg/cm).
9. With the Flat Face towards the impeller, slide the new
spring seal onto the impeller shaft.
10. Thoroughly clean the seal face with a clean cloth
11. Hold the motor shaft in place at the rear of the motor and
hand tighten the impeller clockwise onto the motor shaft.
12. Continue reassembling the pump according to the
instructions given in Pump Reassembly.
Scratching, marring or otherwise damaging the polished shaft
seal faces will cause the seal to leak. Always handle the shaft
seal faces with care and clean them thoroughly before reassembling the pump.
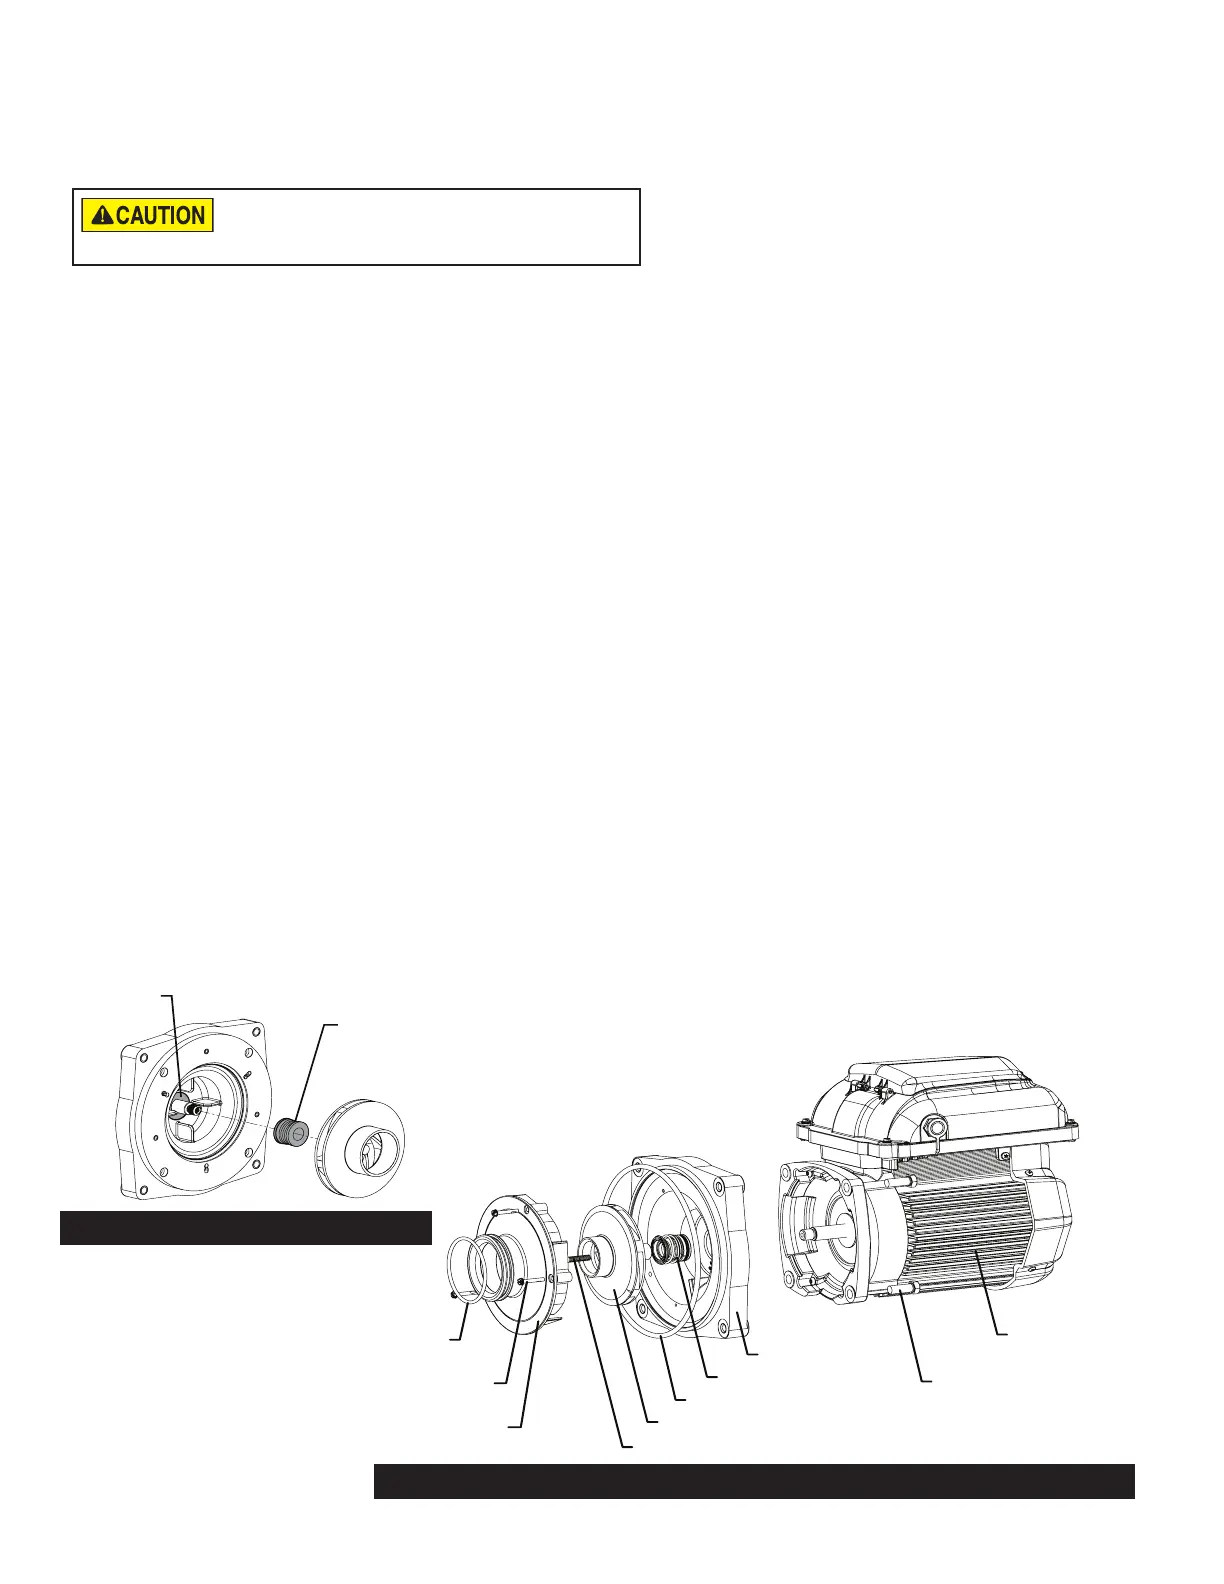
MOTOR/DRIVE
ASSEMBLY
MOTOR/SEALPLATE
BOLTS (x4)
SHAFT SEAL
SEAL PLATE
SEAL PLATE O-RING
IMPELLER
IMPELLER SCREW
DIFFUSER
DIFFUSER
SCREWS (x3)
DIFFUSER
O-RING
Ceramic
Shaft Seal
Spring
Shaft Seal
Flat Face
Towards
Impeller
Motor Assembly Breakdown
Shaft Seal Replacement