EasyManua.ls Logo

Performance Tool W2006 - User Manual

Performance Tool W2006
4 pages
Print Icon
To Next Page IconTo Next Page
Loading...
LIMITED WARRANTY
PERFORMANCE TOOL® extends only the following warranties, and only to original retail purchasers. These
warranties give specific legal rights. Except where prohibited by local law, the law of the State of Washington
governs all warranties and all exclusions and limitations of warranties and remedies. There may be other rights
which vary from state to state.
PERFORMANCE TOOL® warrants the product to be free from defects in materials and workmanship under normal
use and service. A defective product may be returned for a free replacement within 90 days from the date of
purchase, provided that product is returned to place of purchase immediately after discovery of defect. After 90
days and up to one year from date of purchase, PERFORMANCE TOOL® will replace at no charge any parts which
our examination shall disclose to be defective and under warranty. These warranties shall be valid only when a sales
receipt showing the date of purchase accompanies the defective product or defective part (s) being returned. For
part (s) after 90 days, please remit your request, postage prepaid to:
PERFORMANCE TOOL, P.O. Box 88259 Tukwila, WA 98138
These warranties exclude blades, bits, punches, dies, bulbs, fuses, hoses, and other consumables which must be
replaced under normal use and service. These warranties shall not apply to any product or part which is used for a
purpose for which it is not designed, or which has been repaired or altered in any way so as to affect adversely its
performance or reliability, nor shall these warranties apply to any product or part which has been subject to misuse,
neglect, accident or wear and tear incident to normal use and service.
PERFORMANCE TOOL® does not authorize any other person to make any warranty or to assume any liability in
connection with its products.
Except for warranties of title and the limited express warranties set forth above, PERFORMANCE TOOL® makes no
express or implied warranties of any kind with respect to its products. In particular, PERFORMANCE TOOL® makes
no implied warranty of merchantability and no implied warranty of fitness for any particular purpose, except that for
goods purchased primarily for personal, family or household use and not for commercial or business use,
PERFORMANCE TOOL® makes an implied warranty of merchantability (and, if otherwise applicable, an implied
warranty of fitness for a particular purpose), but only for the particular qualities or characteristics, and for the
duration, expressly warranted above.
The laws on limitation of implied warranties may differ from state to state, so the above limitations may not apply in
all cases.
PERFORMANCE TOOL® shall not be liable for consequential, incidental or special damages resulting from or in any
manner related to any product, or to the design, use, or any inability to use the product. The sole and exclusive
remedy for a defective product or part shall be the repair, or replacement thereof as provided above. The laws on
limitation of remedies or on consequential, incidental or special damages may vary from state to state, so the above
limitations may not apply in all cases.
© Copyright 2017 WILMAR CORPORATION, P.O. Box 88259 Tukwila, WA 98138
Question and Answer IconNeed help?

Do you have a question about the Performance Tool W2006 and is the answer not in the manual?

Summary

Limited Warranty

Owners Manual Introduction

General Warning

Owner's responsibility to study all warnings, operating, and maintenance instructions prior to product use.

Safety Guidelines

General Safety Rules

Instructions to prevent electric shock, fire, and serious personal injury by maintaining work area and avoiding hazards.

Personal Safety Precautions

Guidelines for operator alertness, proper attire, avoiding distractions, and using safety equipment.

Operation Instructions

Product Overview

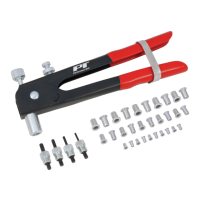
Description of the nut thread setter kit, its components, and its primary function.

Step-by-Step Usage

Detailed instructions for drilling, selecting parts, installing threaded inserts, and using the tool.

Overview

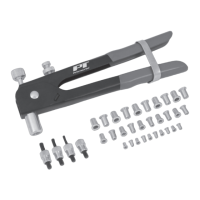
This document describes the 45 PC Threaded Insert Rivet Kit, an owner's manual for item number W2006, manufactured by Performance Tool®. This kit is designed to create backless attachment points in various workpieces using threaded inserts.

Function Description:

The primary function of this kit is to install threaded inserts into a single drilled hole, providing a secure, threaded attachment point where traditional nuts or backing plates might be inaccessible or impractical. The kit includes a rugged thread setting tool, various sized mandrels and nosepieces, 40 assorted thread nuts, a wrench, and a storage case. The tool operates by squeezing its handles, which forms a bulge on the back of the threaded insert, firmly securing it in the workpiece. This allows for subsequent fastening of objects using bolts or machine screws into the newly installed threaded insert.

Important Technical Specifications:

The kit supports multiple insert sizes, each requiring a specific drill diameter:

  • Insert Size 6-32: Requires a 9/32" drill.
  • Insert Size 8-32: Requires a 9/32" drill.
  • Insert Size 10-24: Requires a 5/16" drill.
  • Insert Size 1/4-20: Requires a 3/8" drill.

The tool features a mandrel with a left-hand thread for installation into the head. A depth screw allows for setting the desired length of the insert installation, and a mandrel adjusting knob facilitates removal of the mandrel from the threaded insert after installation.

Usage Features:

The operation of the threaded insert rivet kit involves a clear, step-by-step process:

  1. Drilling: Drill the recommended diameter hole for the chosen threaded insert into the workpiece.
  2. Selection: Select the matching mandrel and nosepiece from the kit based on the insert size.
  3. Mandrel Installation: While the wrench/handle lock is engaged (keeping the handles together), screw the mandrel into the tool's head (note: this is a left-hand thread).
  4. Tightening: Remove the wrench and tighten the mandrel snug. The wrench is designed to prevent overtightening.
  5. Nosepiece Installation: Screw on the nosepiece until snug, which may be easier if the handles are held together in the closed position.
  6. Insert Loading: With the handles released, screw the threaded insert flange end first onto the mandrel.
  7. Depth Setting: Set the depth screw to the desired length for the insert.
  8. Positioning: Pass the threaded insert through the drilled hole until its flange is flush with the workpiece.
  9. Installation: Squeeze the tool handles until the threaded insert is firmly installed by forming a bulge against the back of the workpiece. The depth adjustment screw may need to be fine-tuned to achieve the desired bulge.
  10. Mandrel Removal: Release the tool handles fully and turn the mandrel adjusting knob counter-clockwise to remove the mandrel from the newly installed threaded insert.
  11. Fastening: Fasten the desired object by screwing a bolt or machine screw into the installed threaded insert.

A pilot test is always recommended before installing threaded inserts into the final workpiece to ensure the proper stop position and desired bulge in the insert.

Maintenance Features:

The manual emphasizes the owner's/operator's responsibility for maintenance, including maintaining all decals or warning labels and ensuring the unit is in good working order during use. Regular inspection of the product according to operating instructions is advised.

Safety Information:

The manual includes comprehensive general and personal safety rules:

  • Work Area: Keep the work area clean, well-lit, and free from clutter.
  • Environment: Do not operate power tools in explosive environments or near flammable liquids, gas, or dust.
  • Bystanders: Keep bystanders, children, and visitors away to avoid distractions.
  • Alertness: Stay alert, be aware of surroundings, and use common sense. Do not operate the tool while tired or under the influence of drugs, alcohol, or medication.
  • Dress Code: Dress properly, avoiding loose clothing or jewelry. Contain long hair. Keep hair, clothing, and gloves away from moving parts.
  • Accidental Start-ups: Ensure the switch is in the OFF position before plugging in the tool.
  • Adjusting Keys/Wrenches: Remove adjusting keys and wrenches before turning the tool ON.
  • Footing and Balance: Maintain proper footing and balance at all times.
  • Safety Equipment: Always wear eye protection. Use a dust mask, non-skid safety shoes, a hardhat, or hearing protection when appropriate.

Warranty Information:

Performance Tool® offers a limited warranty to original retail purchasers, covering defects in materials and workmanship under normal use and service.

  • Within 90 days: A defective product can be returned for a free replacement to the place of purchase immediately after defect discovery.
  • After 90 days and up to one year: Performance Tool® will replace defective parts at no charge.
  • Proof of Purchase: Warranties are valid only with a sales receipt showing the purchase date.
  • Exclusions: The warranty excludes consumables (blades, bits, punches, dies, bulbs, fuses, hoses), products used for purposes not designed, repaired/altered in a way that affects performance/reliability, or products subjected to misuse, neglect, accident, or normal wear and tear.
  • Limitations: Performance Tool® does not authorize others to make warranties. The company disclaims all express or implied warranties except for title and the limited express warranties stated. Specifically, no implied warranty of merchantability or fitness for a particular purpose is made, except for goods purchased for personal, family, or household use, where an implied warranty of merchantability (and fitness for purpose, if applicable) applies only for the duration expressly warranted.
  • Liability: Performance Tool® is not liable for consequential, incidental, or special damages. The sole remedy for a defective product or part is repair or replacement as provided.
  • Jurisdiction: The warranty is governed by the laws of the State of Washington, though other rights may vary by state. Limitations on implied warranties and remedies may also vary by state.

The manual also notes that manufacturers may make changes or modifications to merchandise not reflected in the manual, and while efforts are made to maintain accurate information, product specifications or illustrations may vary. Wilmar Corporation is not responsible for typographical errors.

Performance Tool W2006 Specifications

General IconGeneral
BrandPerformance Tool
ModelW2006
CategoryTools
LanguageEnglish

Related product manuals