EasyManua.ls Logo

Phanteks GLACIER G40 MSI - User Manual

Phanteks GLACIER G40 MSI
2 pages
Print Icon
To Next Page IconTo Next Page
Loading...
INSTALLATION GUIDE V1.0
GLAC IER G40 MSI GPU BLOCK
PH-GB4090MS_BK01/CR01/MW01_BP
PACKAGE CONTENTS
WARNING - This product is intended for advanced users. Improper installation may result in damage to your equipment. While all eorts have
been made to provide the most comprehensive information possible, Phanteks assumes no liability expressed or implied for any damage(s) occurring to your
components as a result of using Phanteks cooling products, either due to mistake or omission on our part in the below instructions, or due to failure or defect in
the Phanteks cooling products. Do not disassemble the water block. Warranty will be voided.
STEP 1. REMOVING STOCK COOLER
MSI RTX 4090 GAMING(X) TRIO
MSI RTX 4090/4080 SUPRIM (X)
Unscrew all highlighted screws to remove
the stock cooler and backplate.
Some SUPRIM models require
you to remove these 2 screws.
Secure again with 2x M3 Nuts and
original screws.
Make sure to unplug the LED and Fan
cables when you remove the stock cooler.
backplate screws
MSI SUPRIM PCB version: V510-2.2
stock cooler screws
Clean o the original thermal compound.
We recommend using isopropanol alcohol.
Remove the protective lm and place the
the thermal pads on the correct position
on the PCB.
Apply the Phanteks Thermal Compound to
the center of the GPU chip.
STEP 2. APPLYING THERMAL PASTE & PADS
Make sure to remove the protective lm on
both sides of the thermal pads.
MSI RTX 4090/4080 SUPRIM (X) / GAMING(X) TRIO
Keep for step 3
GB4090MS block
QTY: 1
GB4090MS backplate
QTY: 1
GLACIER stop tting
QTY: 2
Support bracket
QTY: 1
Block thermal pads
QTY: 2 pre-cut pieces
M2.5x5 screws/washers
QTY: 4/4
M3x10 screw (1x)
M3 Nut (2x)
Backplate thermal pads
QTY: 2 pre-cut pieces
M2.5x8 ush screws
QTY: 11
Thermal compound
QTY: 1
Phanteks D-RGB cable
QTY: 1
Motherboard cable
QTY: 1
1
2
3
4
5
10
12 11 11 11 11 11
8
6 6 6 6
7
3
10
12
1
2
6
6
6
6
4
3 3
7
5
8
11
11
11
1111
2x
Question and Answer IconNeed help?

Do you have a question about the Phanteks GLACIER G40 MSI and is the answer not in the manual?

Overview

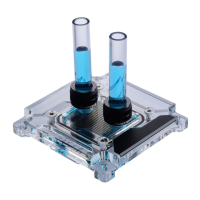
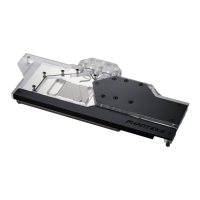
This document provides installation instructions for the GLACIER G40 MSI GPU BLOCK, specifically for the PH-GB4090MS_BK01/CR01/MW01_BP models. This device is a water block designed to cool MSI GPUs, enhancing their thermal performance.

Function Description

The GLACIER G40 MSI GPU BLOCK is a liquid cooling solution for specific MSI graphics cards. Its primary function is to dissipate heat generated by the GPU, memory, and VRM components more effectively than traditional air cooling. By integrating this water block, users can achieve lower operating temperatures, which can lead to increased stability, potential for higher overclocking, and reduced noise levels from the graphics card. The installation process involves replacing the original air cooler with this water block, connecting it to a liquid cooling loop, and securing it to the GPU's PCB.

Important Technical Specifications

The installation package includes several components crucial for the proper functioning and installation of the water block:

  • GB4090MS block (QTY: 1): This is the main water block unit that makes direct contact with the GPU, memory, and VRM.
  • GLACIER stop fitting (QTY: 2): These fittings are used to seal unused ports on the water block.
  • Support bracket (QTY: 1): Provides structural support for the water block assembly.
  • Thermal compound (QTY: 1): High-performance thermal paste for optimal heat transfer between the GPU die and the water block.
  • Block thermal pads (QTY: 2-pre-cut pieces): Pre-cut thermal pads for efficient heat transfer from memory modules and VRM components to the water block.
  • GB4090MS backplate (QTY: 1): A backplate that provides structural rigidity and additional passive cooling for the rear of the PCB.
  • Backplate thermal pads (QTY: 2-pre-cut pieces): Pre-cut thermal pads for the backplate to aid in cooling components on the rear of the PCB.
  • M3x10 screw (QTY: 1x) and M3 nut (QTY: 2x): Fasteners for securing various parts of the assembly.
  • M2.5x5 screws/washers (QTY: 4x): Used for mounting the water block to the PCB.
  • M2.5x8 flush screws (QTY: 11x): Used for securing the backplate.
  • Phanteks D-RGB cable (QTY: 1): For connecting the integrated D-RGB lighting to a compatible motherboard or controller.
  • Motherboard cable (QTY: 1): Likely for connecting to a fan header or similar control point on the motherboard.

The device is compatible with specific MSI graphics cards, including the MSI RTX 4090/4080 SUPRIM (X) and MSI RTX 4090 GAMING (X) TRIO. The PCB version for MSI SUPRIM is V510-2.2.

Usage Features

The GLACIER G40 MSI GPU BLOCK offers several usage features designed to enhance the user experience and cooling performance:

  • Integrated D-RGB lighting: The water block features addressable RGB lighting, which can be synchronized with other D-RGB components in a system via the included D-RGB cable. This allows for personalized aesthetics.
  • Comprehensive cooling: The design ensures that not only the GPU die but also the critical memory modules and VRM components are actively cooled by the liquid loop, leading to more stable operation under heavy loads.
  • Robust construction: The use of high-quality materials and precise manufacturing ensures durability and reliable performance.
  • Compatibility with existing liquid cooling loops: The water block is designed to be integrated into standard custom liquid cooling loops, allowing users to expand their existing setups or build new high-performance systems.
  • Easy integration into system: The D-RGB cable can be connected to the motherboard or a Phanteks D-RGB controller for easy management of lighting effects.

Maintenance Features

Proper maintenance is crucial for the longevity and optimal performance of the GLACIER G40 MSI GPU BLOCK. The manual outlines several key maintenance steps:

  • Regular cleaning of thermal interfaces: The installation process emphasizes the importance of cleaning old thermal compound and pads. For maintenance, it's recommended to periodically inspect and reapply thermal compound and replace thermal pads if necessary, especially if the block is removed or reinstalled. Isopropyl alcohol is specified for cleaning the GPU die and the thermal pads.
  • Checking for leaks: Before powering on the system, a leak test is mandatory. This involves installing the water loop and fittings, filling it with coolant, and checking for any leaks over a period of time (e.g., 24 hours) without powering the system components. This prevents potential damage from coolant spills.
  • Securing components: The manual details the specific screws and nuts to be used for each part of the assembly, ensuring a secure fit. This prevents rattling, misalignment, and ensures proper contact for thermal transfer. For example, M2.5x5 screws/washers are used for the water block, and M2.5x8 flush screws for the backplate.
  • Thermal pad replacement: The package includes pre-cut thermal pads for both the block and the backplate. These should be carefully placed according to the diagrams provided in the manual to ensure effective heat transfer. If the block is ever disassembled for cleaning or other maintenance, new thermal pads should be used to maintain optimal performance. The manual specifically mentions that protective film on both sides of the thermal pads must be removed before installation.
  • Tightening screws: The manual provides instructions for tightening screws, including the use of specific screws for different components. For the MSI SUPRIM PCB version V510-2.2, there are 3 nuts required for the backplate, and 2x M3 nuts are included. For the MSI GAMING (X) TRIO, 2 nuts are required. This attention to detail ensures proper mounting pressure and thermal contact.
  • Warning regarding water block integrity: The manual explicitly warns against disassembling the water block itself, as this will void the warranty. This suggests that the internal components are not user-serviceable and should not be tampered with.
  • Warranty information: The manual includes a general warning about the warranty, stating that Phanteks assumes no liability or responsibility for any damages or injuries resulting from improper installation, use, or failure to detect or fix defects in Phanteks cooling products. This underscores the importance of following the installation instructions carefully.

Phanteks GLACIER G40 MSI Specifications

General IconGeneral
BrandPhanteks
ModelGLACIER G40 MSI
CategoryComputer Hardware
LanguageEnglish

Related product manuals