Do you have a question about the Phanteks ECLIPSE G300A and is the answer not in the manual?
Secures cables and components within the case.
Used for mounting the power supply unit.
Connects D-RGB fans to a motherboard's ARGB header.
Fasteners for securing 3.5" hard drives.
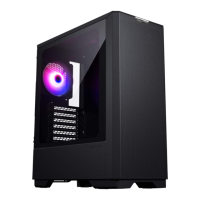
Details on the pre-installed RGB fan.
Screws for mounting SSDs and motherboard standoffs.
Tool for installing motherboard standoffs.
Spacers for mounting the motherboard.
Front panel audio and microphone input jack.
Front panel USB Type-C connector.
Front panel USB Type-A connector.
Button for resetting the system.
Specifies supported fan sizes for front, top, and rear mounting.
Details radiator size compatibility for front and top mounting.
Maximum height allowed for CPU air coolers.
Maximum length for graphics cards.
Maximum depth for ATX power supplies.
Maximum width supported for E-ATX motherboards.
Information on mounting a 360mm AIO cooler at the front and its GPU clearance.
Information on mounting a 240mm AIO cooler at the top and its GPU clearance.
Step-by-step guide to safely remove the left side tempered glass panel.
Instructions for removing the right side panel of the PC case.
Details on how to remove the front panel and access dust filters.
Guide for installing the ATX or M-ATX motherboard with standoffs.
Steps for installing the power supply unit (PSU) and connecting cables.
Instructions for mounting up to three 2.5" SSDs on the backplate.
Guide for installing 3.5" HDDs from the bottom of the chassis.
Details on connecting front panel cables to motherboard headers.
Explains how to connect D-RGB fans to motherboard or controller.
Information on daisy-chaining additional D-RGB products.
Details on the compatibility and installation of the vertical GPU bracket.
Contact details for technical support and RMA for Americas and International.
The Phanteks Eclipse G300A is a computer chassis designed for building a full system, offering a blend of functionality, aesthetic appeal, and user-friendly features. This manual provides comprehensive instructions for assembling a PC within the chassis, detailing everything from panel removal to component installation and cable management.
The Eclipse G300A serves as the enclosure for a personal computer, housing essential components such as the motherboard, power supply, storage drives (SSDs and HDDs), and graphics card. Its primary function is to protect these internal components from dust and physical damage, while also facilitating efficient airflow for cooling. The chassis is designed to support various motherboard form factors, including ATX and M-ATX, and offers flexible options for cooling solutions, including air coolers and liquid radiators. Integrated front I/O ports provide convenient access for peripherals and data transfer.
The Eclipse G300A is engineered with ease of use and flexibility in mind for PC builders.
External Panel Removal and Reinstallation: The chassis features a tool-less design for accessing internal components. The left side panel, made of tempered glass, is secured by two thumb screws and slides off easily. Users are advised to hold the panel carefully to prevent damage. The right side panel is also secured with two captive thumb screws and slides off, providing access to the rear of the motherboard tray for cable management. The front panel can be removed by pulling it from the bottom, which is necessary for installing front fans or radiators and for accessing the front dust filter. Reinstallation of side panels involves aligning them with chassis slits and securing them with thumb screws.
Motherboard Installation: The G300A supports ATX and M-ATX motherboards. Installation involves securing the motherboard with nine screws. For M-ATX motherboards, users may need to adjust the stand-offs according to the motherboard's specifications. A stand-off tool is included to assist with this.
Power Supply Installation: The power supply slides into the chassis from the side and is secured with four PSU screws. It is recommended to connect all necessary cables to the power supply before fully securing it to simplify cable management.
Storage Installation:
Front I/O Connectivity: The front I/O panel includes an audio/mic jack, a USB 3.0 Type-C port, a USB 3.0 Type-A port, and a reset button. These functions are enabled by connecting the corresponding cables (HD Audio, USB 3.0, Power Switch, Reset Switch, Power LED) to the allocated connectors on the motherboard.
Cooling Support: The G300A offers versatile cooling options:
D-RGB Lighting: The chassis supports D-RGB fans, which require a controller to function. Users have two options for D-RGB control:
Optional Vertical GPU Bracket: The G300A chassis supports the Phanteks Vertical GPU Bracket (PH-VGPUKT4.0_03R), allowing for vertical mounting of 3-slot and 4-slot GPUs. This bracket provides access to GPU connectors on slot 1 and 2 and is installed in the PCI slot area, with separate instructions provided with the bracket itself.
The Eclipse G300A incorporates features that simplify maintenance and contribute to the longevity of the system.
Dust Filters: The chassis includes dust filters for both the top and the PSU intake. These filters are crucial for preventing dust buildup inside the system, which can impede airflow and reduce component lifespan. The removable front panel allows for easy access to the front dust filter, while the top and PSU filters are also designed for convenient cleaning. Regular cleaning of these filters helps maintain optimal cooling performance and keeps the internal components free of dust.
Cable Management: The design of the chassis, particularly the space behind the motherboard tray and the inclusion of zip ties, facilitates effective cable management. Tidy cable routing not only improves the aesthetic appeal of the build but also enhances airflow within the case, contributing to better cooling and easier access for future maintenance or upgrades.
Accessible Components: The tool-less removal of side panels and the front panel ensures quick and easy access to all internal components for cleaning, upgrades, or troubleshooting. This user-friendly design minimizes the effort required for routine maintenance tasks.
Durable Construction: The use of tempered glass for the side panel and robust materials for the chassis frame ensures durability and protection for the internal components. Following the provided instructions for panel handling helps prevent accidental damage during assembly and maintenance.
In summary, the Phanteks Eclipse G300A is a well-rounded chassis that prioritizes user experience through its thoughtful design, flexible component support, and features that simplify both the initial build process and ongoing maintenance.
| Form Factor | Mid Tower |
|---|---|
| Motherboard Support | ATX, Micro-ATX, Mini-ITX |
| Material | Steel, Tempered Glass |
| Expansion Slots | 7 |
| Cooling Support | Front: 3x 120mm or 2x 140mm, Top: 2x 120mm or 2x 140mm, Rear: 1x 120mm |
| Maximum PSU Length | 220 mm |
| GPU Clearance | 390 mm |
| CPU Cooler Clearance | 160 mm |
| PSU Support | ATX |
| Drive Bays | 2 x 2.5", 2 x 3.5" |
| Radiator Support | Rear: 120mm |
| Maximum GPU Length | 390 mm |
| Maximum CPU Cooler Height | 160mm |
| Front I/O Ports | 2 x USB 3.0, 1 x Headphone/Microphone Combo |