3-2
SET UP AND OPERATION INSTRUCTION
TEST LEAD CONNECTIONS (continued)
3. Any current flowing through the test lead attached to the “Return” terminal on the unit will
always be measured by the “DC Microammeter” if the “Guard” switch is activated
(illuminated), unless the specimen return is not isolated from ground in which case the
currentmenter will be inoperative. .
4. Current flowing through the test lead attached to the “Ground” terminal on the unit will be
measured by the “DC Microammeter” only when the “Guard” switch is not activated (non-
illuminated). Ground current associated with the “Ground” terminal will not be measured
when the “Guard” switch is activated (illuminated).
5. To use the “Guard” mode (switch depressed, illuminated), the specimen must be isolated
from ground. If the low potential side of the specimen will not or can not be isolated from
ground, the “Guard” mode cannot be used.
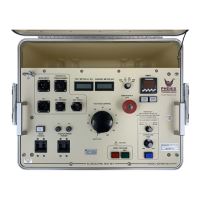
OPERATION
1. Turn the unit on by pressing the “Power” switch. The switch will illuminate and remain
recessed. There will be a normal short delay in illumination of the switch after it is depressed.
2. Set “Voltage Control” to zero. Energize the high voltage power supply by pressing the “High
Voltage” power switch. The switch will illuminate and remain recessed.
NOTE: If the “Voltage Control” has not been set to “Zero”, the overcurrent alarm will sound.
To silence this alarm insure that the voltage control is in its full counter-
clockwise position. When fully set to “Zero” it will click into place.
3. Rotate the “Voltage Control clockwise until the desired test voltage is observed on the
“Kilovolt” meter. Maintain output voltage at the desired level for the required amount of time.
If the test was initiated on the “15” scale and a more accurate voltage reading is required (7.5
kV or below), select “7.5” on the “KV Meter” range switch.
NOTE: If an overcurrent condition is encountered before required test voltage is reached and
it is desirable to achieve a higher test voltage, adjust the “Min-Max” to a more clockwise
position. Restart “Voltage Control” at “Zero”.
4. Observe and record the resultant leakage current or insulation resistance value on the
“Microamperes/Megohms” meter. If no current reading is indicated, select a lower sensitivity
range until an observable reading is obtained at less than full scale on the “DC Micro-
amperes/Megohms” meter.
NOTE: The megohmmeter is scaled to read megohms directly at three test voltages; 5 kV
(lower megohm scale), 10kV (mid scale) and 15 kV (upper megohm scale). If any other test
voltage is used, the megohm reading must be taken by dividing the voltage read on the
kilovolt meter by the current on the DC microamperes meter.