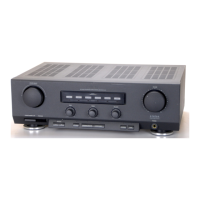
OPERATING ELEMENTS AND THEIR FUNCTION
Figure
2
@
'ONIOFF' switch
Once the 'ONIOFF switch has been pressed, it will take
approximately
7
seconds before the amplifier is fully switched
on. This can be heard by the clicking of the loudspeaker
relays.
@
'48
kHz',
'44
kHz', '32 kHz' frequency indictors
For indicating the sampling frequency of the selected digital
signal source. The amplifier automatically switches to the
correct sampling frequency and the corresponding indicator
then lights up.
@
'VOLUME' control
Inside the amplifier there are four volume controls, the reason
for this being to improve the
signal/noise ratio at low volume
levels.
@
'PHONES' terminal socket for stereo headphones
For connecting stereo headphones with an impedance of
8
-
1000
ohms. By releasing the 'SPEAKERS' switches
@,
it is
possible to listen separately through the headphones.
@
'SPEAKERS' A and B switches
For switching on and off the loudspeakers, which are
connected to the corresponding loudspeaker connections
@.
@
'REC SELECTOR' recorder selection switch
For transferring the signal from the signal source to be
recorded to the terminal sockets
@
'TAPE
1
REC' or
@
'DAT/TAPE 2 REC'.
If no recording is being made, this switch should preferably be
in the 'OFF' position.
For copying sound recording tapes from 'TAPE
1'
to 'DAT/
TAPE 2' and vice versa.
Note:
For further information on the use of this switch, see
section on
'Use with a recorder'
under the heading
'OPERA
-
TION'.
@
'BASS/TREBLE' controls
Using these controls you can set the base and treble to your
own personal preference. The neutral position is
'0'.
@
signal source direct switch with 'SOURCE DIRECT' indicator
If this switch is pressed, the signal from the connected signal
source will be channelled directly via the volume control and
'Tone Defeat', with a flat curve, to the final amplifier and the
sound will be amplified.
@
signal source selector switches with 'PHONO', 'AUX
l',
'AUX
2',
'TAPE
l',
'DAT/TAPE 2', 'TUNER/DBS' and 'CD'
indicator.
For playbackof the selected signal source which is connected
to the corresponding terminal sockets.
@
'LOUDNESS' correction switch
Switch for extra amplification of the bass and treble at low
volume levels.
@
'DIGITAL' analog/digital switch with indicator
Depending on the signal source connections to be used, the
switch must be in the 'ANALOG' or 'DIGITAL' position.
When switch
@
is not pressed: 'ANALOG' position, indicator
does not light up. (This is the setting for units connected to
the connections
@,
@,
0,
@,a,
@,
@, @
and
@.)
When switch @is pressed: 'DIGITAL' position, indicator lights
up. (This is the setting for units connected to the connections
@,@,
@,
Q
and
63.1
@
'BALANCE' control
Used to give a balanced adjustment of
left and right stereo
channels.
OPERATION
Use with the signal source selection switch
1.
Ensure that the 'VOLUME' control
@
is not on maximum.
This should preferably be set at a lower position to prevent
damage to the loudspeakers.
2.
Switch on the amplifier using the 'ONIOFF' switch
@.
The lighting around the volume control
@
and above the
'ON/OFF' switch
@
lights up.
3.
Switch on the loudspeakers using the 'SPEAKERS' switch
-
(es)
@.
When button
'A'
is pressed: for loudspeakers connected to
the loudspeaker connections
@
'system A', see figure 3.
When button
'B'
is pressed: for loudspeakers connected to
the loudspeaker connections
@
'system B', see figure
4.
4.
Switch on the required signal source and prepare this for
playback.
5.
On the amplifier, press the selection switch
@
appropriate for
the signal source. The corresponding indicator will light up.
6.
If you are using a digital signal source, press 'DIGITAL' switch
0.
The corresponding indicator will light up.
7.
Slowly adjust the volume level using 'VOLUME' control
@.
If you hear nothing and no indicator lights up:
-
The amplifier is not switched on.
-
The amplifier is not connected to the mains supply.
-
There is no power at the mains.
If you hear nothing but an indicator does light up:
-
Check selection switch
@
is in the correct position.
-
Check that the selected sound source is working properly
-
Check that the loudspeakers are switched on.
-
Check that the volume control is set high enough.
Do not leave it on
MAX!
-
Check that the loudspeakers are properly connected.
Before checking this, the amplifier must be switched off.
8.
Adjust the stereo balance using 'BALANCE' control
@.
9.
Adjust the bass and treble using the 'BASS/TREBLE' control
w.
10.lf required, at a lowvolume level, switch on the loudness using
the 'LOUDNESS' correction switch
@.
If sound comes from one side only:
-
check that the position of the balance control is correct.
-
check the connection to the faulty loudspeaker.
-
check the connection between the signal source and amplifier.
-
if using stereo headphones, push the plug fully into the terminal socket.
If the amplifier hums, buzzes or howls during record playback.
-
Check the earthing of the record player.
-
Check that the connection plugs are inserted far enough into the terminal
sockets.
-
Ensure that the connection cable to the record player is as far away as
possible from the mains cables (hum) or
TV
circuits (buzz).
-
The amplifier may howl as a result of acoustic feedback from the
loudspeakers to the record player. This may occur particularly at high
volume levels.
In such a case, change the position of the loudspeakers.
Use with the signal source direct switch
For direct playbackfrom a signal source selected using the signal
source selection switch
@.
If you use this switch, the signal from the connected signal
source will be channelled directly via the volume control and
'Tone Defeat', with
a flat curve, to the final amplifier and the sound
will be amplified.
The advantage of this is that the sound signal passes through the
lowest possible number of circuits and is therefore reproduced
most naturally.
Playback
1.
Switch on the amplifier using 'ONIOFF'
a.
2,
Switch on the loudspeakers using 'SPEAKERS'
@.
3.
Switch on the required signal source and prepare this for
playback.
4,
If you are using a digital signal source, press 'DIGITAL' switch
The corresponding indicator will light up.
5.
On the amplifier press 'SOURCE DIRECT' switch
@.
 Loading...