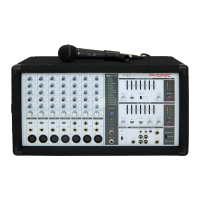
Record
1. When a USB disc is inserted, push the REC button to
activate record mode.
2. The screen will immediately display WAV (as the
recording format) and then the next available track
number will appear on screen. For example, if there
are 12 WAV files on the USB card, the screen will
display “II/REC 013”.
3. Record mode will begin in standby/pause. Push the
Play/Pause button to begin recording.
4. Push the Play/Pause button to pause recording.
Pushing the Play/Pause button again will resume
recording from the position at which it was paused.
5. While recording, push the REC button to save the
current track and continue recording on the next
track. For example, if you are currently recording
track 13, pushing the REC button will save the audio
recorded onto track 13 and continue recording into
track 14.
6. Hold the Play/Pause button to finalize the recording
and return to playback mode.
7. After finalizing your recording, playback mode will
start on the first MP3 track. In this case, push the
Back button once to access the final WAV recording
– in other words, the recording you just finalized.
NOTE: The USB rotary control will adjust the playback level
only and will not affect recording levels. The only level controls
that will affect the recording level are those found on the
individual input channels.
Grabación
1. Cuando el disco USB insertado, pulse el botón REC
para activar el modo de grabación.
2. La pantalla inmediatamente mostrará WAV (como
formato de grabación) y el número de la siguiente
pista aparecerá en la pantalla. Por ejemplo, si hay 12
archivos WAV en la tarjeta USB, la pantalla mostrará
“II/REC 013”.
3. El modo de Grabación comenzará en standby/pause.
Presione el botón Play/Pause para comenzar la
grabación.
4. Presione el botón Play/Pause para detener grabado.
Presione dicho botón nuevamente y continúe desde
el lugar donde hizo la pausa la grabación.
5. Mientras en grabación, presione el botón REC para
guardar la pista actual y continuar grabación en la
pista siguiente. Por ejemplo, si usted está
actualmente grabando la pista 13, presione el botón
REC para guardar el grabado audio en la pista 13 y
continuar grabando en la pista 14.
6. Mantenga el botón Play/Pausa para terminar con la
grabación y volver al modo de reproducción.
7. Después de terminar con su grabación, el modo de
reproducción comenzará en la primera pista de MP3,
en este caso, presione el botón BACK una vez para
acceder al grabado WAV final. En otras palabras, el
grabado que usted acaba de terminar.
NOTE: El control USB giratorio ajustará el nivel de reproducción
solamente y no afectará los niveles de grabado. Solamente los
controles de nivel que afecte el nivel de grabado se encuentran
en los canales de entrada individuales.
录音录音
1. 插入USB闪存时,按下REC按钮就可开
启录音模式。
2. 显示屏将立即显示WAV(录音格式),同
时将显示下一首可用曲目编号。例如,
如果USB闪存里一共有12
个WAV文件,
屏幕将显示“II/REC013”。
3. 录音模式将处于待命/暂停状态。按下播
放/暂停按钮可开始录音。
4. 按下播放/暂停按钮停止录音。再次按下
播放/暂停按钮可在录音暂停的地方恢复
录音。
5. 录音时,按下REC按钮可保存当前录制
的曲目并进行下一曲目录音。例如,您
当前录制的是曲目13,按下REC按钮将
以曲目13保存WAV文件,同时屏幕将显
示“II/REC 014”曲目14等待录音。
6. 按下并保持播放/暂停按钮可结束录音并
返回至重放模式。
7. 结 束 录 音后 , 重 放 模式 将播 放 第 一 曲
MP3曲目。在这种情况下,按下返回按
钮将跳至最后一曲WAV录音—换句话说
也就是您刚刚保存的录音。
注意:注意:USB旋钮控制仅可调节重放音量,且不影
响录音音量。调节录音音量的控制位于各输入声
道。