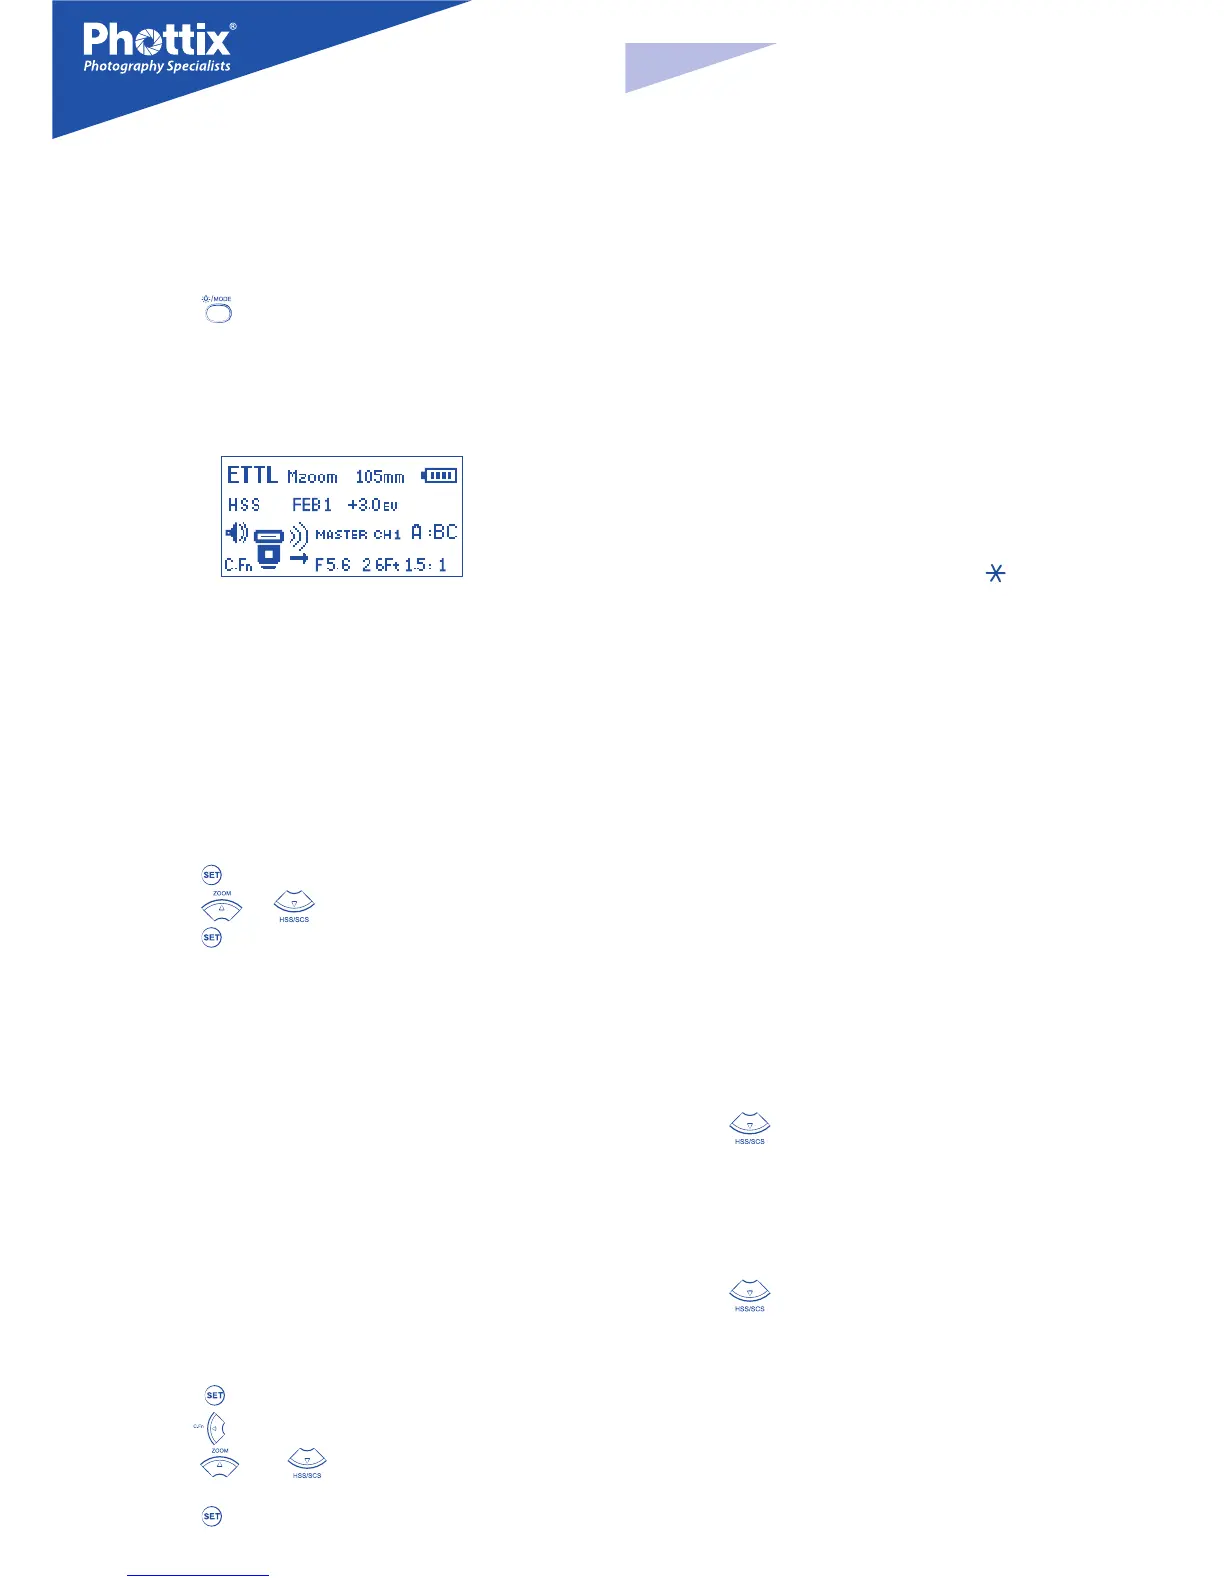
7
Flash Modes
The Phottix Mitros has three ash modes: ETTL, Manual (M) and Multi (Strobo-
scopic).
To change modes:
1. Press the button.
2. The ash modes will cycle through ETTL, Manual (M) and Multi modes.
3. The current mode will be displayed in the top left corner of the LCD.
ETTL Mode
In ETTL Mode the ash and camera will work together to calculate the correct
exposure for recorded images. When the shutter button is fully pressed the ash
will re a pre-ash that the camera will use to calculate exposure and ash pow-
er the instant before the photo is taken.
Flash Exposure Compensation - FEC
The Phottix Mitros Flash oers Flash Exposure Compensation (FEC) functions
and adjustements from -3 to +3 in 1/3
rd
stops. This is useful in situations where
ne-tuning of the TTL system is needed based on the environment.
To set FEC:
1. Press the button to enter FEC Adjustment Mode.
2. Press the or buttons to adjust FEC up or down.
3. Press the button to exit FEC Adjustment Mode.
Please note:
- Some cameras have custom functions to change stop adjustments from
1/3 to 1/2 stop increments for FEB and FEC. If camera custom functions are
changed the Phottix Mitros will adjust levels in 1/2 stop increments.
Flash Exposure Bracketing - FEB
Flash Exposure Bracketing (FEB) can be used to automatically change ash pow-
er over a series of photos. The camera will record three images with dierent
exposures – one exposed as per camera calculations, one over-exposed and
another under-exposed. Over and under exposure levels can be set by the user.
FEB is useful in run-and-gun situations as well as when shooting scenes with
dierent lighting conditions to help ensure a properly exposed photo. It can
also be used for HDR photography.
Some cameras have ash exposure storage function, see your camera user man-
ual for more details.
To Set FEB:
1. Press the button.
2.
Press the button. “FEB 0” will be displayed and highlighted on the LCD.
3. Press the and buttons to adjust the exposure bracketing
amount.
4. Press the button to conrm the setting.
Please note:
- By default: FEB will be cancelled after three photos are taken. FEB can be set
in the Custom Functions screen (see C.Fn-03 below).
- FEB shooting sequence can be changed (see C.Fn-04 below).
- FEB can be used with FEC and FEL (see below).
- For best results set the camera drive mode to “single” and ensure the ash is
fully recharged before taking the second and third photos.
- Some cameras have custom functions to change stop adjustments from
1/3 to 1/2 stop increments for FEB and FEC. If camera custom functions are
changed the Phottix Mitros will adjust levels in 1/2 stop increments.
Flash Exposure Lock - FEL
Flash Exposure Lock (FEL) can be used to lock the ash exposure before a photo
is taken. This is useful when manual spot metering is being used in a scene with
dierent lighting conditions.
While in ETTL mode, press the camera’s FEL button (the “
” button) to use this
function. See your camera user manual for more information on FEL functions
and usage.
Pressing the FEL Button will cause the ash to re a pre-ash that will be used
to calculate ash power during the exposure. This will be retained in the camera
memory. The FEL icon will be displayed in the camera viewnder.
Each time the FEL button is pressed a pre-ash will re and a new exposure cal-
culated. When the shutter button is fully pressed the ash will re at the locked
exposure.
Please note:
- If the subject is too far away underexposure will result, the “FEL” icon will
blink for approximately 0.5 sec. in the camera viewnder.
- If the subject is too small in the viewnder, FEL may not be eective.
High Speed Sync – HSS
In HSS mode, the camera/ash maximum sync speed can reach the camera’s
maximum shutter speed. This is useful when using aperture priority mode or
to limit ambient light. HSS may vary with dierent camera models - see your
camera user manual for details.
To use HSS mode:
1. Press the button.
2. The HSS icon will be displayed on the ash LCD.
3. Set shutter speeds higher than the camera’s ash sync speed and take
photos.
To exit HSS mode:
1. Press the button twice.
2. It will cycle from HSS to SCS and back to regular FCS mode.
Please note:
- Check that the HSS icon is displayed in the viewnder.
- HSS drastically reduces ash power, battery power and range.
En
INSTRUCTION MANUAL
 Loading...