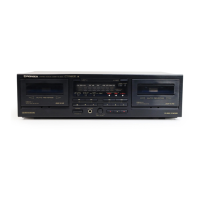
Do you have a question about the Pioneer CT-W900R and is the answer not in the manual?
Appliance must not be exposed to water or excessive moisture to prevent fire or shock hazards.
Connect only to the power supply type described in instructions or marked on the appliance.
Refer to qualified personnel for service if power cord, plug, or unit is damaged.
Details grounding wire size and installation requirements for antenna systems.
Explains condensation effects and how to avoid them by acclimatizing the unit.
For U.S. models, information on radio frequency energy and potential interference.
Details the quick reverse mechanism and relay recording/playback functions for continuous operation.
Explains the Dolby HX Pro system for dynamic control of recording bias for wider frequency response.
Describes the Dolby NR system's role in reducing high-frequency tape hiss noise.
Allows tapes to be easily copied from deck I to deck II at normal or double speed.
Explains the MPX FILTER switch function, normally off, for FM recording.
Connects to compatible components for system remote control operation.
Outputs remote control signals to other compatible Pioneer components.
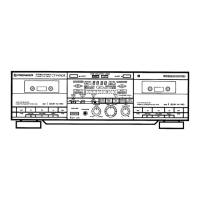
Details power switch, Dolby NR, Phones Level, REC LEVEL, and REC BALANCE controls.
Covers reverse mode, blank search, relay/skip, parallel record, synchro copy buttons.
Illustrates tape transport conditions indicated by symbols for deck I or deck II.
Guides on checking cassettes before use and the function of erasure prevention tabs.
Explains the function that automatically sets bias and equalization based on tape type.
Provides advice on leader tape, storage, and using C-120 tapes.
Instructions for performing recording on a single deck (deck I or deck II).
Details using recording mute for blanks and finding unrecorded tape portions.
Explains how to initiate the blank search function on the deck.
Instructions for continuous recording using both decks sequentially.
Instructions for recording the same source on both decks simultaneously.
Instructions for playing back a recorded tape on a single deck.
Enables skipping unrecorded portions during tape playback.
Instructions for continuous playback using both decks sequentially.
Explains how to skip selections forward or backward to find desired tracks.
Details how selections are counted when using the music search feature.
Step-by-step guide for copying tapes from Deck I to Deck II at various speeds.
Provides important notes regarding double speed copy, including potential interference.
Instructions for setting up unattended recording using a tuner and audio timer.
Instructions for setting up wake-up playback using an audio timer.
Details the procedure for cleaning essential tape path components.
Specific steps for cleaning the pinch roller while it is rotating.
Explains the importance and method for demagnetizing tape heads.
Instructions for cleaning the front panel and cassette door area.
Troubleshooting steps for power-on failures and cassette door problems.
Addresses playback issues like stopping immediately, no sound, or meter errors.
Troubleshooting steps for recording failures, indicators, and immediate stops.
Resolves issues like unstable sound, no/emphasized high frequencies, distortion, and noise.
Troubleshooting for music search, tape counter, sudden starts, and remote control issues.
Details specifications for heads, motors, wow/flutter, frequency response, and signal-to-noise ratio.
Lists specifications for noise reduction effects and harmonic distortion levels.
Details input/output levels, power requirements, and consumption for various regions.
Lists key features, subfunctions, and included accessories.
| power requirements U.S., Canadian models | AC 120V, 60 Hz |
|---|---|
| power requirements European model | AC 220V, 50/60 Hz |
| power requirements U.K., Australian models | AC 240V, 50/60 Hz |
| power requirements U.S. military and other destination models | AC 110V/120V—127V/220V/240V, 50/60 Hz |
| power consumption U.S., Canadian models | 26W |
| power consumption European, U.K., Australian models | 26W |
| power consumption U.S. military, other destination models | 26W |
| wow and flutter | No more than 0.055% (WRMS) |
|---|---|
| harmonic distortion | No more than 0.7% (0 dB) |
| signal-to-noise ratio with Dolby NR OFF | More than 58 dB |
| frequency response for normal tape at 20 dB recording | 18 to 17, 000 Hz |
|---|---|
| frequency response for chrome tape at 20 dB recording | 18 to 18, 000 Hz |
| frequency response for metal tape at 20 dB recording | 18 to 18, 500 Hz |
| frequency response for normal tape at 0 dB recording | 18 to 12, 000 Hz |
| frequency response for chrome tape at 0 dB recording | 18 to 13, 500 Hz |
| frequency response for metal tape at 0 dB recording | 18 to 16, 000 Hz |
| noise reduction effect with Dolby NR B type ON | More than 10 dB (at 5 kHz) |
|---|---|
| noise reduction effect with Dolby NR C type ON | More than 19 dB (at 5 kHz) |
| dimensions | 420(W) x 132(H) x 318(D) mm |
|---|---|
| dimensions in inches | 16-9/16(W) x 5-3/16(H) x 12-1/2(D) in |
| weight | 6 kg (13 lb 4 oz) |