EasyManua.ls Logo

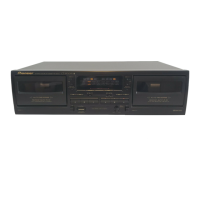
Pioneer CT-W208R - Service Manual

Pioneer CT-W208R
34 pages
Print Icon
To Next Page IconTo Next Page
Loading...
ORDER NO.
PIONEER CORPORATION 4-1, Meguro 1-chome, Meguro-ku, Tokyo 153-8654, Japan
PIONEER ELECTRONICS SERVICE, INC. P.O. Box 1760, Long Beach, CA 90801-1760, U.S.A.
PIONEER ELECTRONIC (EUROPE) N.V. Haven 1087, Keetberglaan 1, 9120 Melsele, Belgium
PIONEER ELECTRONICS ASIACENTRE PTE. LTD. 253 Alexandra Road, #04-01, Singapore 159936
PIONEER CORPORATION 1999
c
CT-W208R
RRV2186
1. SAFETY INFORMATION
......................................
2
2. EXPLODED VIEWS AND PARTS LIST
................
3
3. BLOCK DIAGRAM AND SCHEMATIC DIAGRAM
..
10
4. PCB CONNECTION DIAGRAM
..........................
18
5. PCB PARTS LIST
...............................................
24
6. ADJUSTMENT
....................................................
27
CONTENTS
7. GENERAL INFORMATION
................................
31
7.1 DIAGNOSIS
.................................................
31
7.1.1 POWER ON SEQUENCE
......................
31
7.2 PARTS
.........................................................
32
7.2.1 IC
............................................................
32
8. PANEL FACILITIES AND SPECIFICATIONS
....
33
T–ZZR AUG. 1999 Printed in Japan
Type
Model
Power Requirement
CT-W208R
KUXJ AC120V
KCXJ AC120V
HYXJ AC220-230V
HVXJ AC230-240V
THIS MANUAL IS APPLICABLE TO THE FOLLOWING MODEL(S) AND TYPE(S).
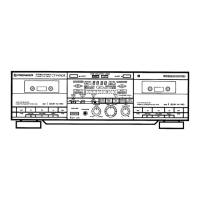
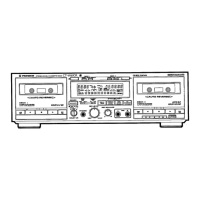
STEREO DOUBLE CASSETTE DECK
Remarks
AUTO REVERSE
Auto Tape Selector Auto Tape Selector
HIGH SPEED COOPY SYSTEM / REC & PLAY
HIGH SPEED COOPY SYSTEM / PLAYBACK
STEREO DOUBLE CASSETTE DECK
NORMAL HIGH
POWER
OFF _ ON
HIGH SPEED
COPY SYSYEM
MIN MAX
REC
LEVEL
REV MODE
RELAY/SKIP
COPY I II
3
DOLBY B-C NR
Ωı¿ˆ<?˘B
DECK
II
DECK
I
Î
DOLBY NR
OFFBC
DECK II
MS
MS
+
+
DECK I
AUTO REVERSE
DECK II
PLAY
-15
-9 -3
-3
0
-00
RIGHT
LEFT
COPY
DECK IIDECK I
dB
Ÿ
FWD
REV
PLAY
FWD
REV
REC
LEVEL

Other manuals for Pioneer CT-W208R

Questions and Answers

  • C
    Catherine GonzalezAug 12, 2025
    Why is there too much noise coming from my Pioneer CT-W208R?
    • H
      hendersonteresaAug 13, 2025
      Excessive noise from your Pioneer Cassette Player can stem from several factors. It could be due to using a high noise tape, which can be resolved by replacing the cassette. Incomplete connection of a cord or poor contact may also be the cause, so check all connections. Additionally, a recording level that's too low can introduce noise; try turning the REC LEVEL control up when recording. A dirty head can also cause this issue, so clean the head. In some cases, the head may be magnetized, requiring demagnetization with a head demagnetizer.
  • A
    Amanda WhiteAug 16, 2025
    What to do if the sound is distorted on my Pioneer CT-W208R Cassette Player?
    • K
      Kayla NelsonAug 16, 2025
      Distorted sound from your Pioneer Cassette Player can arise from a few reasons. If the recording level is too high, turn the REC LEVEL control down when recording. If the recorded signal itself is distorted, try replacing the cassette. Also, a dirty head can cause distortion, so cleaning the head is advisable.
  • D
    Dustin WilliamsAug 20, 2025
    How to fix unstable sound on Pioneer Cassette Player?
    • J
      John HuntAug 20, 2025
      Unstable or interrupted sound on your Pioneer Cassette Player can be caused by a few things. The head, pinch rollers, and capstans might be dirty, so clean the head. Also, if the tape is not uniformly wound, completely fast-forward or rewind the tape.
  • X
    xvaughanAug 25, 2025
    Why are there no high frequencies on my Pioneer Cassette Player?
    • D
      Dr. John PotterAug 25, 2025
      The absence of high frequencies on your Pioneer Cassette Player could be due to a tape recorded without Dolby NR being played back with the DOLBY NR switch in the B or C position; set the DOLBY NR switch to OFF. Another potential cause is a dirty head, so cleaning the head is recommended.
  • K
    Kaylee GonzalezAug 27, 2025
    Why can I still hear previous recordings when rerecording a tape on my Pioneer Cassette Player?
    • B
      Brian HowellAug 27, 2025
      If you're hearing remnants of previous recordings when rerecording a tape on your Pioneer Cassette Player, the head may be dirty. Cleaning the head is the suggested solution.
  • S
    Sherry MitchellAug 31, 2025
    How to decrease emphasized high frequencies on Pioneer CT-W208R Cassette Player?
    • M
      Miss Karen EdwardsAug 31, 2025
      If high frequencies are emphasized on your Pioneer Cassette Player, it could be because a Dolby NR-encoded tape is being played back with the DOLBY NR switch in the OFF position. Set the DOLBY NR (B/C) switch to the same position used for recording.
  • D
    Danny CookSep 4, 2025
    Why doesn't the music search function work on my Pioneer CT-W208R?
    • M
      martinezdaleSep 4, 2025
      If the music search function isn't working on your Pioneer Cassette Player, it might be because the blanks between selections are less than 4 seconds long. Use a tape with blanks more than 4 seconds long.
  • M
    Mary SotoSep 7, 2025
    What to do if I cannot use the remote control system on my Pioneer CT-W208R?
    • S
      Sandra ScottSep 7, 2025
      If you cannot use the remote control system with your Pioneer Cassette Player, the remote control cord may not be connected. Connect the remote control cord.

Summary

1. SAFETY INFORMATION

1. SAFETY PRECAUTIONS

Checks for customer and service technician protection, including leakage current measurement.

2. PRODUCT SAFETY NOTICE

Highlights special safety characteristics of electrical/mechanical parts and risks of using substitute components.

2. EXPLODED VIEWS AND PARTS LIST

2.1 PACKING

Details parts related to product packaging, including diagrams and lists.

(2) CONTRAST TABLE

Compares parts across different model types (KUXJ, KCXJ, HYXJ, HVXJ).

2.2 EXTERIOR

(1) EXTERIOR PARTS LIST

Lists and identifies external parts of the CT-W208R with their part numbers.

(2) CONTRAST TABLE

Compares external parts across different model types (KUXJ, KCXJ, HYXJ, HVXJ).

2.3 FRONT PANEL SECTION

(1) FRONT PANEL SECTION PARTS LIST

Lists and identifies parts for the front panel section of the CT-W208R.

(2) CONTRAST TABLE

Compares front panel parts across different model types (KUXJ, KCXJ, HYXJ, HVXJ).

2.4 MECHANISM SECTION

MECHANISM UNIT PARTS LIST

Lists and identifies all parts for the mechanism units of the CT-W208R.

3. BLOCK DIAGRAM AND SCHEMATIC DIAGRAM

3.1 BLOCK DIAGRAM

Provides a high-level overview of the CT-W208R's internal components and their interconnections.

Main Unit Schematic (Part 1)

3.2 OVERALL WIRING DIAGRAM

3.3 MAIN UNIT (1;2) Schematic

3.4 MAIN UNIT (2;2) Schematic

Subb Unit Schematic

4. PCB CONNECTION DIAGRAM

A Main Unit PCB Diagram

Illustrates the PCB layout and component connections for the Main Unit.

4.2 SUBB UNIT

B SUBB UNIT PCB Diagram

Shows PCB layout and component connections for the Subb Unit.

4.3 TRN 2 UNIT and POWER SW UNIT

D POWER SW UNIT Diagram

Diagram showing the Power SW Unit and its connection to the AC power cord.

C TRN 2 UNIT Diagram

Diagram showing the TRN 2 Unit.

5. PCB PARTS LIST

LIST OF HOLE PCB ASSEMBLIES

Lists the part numbers for various PCB assemblies across different models.

CONTRAST OF PCB ASSEMBLIES

Compares part number variations for PCB assemblies across different model types.

Main Unit Component Details (KUXJ)

Subb Unit Component Details (RWZ4353)

6. ADJUSTMENT

6.1 Door Damping Check and Adjustment

Procedure for checking and adjusting the door spring tension for proper damping.

6.2 Tape Speed Adjustment

Procedure for adjusting tape speed using test mode and specific test tapes.

6.3 Electrical Adjustment Conditions

Specifies conditions and lists electrical adjustments for playback and recording.

6.4 Playback Section Adjustments

Details Head Azimuth and Playback Level adjustments for both decks.

6.5 Bias Oscillator Adjustment

Procedure for adjusting the bias oscillator frequency for recording.

6.6 Recording Bias Adjustment

Procedure for adjusting recording bias using test tapes and signals.

6.7 Recording Level Adjustment

Procedure for setting the recording level for optimal playback.

6.8 Recording Frequency Characteristics Confirmation

Procedure to check frequency response during recording and playback.

6.9 Adjustment and Measurement Points

Diagrams showing specific points for adjustment and measurement on the Main Unit.

7. GENERAL INFORMATION

7.1 DIAGNOSIS

Provides diagnostic information.

7.1.1 POWER ON SEQUENCE

Flowchart detailing the sequence of operations when the unit is powered on.

7.2 PARTS

7.2.1 IC

Lists IC part numbers and their pin functions for the u-COM IC (PD5351A).

8. PANEL FACILITIES AND SPECIFICATIONS

PANEL FACILITIES

Diagram and explanation of the front panel controls and their functions.

SPECIFICATIONS

Pioneer CT-W208R Specifications

Audio System IconAudio System
wow and flutter0.09% (WRMS)
wow and flutter (DIN)±0.19%
frequency response (TYPE IV tape)20 to 16, 500 Hz
frequency response (TYPE II tape)20 to 16, 000 Hz
frequency response (TYPE I tape)20 to 16, 000 Hz
signal-to-noise ratio (Dolby NR OFF)More than 57 dB
noise reduction effect (Dolby B-type NR ON)More than 10 dB (at 5 kHz)
noise reduction effect (Dolby C-type NR ON)More than 19 dB (at 5 kHz)
harmonic distortionNo more than 0.8% (at –4 dB: 160 nwb/m)
Power IconPower
power requirements (U.K. and Australian models)AC 230 ~ 240 volts, 50/60 Hz
power requirements (U.S. model)AC 120 V, 60 Hz
power consumption16 W
Weight and Dimensions IconWeight and Dimensions
dimensions420 (W) x 125 (H) x 250 (D) mm
dimensions (inches)16 - 9/16 (W) x 4 - 7/8 (H) x 9 - 13/16 (D) in.
weight (U.K. and Australian models)3.9 kg (8 lb 10 oz)
weight (U.S. model)3.8 kg (8 lb 6 oz)

Related product manuals