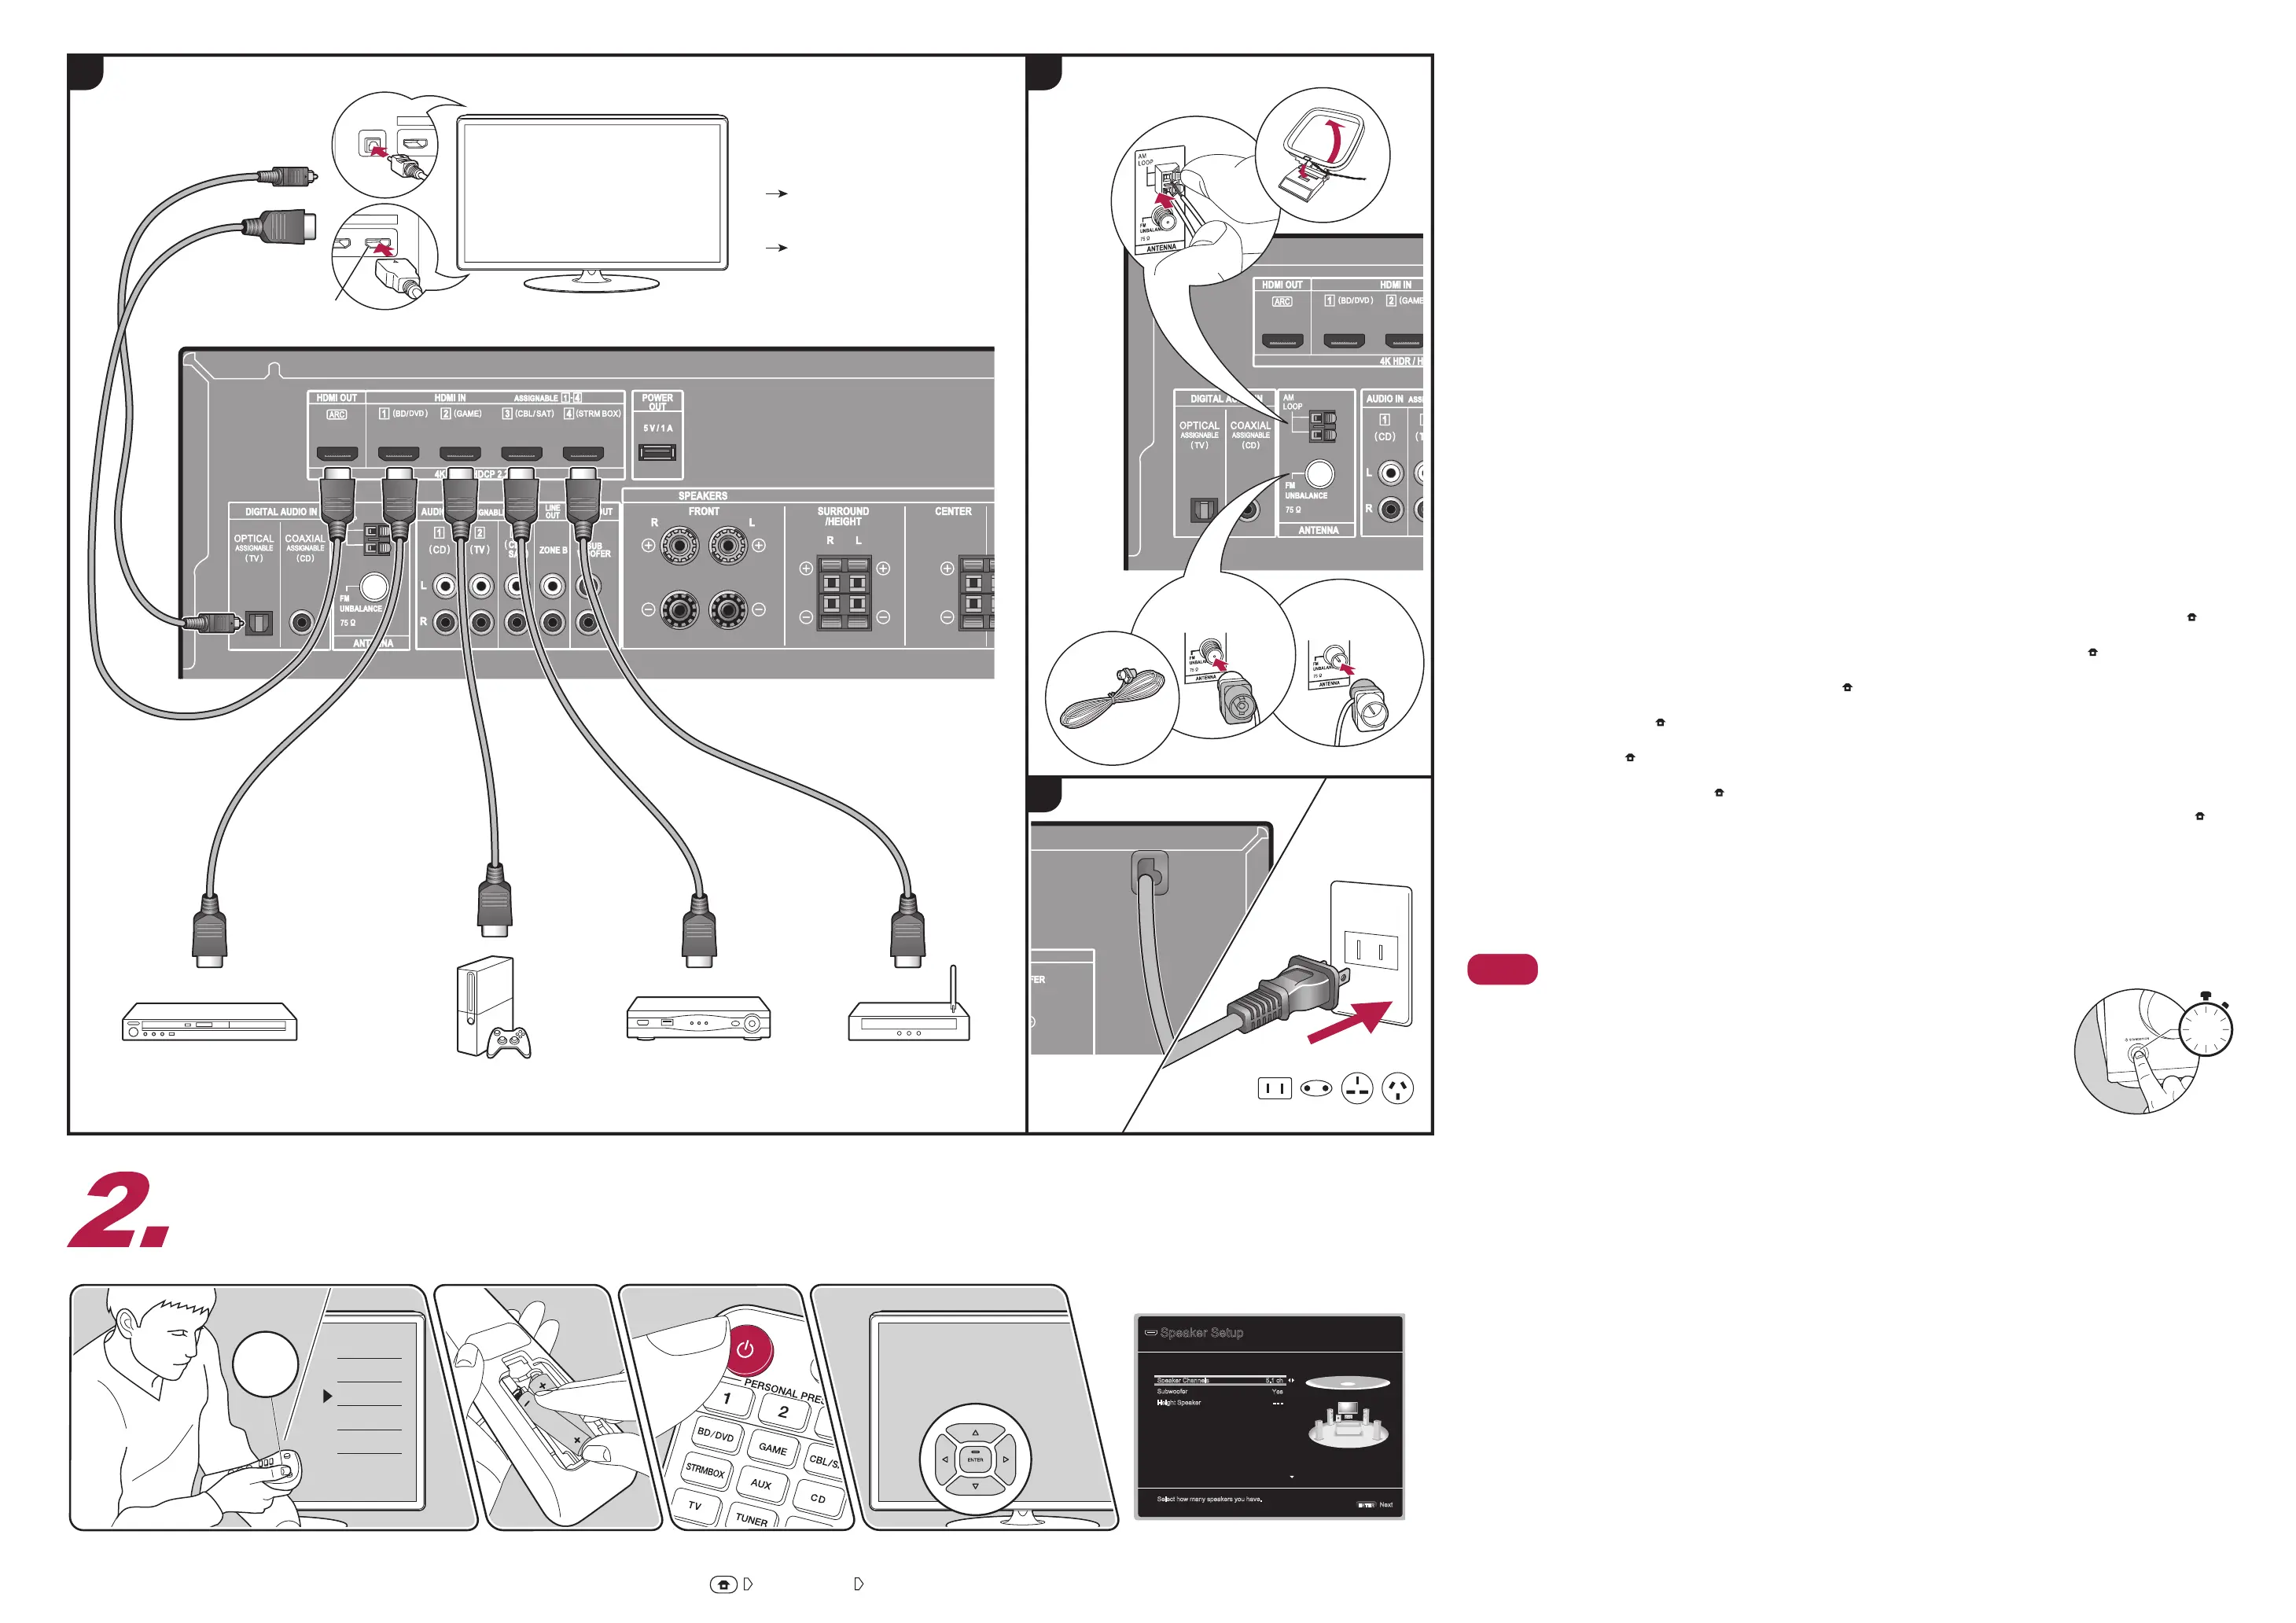
BD/DVD Cable/Satellite set-top box
Streaming
media playerGAME
ARC TV
c
Non-ARC TV
c + d
d
ARC
c
*4
6
Initial Setup with Auto Start-up Wizard
Conguration avec l'assistant de démarrage automatique / Conguración con el asistente de arranque automático / Setup con installazione guidata / Einrichtung mit dem
automatischen Startup-Assistenten / Instellen met Automatische Opstart Wizard / Grundinställning med den automatiska startguiden
Inputs
TV
HDMI 1
HDMI 2
HDMI 3
Speaker Setup
Speaker Channels
Subwoofer
Height Speaker
Select how many speakers you have.
Next
5.1 ch
Yes
- - -
ENTER
TV’s REMOTE
*5
*6
To redo the initial setup / Pour refaire la conguration initiale / Para rehacer la conguración inicial / Per ripetere l'Initial Setup / Erneutes Vornehmen
der ersten Einrichtung (Initial Setup) / Opnieuw uitvoeren van Initial Setup / Att göra om Initial Setup
"6. Miscellaneous"
"3.Initial Setup"
c HDMI cable
d Digital optical cable
(North American
models)
(European,
Australian and
Asian models)
*
1
En : The speakers may also be attached to the wall using the holes provided on the rear. Request installation from a professional. For details, see the
instruction manual. / Fr : Les enceintes peuvent également être xées au mur à l’aide des trous présents à l’arrière. Faites une demande d’installation auprès
d’un professionnel. Pour plus de détails, lisez le mode d’emploi. / Es : Los altavoces también pueden colocarse en la pared utilizando los oricios de la parte
trasera. Solicite la instalación a un profesional. Para más información, consulte el manual de instrucciones. / It : I diffusori possono essere ssati alla parete
anche usando i fori sul retro. Richiedere l’installazione da parte di un professionista. Per informazioni, vedere il manuale di istruzioni. / De : Die Lautsprecher
können auch an der Wand befestigt werden. Verwenden Sie dazu die Löcher auf der Rückseite. Lassen Sie die Installation von einem Fachmann ausführen.
Einzelheiten nden Sie in der Bedienungsanleitung. / Nl : De luidsprekers kunnen ook aan de muur bevestigd worden met gebruik van de gaten op de
achterkant. Vereist installatie door een professionele installateur. Zie voor details de gebruiksaanwijzing. / Sv : Högtalarna kan också fästas på väggen med
hjälp av hålen som nns på baksidan. Begär installation av en fackman. Mer information nns i instruktionsboken.
*
2
En : Stick the supplied non-skid pads on the four corners of the bases of the front speakers, center speaker, and surround speakers. / Fr : Fixez les
coussinets antidérapants fournis aux quatre coins des bases des enceintes avant, de l’enceinte centrale et des enceintes surround. / Es : Pegue las
almohadillas antideslizantes suministradas en las cuatro esquinas de las bases de los altavoces delanteros, el altavoz central y los altavoces envolventes. / It
: Fissare i feltrini antiscivolo in dotazione ai quattro angoli delle basi dei diffusori anteriori, del diffusore centrale e dei diffusori surround. / De : Bringen Sie die
mitgelieferten Antirutsch-Pads an den vier Ecken der Bodenplatten der Frontlautsprecher, der Center-Lautsprecher und der Surround-Lautsprecher an. / Nl :
Plak de bijgeleverde antislip-laagjes op de vier hoeken van de basis van de voorluidsprekers, de middenluidsprekers en de surroundluidsprekers. / Sv : Sätt
fast de medföljande halkfria fötterna i de fyra hörnen på fronthögtalarens, centerhögtalarens och surroundhögtalarnas undersida.
*
3
En : Connect so that the exposed wires at the ends of the speaker cables do not stick out of the speaker terminals. The unit can be damaged if the exposed
wires of the speakers touch the rear panel or the + and - wires touch each other. / Fr : Branchez de façon à ce que les ls dénudés à l’extrémité des câbles
d’enceinte ne sortent pas des bornes de l’enceinte. L’appareil peut être endommagé si les ls dénudés des enceintes entrent en contact avec le panneau
arrière ou si les ls + et - se touchent. / Es : Conecte de modo que los hilos expuestos de los extremos de los cables de los altavoces no sobresalgan de
los terminales de los altavoces. La unidad podría sufrir daños si los cables expuestos de los altavoces tocan el panel trasero o los cables + y - se tocan
entre sí. / It : Effettuare il collegamento in modo che i conduttori spellati all’estremità dei cavi dei diffusori non fuoriescano dai terminali dei diffusori. L’unità
può subire danni se i conduttori spellati dei cavi dei diffusori toccano il pannello posteriore o se i conduttori + e - entrano in contatto. / De : Nehmen Sie den
Anschluss so vor, dass die Drahtenden der Lautsprecherkabel nicht aus den Lautsprecherklemmen herausragen. Wenn die freiliegenden Lautsprecherdrähte
die Geräterückwand berühren oder das (+)- und das (-)-Kabel einander berühren, kann es zu einer Beschädigung des Gerätes kommen. / Nl : Breng de
verbinding zo tot stand dat de blootgesteld draden aan de uiteinden van de luidsprekerkabels niet uit de luidsprekeraansluitingen naar buiten steken. Het
toestel kan beschadigd raken als de blootgestelde draden van de luidsprekers het achterpaneel raken of als de + en - draden elkaar raken. / Sv : Anslut så
att högtalarkablarnas oskyddade kabeländar inte sticker ut ur högtalaruttagen. Apparaten kan skadas om de oskyddade högtalarkablarna rör vid den bakre
panelen eller om kablarna för + och - rör vid varandra.
*
4
En : If it is an ARC TV, connect to the ARC compatible input jack on the TV.
Settings are required to use the ARC function. Select "Yes" for "ARC Setup" in
"Initial Setup".
/
Fr :
S’il s’agit d’un TV ARC, branchez la prise compatible ARC du téléviseur.
Des réglages sont nécessaires pour utiliser la fonctionnalité
ARC. Sélectionnez "Yes" pour "ARC Setup" dans "Initial Setup".
/
Es :
Si se trata de un TV ARC, conecte al conector de entrada compatible con ARC del TV.
Para usar la función ARC se requieren algunos ajustes. Seleccione "Yes" para "ARC Setup" en la "Initial Setup".
/
It :
Se si tratta di una TV ARC, effettuare
il collegamento al terminale di ingresso compatibile con ARC del televisore.
Per utilizzare la funzione ARC è necessario effettuare alcune impostazioni.
Selezionare "Yes" per "ARC Setup" in "Initial Setup".
/
De :
Bei ARC-Fernsehern stellen Sie eine Verbindung mit der ARC-kompatiblen Eingangsbuchse des
Fernsehers her.
Es sind bestimmte Einstellungen erforderlich, um die ARC-Funktion zu verwenden. Wählen Sie "Yes" für "ARC Setup" beim "Initial Setup".
/
Nl :
Als het een ARC TV is, maak dan verbinding met de ARC-compatibele ingangsaansluiting op de TV.
Voor het gebruik van de ARC-functie zijn bepaalde
instellingen vereist. Selecteer "Yes" voor "ARC Setup" in "Initial Setup".
/
Sv :
Om det är en ARC-tv, ansluter du till den ARC-kompatibla ingången på tv:n.
Det
krävs att du gör inställningar för att använda ARC-funktionen. Välj "Yes" för "ARC Setup" i "Initial Setup".
*
5
En : Switch the input on the TV to that assigned to the unit. Follow the guidance displayed on the screen to complete Initial Setup. If you selected "No, Skip"
for "ARC Setup" in the Initial Setup, to enable HDMI CEC and HDMI Standby Through function, after completing Initial Setup, you will need to press
on the
remote controller and make the settings in "5. Hardware" - "1. HDMI". / Fr : Réglez l’entrée du téléviseur sur celle assignée à l’appareil. Suivez les instructions
afchées sur l’écran pour terminer la Conguration initiale. Si vous sélectionnez "No, Skip" pour "ARC Setup" dans la Conguration initiale, pour activer
la fonction HDMI CEC et HDMI Standby Through, une fois la Conguration initiale terminée, vous devrez appuyer sur la touche
de la télécommande
et effectuer les réglages dans "5. Hardware" - "1. HDMI". / Es : Cambie la entrada en la TV a aquella asignada a la unidad. Siga la guía mostrada en la
pantalla para completar la conguración inicial. Si seleccionó "No, Skip" para "ARC Setup" en la conguración inicial, para activar la función HDMI CEC y
HDMI Standby Through, tras completar la conguración inicial deberá pulsar en el mando a distancia y realizar los ajustes de "5. Hardware" - "1. HDMI".
/ It : Spostare l’ingresso sul televisore a quello assegnato all’unità. Seguire la guida visualizzata sullo schermo del televisore per completare Initial Setup.
Se è stato selezionato "No, Skip" per "ARC Setup" in Initial Setup, per abilitare la funzione HDMI CEC e HDMI Standby Through, dopo aver completato
Initial Setup, sarà necessario premere
sul telecomando ed effettuare le impostazioni in "5. Hardware" - "1. HDMI". / De : Schalten Sie den Eingang des
Fernsehers auf denjenigen, der mit dem Gerät belegt ist. Folgen Sie den Anweisungen auf dem Bildschirm, um die Ersteinrichtung abzuschließen. Wenn Sie
bei der Ersteinrichtung "No, Skip" für "ARC Setup" ausgewählt haben, müssen Sie zur Aktivierung der Funktionen HDMI CEC und HDMI Standby Through
an der Fernbedienung die Taste
drücken und die Einstellungen in folgendem Menü vornehmen: "5. Hardware" - "1. HDMI". / Nl : Schakel de ingang op
de TV naar die is toegewezen aan de unit. Volg de aanwijzingen die op het scherm weergegeven worden om de begininstelling te voltooien. Als u "No, Skip"
voor "ARC Setup" in de begininstelling geselecteerd had, om de HDMI CEC en de HDMI Standby Through functie in te schakelen, dient u na het voltooien
van de begininstelling op de afstandsbediening op
te drukken en de instellingen te maken in "5. Hardware" - "1. HDMI". / Sv : Växla ingångskällan på
TV:n till den som har tilldelats enheten. Följ anvisningarna som visas på skärmen för att slutföra grundinställningarna. Om du valde "No, Skip" i "ARC Setup"
i grundinställningarna måste du, för att aktivera HDMI CEC och HDMI Standby Through-funktionen efter att ha slutfört grundinställningarna, trycka på
på
fjärrkontrollen och göra inställningarna i "5. Hardware" - "1. HDMI".
*
6
En : If all supplied speaker systems are to be connected, there is no need to change any settings in "Speaker Setup". / Fr : Si tous les systèmes d’enceintes
doivent être raccordés, il n’est pas nécessaire de changer des paramètres dans "Speaker Setup". / Es : Si se van a conectar todos los sistemas de altavoces
suministrados, no es necesario cambiar ningún ajuste en "Speaker Setup". / It : Se vengono collegati tutti i diffusori in dotazione, non è necessario modicare
le impostazioni in "Speaker Setup". / De : Wenn alle mitgelieferten Lautsprechersysteme angeschlossen werden sollen, sind Änderungen an Einstellungen
in "Speaker Setup" nicht erforderlich. / Nl : Als alle meegeleverde luidsprekersystemen verbonden moeten worden, is het niet nodig om enige instelling in
"Speaker Setup" te wijzigen. / Sv : Om alla medföljande högtalarsystem ska anslutas, nns det ingen anledning av ändra några inställningar i "Speaker
Setup".
When the unit is operating erratically
Lorsque l'appareil fonctionne de façon irrégulière / Cuando el funcionamiento de la unidad sea
errático / Quando l'unità non funziona correttamente / Erratische Gerätefunktionsweise / Als het
toestel verkeerd werkt / När enheten fungerar på felaktigt sätt
En : If operation becomes unstable, try restarting the unit. Set the unit to standby, then press and hold
STANDBY/ON on the main unit
for 5 seconds or more. / Fr : Si le fonctionnement devient instable, essayez de redémarrer l’appareil. Mettez l’appareil en mode veille, puis
appuyez sur la touche
STANDBY/ON de l’appareil principal pendant au moins 5 secondes. / Es : Si el funcionamiento se vuelve inestable,
pruebe a reiniciar la unidad. Ajuste la unidad en el modo de espera y después mantenga pulsado
STANDBY/ON en la unidad principal
durante 5 segundos o más. / It : Se il funzionamento diventa instabile, provare a riavviare l’unità. Impostare l’unità in standby, quindi tenere
premuto
STANDBY/ON sull’unità principale per almeno 5 secondi. / De : Bei instabilem Betrieb starten Sie das Gerät neu. Schalten Sie
das Gerät in den Standby-Modus und halten Sie dann
STANDBY/ON am Hauptgerät mindestens 5 Sekunden lang gedrückt. / Nl : Als de werking instabiel wordt, probeer het toestel
dan te herstarten. Zet het toestel op stand-by, druk vervolgens 5 seconden of langer op het hoofdtoestel op
STANDBY/ON. / Sv : Om funktionen inte är stabil, försök att starta om
apparaten. Ställ in apparaten i standby, tryck sedan på och håll kvar
STANDBY/ON på huvudapparaten i 5 sekunder eller mer.
En : If restarting doesn’t x the problem, try unplugging the power cord and HDMI cables then replugging them in again, initializing settings (with the unit ON, while pressing AUTO/
DIRECT on the main unit, press
STANDBY/ON.), and trying Firmware Update. / Fr : Si le redémarrage de règle pas le problème, essayez de débrancher le cordon d’alimentation
et les câbles HDMI puis de les rebrancher, paramères d’initialisation (avec l’appareil en marche, tout en appuyant sur la touche AUTO/DIRECT de l’appareil principal, appuyez sur
STANDBY/ON.), et essayez la Mise àjour du micrologiciel. / Es : Si reiniciar la unidad no soluciona el problema, pruebe a desconectar el cable de alimentación y los cables HDMI y
volverlos a conectar, a ajustar de inicialización (cuando la unidad se encuentra en ON, mientras pulsa AUTO/DIRECT en la unidad principal, pulse
STANDBY/ON.), y a actualizar
el rmware.
/
It : Se il riavvio non risolve il problema, provare a scollegare il cavo di alimentazione elettrica ed i cavi HDMI e quindi a ricollegarli, inizializzazione delle impostazioni
(Con l’unità accesa, tenendo premuto AUTO/DIRECT sull’unità principale, premere
STANDBY/ON. ), e tentare l’aggiornamento del rmware. / De : Ist das Problem nach dem
Neustart nicht behoben, trennen Sie Netz- und HDMI-Kabel ab, schließen die Kabel wieder an, Initialisieren der Einstellungen (Halten Sie bei eingeschaltetem Gerät AUTO/DIRECT
am Hauptgerät gedrückt und drücken Sie
STANDBY/ON.) und aktualisieren ggf. die Firmware. / Nl : Als het herstarten het probleem niet verhelpt, probeer het netsnoer en de HDMI-
kabels dan af en weer aan te sluiten, initialiseren van de instellingen (Terwijl u met het toestel op ON op het hoofdtoestel op AUTO/DIRECT drukt, drukt u op
STANDBY/ON.) en
probeer een Firmware Update. / Sv : Om problemet inte försvinner när du startar om, försök att dra ur nätkabeln och HDMI-kablarna och sätt sedan i dem igen. Initiera inställningarna (När
apparaten är ON trycker du på
STANDBY/ON medan du trycker på AUTO/DIRECT på huvudapparaten.) och försök uppdatera det fasta programmet.
5"
“Pioneer” is a trademark of Pioneer Corporation, and is used under license.
SN29403521_HTP-076_QSG_U7.indd 2 2019/02/13 10:52:53

 Loading...