Once the location of your foodplot is determined, you are ready
to begin preparing the soil for planting. You should always
mow, spray with herbicide, or use other techniques to remove
unwanted grasses and vegetation prior to discing or plowing
the soil. This step will eliminate competition between wanted
and unwanted plants. Reduction of vegetation will also improve
discing and plowing, taking less time and doing a better job.
Having some soil moisture will also increase discing and
plowing capabilities.
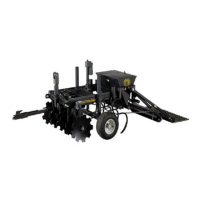
Aggressiveness of cut will vary depending on soil type. There
are also four depth adjustments on the plow attachment. For
normal cut, we use the second hole from the bottom. If soil is
hard, you may want to put more pressure on the plow tips.
More pressure can be added by dropping the plows and using
the third or fourth adjustment holes. If you have really hard
soils, we suggest putting the disc in the third position and using
the chisel plow points on the plow attachment. The chisel plow
points will dig down easier to break-up hard soils. If vegetation
is clogging up the plow attachments you may want to use the
chisel points, since they are narrow they will let more debris
pass through. In grown up areas where mowing is not possible,
the second and fourth plow tines can be removed and build-up
should not occur. The plow attachment may also be completely
removed when only discing is required.
While preparing the soils for planting, the cultipacker should
be in the raised position. When plowing hard soils, the
cultipacker, filled with sand, will add extra weight directly over
the disc, further helping the PLOTMASTER™ cut those hard
soils.