15
Replacing Camera Back, Backplate (Holder Frame) and Hand Strap
Note: To reassemble or replace parts and sub-assemblies, do the Disassembly or
Removal steps in reverse order, unless noted otherwise.
Disassembling/Reassembling of Sub-Assemblies
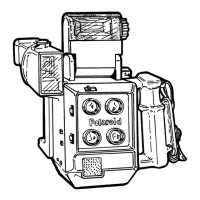
Viewfinder and Hot Shoe (Figures 3-4 through 3-6)
Notes: • Camera Back and Backplate must first be removed. (Refer to the Removing/
Replacing procedure in this Section.
• If you expect to service optical elements, wear lintless gloves to keep
fingerprints off lenses.
1. To release the Eyecup, pull out its edges from the mounting channels on the
Viewfinder body. (On reassembly, note that the narrower width of the Eyecup is at
the top.)
2. To remove the Object Frame (Figure 3-4), first note the locking tab at the bottom of
the Frame. To release this tab and the Frame from the Camera Body, tilt the body
face down and look inside at the area at the base of the metal post. The Object
Frame locking tab can just be seen protruding into the Camera Body.
With a small, flat blade tool between the end of the tab and the metal post, gently
release this locking tab and push it up through the Camera Body.
3. Now the Object Frame can be lifted straight up and off the Viewfinder housing.
(Note the second tab at the top of the object Frame, which fits into the slot at the
front of the Viewfinder Cover.)
 Loading...