Installation Guide http://www.autostart.ca/ P. 5
Multi-speed Tach Programming
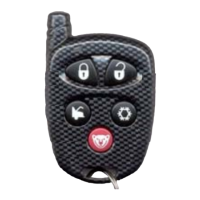
1. Enter programming mode (see on page 2) the parking lights will stay on for up to 20 seconds.
2. Before the lights go out, press and hold the brake pedal and press the LOCK and UNLOCK buttons
simultaneously the parking lights will flash 4 times. At that point, release the brake pedal. Note: For
vehicles that require the ignition to be turned ON to activate the brake, follow these steps:
a) Turn the ignition ON; The parking lights will turn OFF
b) After 4 seconds the parking lights will turn ON and then press the brake.
3. Start up the engine and allow the vehicle to reach regular engine idle speed.
4. Once the engine is running at normal idle speed, press the brake pedal and keep it down until you hear the
parking lights output click 5 times.
5. Release the brake pedal the tach programming is now complete.
Horn Honk Timing adjustment
1. Enter programming mode
2. Press and hold the brake pedal, then simultaneously press the UNLOCK and START/STOP buttons
the horn will chirp 5 times. Note: For vehicles that require the ignition to be turned ON to activate the
brake, follow these steps:
a. Turn the ignition ON; The parking lights will turn OFF
b. After 4 seconds the parking lights will turn ON and then press the brake.
3. Release the brake pedal.
4. To change the timing:
To increase the Horn pulse by 3 ms, press the LOCK button.
To decrease the pulse by 3 ms, press the UNLOCK button.
To increase the pulse by 10 ms, press the START button.
To decrease the pulse by 10 ms, press the TRUNK button.
5. To save the new settings: press LOCK and UNLOCK. If 3 chirps are returned, the new settings have
been saved.
P. 8 http://www.autostart.ca Installation Guide
Programming the transponder
This feature will be very useful especially in manual transmission vehicles. Upon using the data cable between the bypass and
the remote starter it is impossible to trigger the bypass “Out When Running” wire since the information is sent by data from the
remote starter. Now with this learning procedure the remote start will automatically generate the ignition, 2
nd
ignition and
accessory and “Out When Running” signal upon request.
1. Turn ignition ON/OFF 5 times, to access Valet Mode;
x The LED on the antenna will stay ON to confirm that the system has successfully
entered Valet mode
2. Learn the first key, learn the second key then keep the Ignition ON.
3. Press and hold the brake and then press
.
1*
x The parking lights will turn ON confirming the accessing of the “Transponder learn
mode”
4. Release the brake and then turn the Ignition OFF.
2*
x The parking lights will turn OFF.
x There will be a delay of 3 seconds before the remote starter activates IGN, ACC, 5
th
relay and Ground Out for up to 5 minutes.
5. To immediately exit the “Transponder Learning Mode”, press and release the Brake.
1) Warning! If the button is not pressed within 5seconds, the system will automatically
exit the “Transponder learn mode”. To return to “Transponder learn mode”, the system must be put out of valet
mode by turning the ignition ON/OFF 5 times and then repeat the steps from step#1.
2) Warning! If the IGN is not turned OFF within 5 seconds, the system will automatically exit
the “Transponder learn mode”. To return to “Transponder learn mode”, the system must be put out of valet mode
by turning the ignition ON/OFF 5 times and then repeat the steps from step#1.
Note: For diesel vehicles, the Glow plug wire must be left unconnected when doing the “Transponder learn
mode”.
 Loading...