1. Battery Access
& User Controls
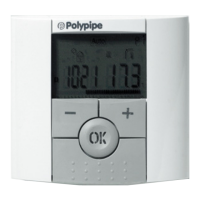
1.1 Keyboard
1.2 Display & LED
1 Current day of the week: 1 = Monday
2 Operating menu (active mode is framed)
3 Program number or parameter
4 Installer menu
5 Type of sensor used and temperature displayed
6 Heating demand indication
7 Low batteries indicator
8 °C or °F indicator
9 Setting or measured temperature
10 Temporary override activated, or “ITCS” function if blinking
11 Time
12 Program of the current day (the current time bare/blink)
13 Pictogram for programming
14 Key lock indicator
2. First Time Installation
This section will guide you to starting your thermostat for the
first time.
2.1 Installing Batteries
- Open the two side covers and insert the 2 x AAA alkaline
batteries supplied (or remove the small protection sticker if the
batteries are already installed in the compartment).
- Close the two side covers
- Your thermostat will ask you to set the time
- Note: The time and date setting can be set at any time by
pressing the
(
•
) program key
Navigation key left ( )
Navigation key right (
)
Escape key (
)
Program key (
•
)
Minus
key (-)
Plus
key (+)
Validation
key (OK)
Status
LED
Red on: Heating demand
Green flash: Attention
Red flash: Error (batteries, sensor...)
04