Charging your remote handset:
Your remote handset can be used for up to 5 rounds of golf on a single charge depending on use and duration. For
optimum performance and prolonging the life of the battery, we recommend charging after every use.
To charge the handset:
1. Plug the supplied mini-USB cable into a powered USB port on laptop, phone charger or trolley. Always check the
manufacturers information before use.
2. Plug in the handset to begin charging.
3. The LED on the remote will illuminate red to indicate charging.
4. The charging time will range up to 5 hours depending on the level of discharge.
5. Once the charging process is complete, the LED will turn to green.
6. Unplug the handset once fully charged.
Avoid leaving the handset plugged in, on charge beyond 5 hours.
Please note:
• The remote can be charged during the round using the USB port on the underside of the handle. This will use
power from the trolley battery.
• Please charge the remote using the charging cable supplied. Other cables may cause damage.
2
1
4
3
5
6
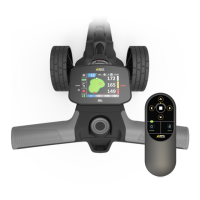
LED
The Remote Control features of the trolley are listed below:
1. POWER/PAIR BUTTON:
• Press to tun handset on. The LED will ash Green.
• Press to turn o handset. The LED will ash Red.
• Press and Hold during pairing process. See Section 13 for pairing
instructions.
2. FORWARD ARROW:
• Press to move the trolley forward.
• Press to increase speed.
• Press and hold for increased acceleration.
3. BACK ARROW:
• Press to decrease speed when trolley moving in a forward
direction. (Press and Hold to increase the reduction in speed)
• Press and Hold to reverse the trolley.
Note: There is no steering function when reversing the trolley.
The trolley will stop when the button is released.
4. LEFT AND RIGHT ARROWS:
• Press and Release quickly when the trolley is moving forwards to
make small course corrections.
• Press for a longer duration when moving forwards to make a
larger course correction.
• Press and Hold when stationary will turn the trolley on the spot.
Note: a continuous Press and Hold when the trolley is moving
forwards will cause the trolley to turn on the spot. Once the
button has been released, the trolley will continue on its new
heading and accelerate back to the previous speed.
5. STOP BUTTON:
• Press the button to bring the trolley to a gentle stop.
• Press and hold to bring to an abrupt Emergency stop.
Note: the Emergency stop should only be used when required.
Continuous use could cause accelerated wear to the drive
system.
6. LOCK BUTTON:
• Press to lock the handset. The LED will ash Red.
• Press to unlock the handset. The LED will ash Green.
Note: when the handset is locked and a button is pressed, the
LED will ash Red.
 Loading...