SECTION 2
INSTALLATION AND OPERATION
2.1
UNPACKING AND INSPECTION
This
instrument
is
ready for operation as shipped from the factory.
After
unpacking
inspect
for damage
that
might
have occured in transit.
2.2 PRELIMINARY PROCEDURES
2.2.1
Set the AC
switch
to
the OFF
position
and
connect
the line cord
to
an appropriate
source
of
AC power.
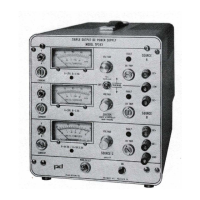
2.2.2 Rotate the Current, Voltage and Crowbar
controls
on all three sources
fully
clockwise.
2.2.3 Select the mode
of
operation
of
Source A and Source B by setting the tracking
switch
to
either
TRACKING for master/slave operation (Source A
controls
Source
B)
or
OFF
for individual control.
2.2.4 Set the AC
switch
to
the ON position. The AC lamp should light.
2.2.5 Set all three meter
function
switches
to
the VOLTS position. The three meters should
indicate
output
voltage. Set the desired
output
voltage levels for each source
with
the
Voltage control.
2.2.6 Connect the load
to
the front panel
binding
posts.
2.3 CONSTANT VOLTAGE OPERATION (All Sources)
2.3.1
Voltage
Adjustment
(1)
Rotate the voltage control for each source
fully
counterclockwise.
(2)
Set the AC
switch
to
the
ON
position. The AC
pilot
light
should illuminate.
(3)
Set the meter
function
switches
to
the VOL
TS
position.
(4)
Set the voltage control on each source
to
the desired
output
voltage level.
2.3.2 Current
Limiting
(1)
Set the AC
switch
to
the OFF position.
(2)
Connect a shorting
jumper
across the
output
terminals
of
each source.
(3)
Set the AC
switch
to
the
ON
position.
(4)
Set all three meter
function
switches
to
the AMPS position.
(5)
Set each current control
to
the desired current
limit
level.
(6)
Turn the supply
off
and remove the shorting
jumpers
from the
output
ter-
minals.
-3-