5 - ENG
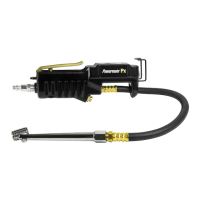
Part Description Qty. Part Description Qty.
L Ination tool 1 R Hanging hook 1
M Air relief valve 1 S LCD Display 1
N Hose 1 T On/Unit/Light Button 1
O Swivel end 1 U Ination lever 1
P Air chuck 1 V Tool retractor hook 1
Q Battery compartment cover 1 W Male connector (In box) 1
Q1 Battery protection strip 1 X Manual 1
L
1 - ENG
Heavy Duty Digital Tire Inflation Tool Instruction Manual
Manuel d’instructions de l’outil de gonflage de pneu numérique
Heavy Duty
Herramienta Digital De Alto Rendimiento Para Inflar Neumáticos
Manual de instrucciones
200-3141, Rev. A, 9/13/18
Read and understand all safety precautions in this manual before operating. Failure
to comply with instructions in this manual could result in personal injury, property damage and/or voiding
of your warranty. The manufacturer WILL NOT be liable for any damage because of failure to follow these
instructions.
Lisez et veillez à bien comprendre toutes les consignes de sécurité de
ce manuel avant d’utiliser l’appareil. Toute dérogation aux instructions contenues dans ce manuel peut
entraîner l’annulation de la garantie, causer des blessures et/ou des dégâts matériels. Le fabricant NE
SAURA être tenu responsable de dommages résultant de l’inobservation de ces instructions.
Lea y comprenda todas las precauciones de seguridad contenidas en este
manual antes de utilizar esta unidad. Si no cumple con las instrucciones de este manual podría ocasionar
lesiones personales, daños a la propiedad y/o la anulación de su garantía. El fabricante NO SERÁ
responsable de ningún daño por no acatar estas instrucciones.
Model No.
P024-0375SP
X
M
N
O
P
Q
R
S
T
U
V
W
Q1
NOTE: Before operating the ination tool for the rst time, pull out the
battery protection strip (Q1) and discard.
PRE-INSTALLATION (cont.)
INSTALLATION
Connecting to the air compressor:
This product is specically designed for compressed air or nitrogen service only. Never use
this tool to measure or dispense oxygen, carbon dioxide, combustible gases, or any other bottled gas.
Always turn compressor OFF, disconnect from power source, and drain all pressure from sys-
tem before servicing.
1. As a standard practice, drain water from the air compressor tank and air lines prior to use each day
(reference your compressor operators manual for detailed instructions).
2. To connect the air supply to the inator (L), connect an air hose (Y) to a compressor that has a quick
connect coupler (Z) on the end.
3. Put thread sealant tape on the male threads of the connector (W) that is supplied with the inflator (L).
Note: Use Teflon® Tape on all threaded connections.
4. Thread the male connector (W) into the end of the inator (L) and tighten using an adjustable wrench.
NOTE: Insert the male connector (W) into the quick connect coupler (Z) and push to lock in place.
Y
To
Compressor
Z W L
Figure 2
Typical Installation
Part Description Part Description
Y Air Hose (not included) W Male Connector (included)
Z Quick Connect Coupler (not included) L Inator (included)