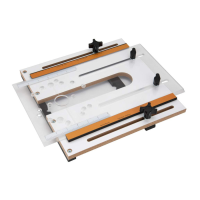
SETTING THE GAUGE TO 90° See Figure 3
NOTE: The Miter Gauge arrives factory calibrated.
For convenience, a Fence (not included) can also be used to verify
perpendicularity to the miter bar.
1. Align both the Miter Gauge Head and Indexer to 0°.
Lock the Adjustment Plunger.
2. Use a square to verify that the miter bar and miter gauge face
are perpendicular.
Figure 3
If not square or requires resetting:
Use the included 3 mm hex wrench to loosen the four screws on
top of the miter head. Back out the two screws on bottom of miter
gauge face. Use a square to set the face perpendicular to the miter
bar. Re-tighten the four screws on the top of the miter gauge. Run
the two screws, on the bottom face of the miter bar, in until they
just touch the miter gauge head. Use a square to verify the face is
still perpendicular and did not shift.
NOTE: Once the miter gauge face is square to the bar, no
other adjustment is required. If by chance the workpiece is not
square, use a square to square the miter gauge face directly to
the blade or follow the instructions supplied with the machine to
square the machine's miter slot to the blade.
FITTING MITER GAUGE TO MITER SLOT
See Figures 4, 5. If the tool is equipped with a T-slotted miter
slot, use the 3mm hex wrench (included) to ensure the screw
holding the miter bar plate is tight. If the tool is not equipped
with a T-slotted miter slot, remove the plate. Save this part.
Figure 4
Place the miter bar into the miter slot on the saw table and
check for side movement. If the miter gauge guide bar moves
freely through the miter slot and has no side-to-side play, no
adjustment isneeded.
If adjustment is needed:
Use the four expansion discs located on the top of the
miter bar to adjust any side movement. Use the 2.5mm hex
wrench (included) to tighten the screws until all side motion
is removed. Turn the screws clockwise to tighten the t and
counterclockwise to loosen the t. Ensure the bar slides freely in
the miter slot.
Figure 5