EasyManua.ls Logo

PowerTec 71845 - User Manual

PowerTec 71845
4 pages
Print Icon
To Next Page IconTo Next Page
Loading...
FOLLOW ALL STANDARD SHOP SAFETY
PRECAUTIONS, INCLUDING:
Keep children and visitors at a safe distance from work area.
Keep work area clean. Cluttered work areas invite accidents.
Work area should be properly lit.
Do not use power tools in dangerous environments. Do not
use power tools in damp or wet locations. Do not expose
power tools to rain.
TURN OFF AND UNPLUG all power tools BEFORE making
any adjustments or changing accessories.
Be alert and think clearly. Never operate power tools when
tired, intoxicated or when taking medications that cause
drowsiness.
Wear proper apparel. Do not wear loose clothing, gloves,
neckties, rings, bracelets or other jewelry which may get
caught in moving parts of the tool.
Wear protective hair covering to contain long hair.
Wear safety shoes with non‑slip soles.
Wear safety glasses complying with United States ANSI
Z87.1. Everyday glasses have only impact resistant lenses.
They are NOT safety glasses.
Wear face mask or dust mask if operation is dusty.
A guard or any other part that is damaged should be properly
repaired or replaced. Do not perform makeshift repairs.
Use safety equipment such as featherboards, push sticks and
push blocks, etc., when appropriate.
Maintain proper footing at all times and do not overreach.
Do not force woodworking tools.
CAUTION
Think safety! Safety is a combination of operator common sense
and alertness at all times when tool is being used.
CAUTION
Do not use the Pocket Hole Jig until completely assembled
and you have read and understood this entire operating
manual and the operating manual of the tool being used with
this Pocket Hole Jig.
SAVE ALL WARNINGS AND INSTRUCTIONS
FOR FUTURE REFERENCE
SAFETY RULES
WARNING
For your own safety, read all of the rules and precautions before
operating tool.
WARNING
Always follow proper operating procedures as dened in this
manual even if you are familiar with use of this Pocket Hole
Jig or any tool used with this Pocket Hole Jig. Remember that
being careless for even a fraction of a second can result in
severe personal injury.
Before using another tool with this product, always read,
understand and follow the instructions and safety warnings in
the owner’s manual for that tool. If you do not have the owner’s
manual, obtain one from the tool’s manufacturer before using it
with this product.
You must be familiar with the use of any tool or accessory
used with this Pocket Hole Jig. The supplier cannot be held
responsible for any accident, injury or damage incurred while
using this Pocket Hole Jig with any tool.
It is the responsibility of the purchaser of this product to ensure
that any person using this product reads and complies with all
instructions and safety precautions outlined in this manual and
the operating manual of the tool being used prior to use.
WARNING
Some dust created by operation of power tool contains
chemicals known to the State of California to cause cancer,
birth defects or other reproductive harm. To reduce your
exposure to these chemicals, work in a well ventilated area and
work with approved safety equipment. Always wear OSHA/
NIOSH approved, properly tting face mask or respirator when
using such tools.
CAUTION
Do not modify or use this Pocket Hole Jig for any application
other than that for which it was designed.
23‑0414
Model No. 71845INSTRUCTION SHEET
Pocket Hole Jig Kit
Question and Answer IconNeed help?

Do you have a question about the PowerTec 71845 and is the answer not in the manual?

Summary

Safety Rules and Precautions

General Safety Rules

Read all rules and precautions before operating the tool.

Proper Operating Procedures

Always follow proper operating procedures, even if familiar with the tool.

Set Up to Drill Pocket Holes

Material Thickness Alignment

Align the material thickness mark on the jig with the material thickness measurement.

Set the Drill Depth Position

Stop Collar and Drill Bit Setup

Slide stop collar onto drill bit, insert into jig, and align with scale marks.

Depth Adjustment Guide

Align stop collar with 1st, 2nd, or 3rd mark based on material thickness.

Drilling Pocket Holes

Drilling Process

Start drilling at slow speed until the stop collar touches the jig edge.

Drilling After Assembly

Drilling Procedure

Start drilling at slow speed until the stop collar touches the jig edge.

Drive Pocket Hole Screws

Screw Length Recommendation

Reference chart for correct screw length based on material thickness.

Overview

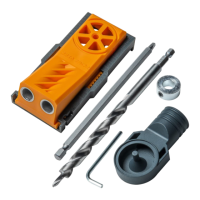
The POWERTEC Pocket Hole Jig Kit, Model No. 71845, is a woodworking tool designed for creating pocket holes, which are angled holes used to join two pieces of wood with screws. This kit facilitates both new construction and the repair or strengthening of existing assemblies like case goods or drawers.

Function Description:

The primary function of the Pocket Hole Jig is to guide a drill bit at a precise angle into a workpiece, creating a pocket hole. This allows for the insertion of a square drive head screw, which pulls the two pieces of material tightly together, forming a strong and concealed joint. The jig is adjustable to accommodate various material thicknesses, ensuring accurate and consistent pocket hole placement. It can be used with or without a dust collector adapter to manage wood chips during drilling.

Important Technical Specifications:

While specific dimensions for the jig itself are not provided, the kit includes a 3/8" drill bit and a 3/8" stop collar, indicating the standard size of the pocket holes it creates. The kit also includes an R2 Driver Bit for driving the specialized square drive head screws. The screws provided in the kit come in various lengths and types:

  • #7-1" L Coarse Square Drive Pan-Head Screws
  • #8-1-1/4"L Coarse Square Drive Washer-Head Screws
  • #8-1-1/2" L Coarse Square Drive Washer-Head Screws
  • #8-2"L Coarse Square Drive Washer-Head Screws
  • #8-2-1/2"L Coarse Square Drive Washer-Head Screws

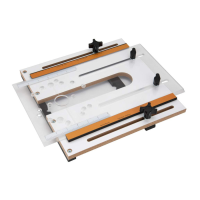
The jig features material thickness alignment marks on its side, allowing for precise adjustment based on the workpiece thickness. These marks include measurements for 1/2", 5/8", 3/4", 7/8", 1", 1-1/8", 1-1/4", 1-3/8", and 1-1/2" material thicknesses. The drill depth position is also adjustable using the stop collar, with alignment marks for material thicknesses less than 7/8", 1" - 1-1/8", and greater than 1-1/4".

Usage Features:

The Pocket Hole Jig is designed for ease of use and versatility.

  • Material Thickness Adjustment: Users measure the material thickness and then slide the body of the Pocket Hole Jig to align its alignment mark with the corresponding measurement on the jig's side. An example shows alignment for 3/4" material thickness.
  • Drill Depth Setting: The 3/8" stop collar is placed on the 3/8" drill bit. The drill bit is then inserted into the jig, and its second step is aligned with one of three scale marks based on the material thickness. The stop collar is then slid to the edge of the jig and tightened with the provided Hex Key.
  • Drilling Pocket Holes (New Construction): The jig is clamped securely to the workpiece. Pocket holes should be placed 5/8" to 1-1/2" from the edge and 6" to 8" apart. The jig has three alignment marks on the front: a middle line for centering between two holes and two side lines for centering a single hole. Drilling is performed at a slow speed until the stop collar touches the jig's edge.
  • Drilling Holes (After Assembly/Repair): For repairing or strengthening existing assemblies, the Pocket Hole Jig body can be removed from its slide bracket. Users scribe a line on the assembled material, reference the "Drilling After Assembly" chart for the required distance from the edge, align the jig's edge to the scribed line, clamp it, and drill the hole.
  • Dust Collector Adapter: The included dust collector adapter snaps onto the top of the jig and can be connected to a dust extractor or collector. It can be rotated over 180° for optimal positioning. If not using the adapter, users must ensure chip ejection holes are not blocked.
  • Screw Length Selection: A "Recommended Screw Length" chart guides users in selecting the appropriate screw length based on material thickness, ranging from 1" for 1/2" and 5/8" material to 2-1/2" for 1-1/2" material. Pan-Head Pocket Screws are recommended for 1/2" material.
  • Driving Screws: The R2 Driver Bit, supplied with the kit, is used to drive the wood screws into the material, completing the joint.

Maintenance Features:

General maintenance for the Pocket Hole Jig focuses on keeping it clean and dry to ensure longevity and reliable performance.

  • Cleaning: The jig should be kept dry, clean, and free from oil and grease. A clean cloth should be used for cleaning.
  • Avoid Harsh Chemicals: Users are warned against using brake fluids, gasoline, petroleum-based products, or strong solvents, as these can damage, weaken, or destroy the plastic components of the jig, potentially leading to serious personal injury.
  • Replacement Parts: When servicing, only identical replacement parts should be used to maintain safety and reliability. All repairs should be performed by a qualified service technician.

The manual emphasizes safety throughout, advising users to read and understand all safety rules and precautions, wear appropriate personal protective equipment (safety glasses, face mask/respirator), secure workpieces, and avoid operating tools when tired or under the influence of medication. It also highlights the importance of understanding the operating manuals for any power tools used in conjunction with the jig.

PowerTec 71845 Specifications

General IconGeneral
BrandPowerTec
Model71845
CategoryTools
LanguageEnglish

Related product manuals