Do you have a question about the PowerTec 71768 and is the answer not in the manual?
Loosen knobs, slide T-bolts into fence slot on miter gauge.
Insert I-Beam Extender, set length, tighten knobs to secure.
Read manual, keep hands clear, power off for adjustments, check clearance.
Unplug machine before attaching fence to prevent accidental startup.
Use only identical replacement parts; repairs by qualified technicians.
Keep fence dry, clean with cloth, avoid solvents to prevent damage.
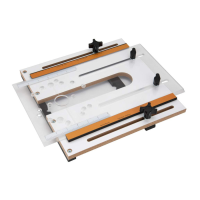
The POWERTEC Telescoping Fence, Model No. 71768, is an accessory designed to enhance precision and versatility when working with woodworking machinery, particularly when used in conjunction with a miter gauge (such as the POWERTEC 71767, sold separately). Its primary function is to provide an adjustable and extendable fence for accurate material positioning and repeatable cuts.
The Telescoping Fence serves as a robust and adjustable guide for workpieces. It features a telescoping design that allows for significant extension, enabling users to handle longer materials or achieve greater cutting capacities. The core of its adjustability lies in the I-Beam Extender with a 3" Fence End, which can be pulled out to a desired length and secured using two Lock Knobs. This extender provides an additional 17" of reach, contributing to a total maximum extension of 34". The I-Beam Extender is versatile, as it can be inserted into either end of the main fence, allowing users to switch its position based on the specific application or workpiece orientation. To change sides, the Lock Knobs are loosened, the 3" Fence End with I-Beam Extender is removed, and then reinserted into the I-beam profile on the opposite end of the fence before tightening the knobs.
A key feature of the fence is its integrated 12" Movable Scale. This scale allows for precise measurement and calibration, aiding in accurate material positioning. When used with a flip stop (sold separately), the scale can be calibrated by aligning the corner edge of the flip stop with the alignment point on the fence, then securing the flip stop's adjustment knob. This ensures repeatable and accurate cuts.
The fence is designed to be installed onto a miter gauge. The installation process involves removing a Fence Lock Knob, loosening two 5/16" Round Knobs on the miter gauge, and sliding the T-bolts of the miter gauge into the slot on the fence. Once the I-Beam Extender with its 3" Fence End is inserted and set to the desired length, the 5/16" Round Knobs on the miter gauge are tightened, and the Fence Lock Knobs are reinserted and tightened to secure the I-Beam Extender in position.
For enhanced functionality, the fence is compatible with a flip stop (sold separately). A flip stop can be inserted by sliding its T-Bolt into the slot on the top of the fence or the 3" Fence End. The arm of the flip stop can then be positioned as needed and secured by tightening its Adjustment Knob, providing a repeatable stop for multiple cuts.