EasyManua.ls Logo

PowerTec 71767 User Manual

PowerTec 71767
4 pages
To Next Page IconTo Next Page
Page #1 background imageLoading...
Page #1 background image
INSTRUCTION SHEET
Precision Miter Gauge
WARNING
For your own safety, read the machine's instruction manual before
using any accessory. Failure to heed these warnings may result in
serious personal injury and damage to the tool and theaccessory.
Before using the Precision Miter Gauge, read and follow all
instructions and safety information provided.
Always keep hands clear of the blade, cutter, sanding disc/belt.
Before making adjustments to the Precision Miter Gauge,
turn off the power, allow the blade, cutter or sanding disc/
belt to come to a complete stop and unplug the machine.
Ensure handle and lock knob are tight beforeusing.
Before turning on the power afteradjustments, ALWAYS verify
there is a safe clearance between the blade and fence.
UNPACKING CONTENTS
NOTE: Check for shipping damage. Check immediately whether
all parts and accessories are included.
ITEM DESCRIPTION QTY
A Miter Gauge
1
B Handle
1
C Washer for Handle
1
D 5/16" Round Knobs
2
E T-Bolt 5/16"-18x3/4"
2
F Extra Expansion Discs (Retain for future use)
4
G M4 Screws (for Expansion Discs)
4
H 3 mm Hex Wrench
1
I 2.5 mm Hex Wrench
1
WARNING
Risk of accidental starting and serious personal injury.
Unplug the machine before attaching the Precision Miter Gauge.
ASSEMBLY Refer to Figures 1, 2
No additional tools needed.
NOTE: This miter gauge is equipped with a Locking Plunger
with spring loaded pin. The most commonly used angles are
notched with positive stops 0°, 15°, 22.5°, 30°, 45° and 60°.
To set or change the angles see TO USE on page 4.
Figure 1
See Figure 2. Place washer onto handle threads and thread the
handle onto the guide bar. Tighten handle.
Figure 2
Model No. 71767
23-0228
Question and Answer IconNeed help?

Do you have a question about the PowerTec 71767 and is the answer not in the manual?

PowerTec 71767 Specifications

General IconGeneral
BrandPowerTec
Model71767
CategoryTools
LanguageEnglish

Summary

Safety Warnings and Precautions

General Safety Instructions

Read manual, keep hands clear of blade, unplug before adjustments, ensure handle tightness, verify clearance.

Unpacking and Contents Check

Verify Parts List

Check for shipping damage and confirm all parts and accessories are included.

Setting the Gauge to 90 Degrees

Perpendicularity Verification

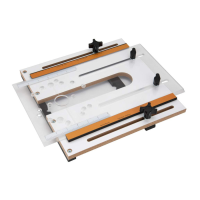
Use a square to check if the miter bar and gauge face are perpendicular to the miter slot.

Resetting for Squareness

Instructions for adjusting screws to make the miter gauge face perpendicular to the miter bar.

Fitting Miter Gauge to Miter Slot

Securing Miter Bar Plate

Tighten the screw holding the miter bar plate for T-slotted miter slots.

Adjusting for Side Movement

Use expansion discs and a hex wrench to eliminate side-to-side play in the miter slot.

Squaring the Miter Gauge Face

Checking Gauge Face Squareness

Verify the miter gauge face is perpendicular to the table using a square.

Adjusting Miter Gauge Face

Use adjustment screws to set the miter gauge face perpendicular to the miter bar.

Installing onto a Fence

Attaching to Fence Slot

Slide T-bolts into the fence slot and tighten knobs to secure the miter gauge.

Using the Precision Miter Gauge

Angle Setting Procedure

Unlock the plunger, maneuver the gauge, and tighten the handle to set angles.

Locking and Unlocking Plunger

Instructions for engaging or disengaging the adjustment plunger for angle locking.

Precise Angle Measurement

Use the protractor scale and vernier markings for accurate angle settings.

General Maintenance and Warnings

Cleaning and Care

Keep the gauge dry and clean using a soft cloth; avoid solvents.

Service and Repairs

Use only identical replacement parts; repairs by qualified technicians.

Related product manuals