page 21
COMMERCIAL PRODUCTS DIVISION
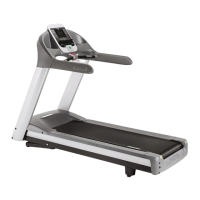
Diagram 20
Display console keypad.
These next few pages provide information that lets you customize the treadmill for
your Club. It is not information that your customer needs or, necessarily, should see.
This section covers the following information about how to:
• determine which language appears on the display
• set maximum speed, workout, and pause times
• design custom programs
• display the odometer and other useful information
• connect to CSAFE compatible devices
Note: If your customers are interested in the learning more about the C956i or
C954i treadmill, you may wish to direct them to the manual available on Precor’s
web site (www.precor.com). (The manual that appears on the web site does not
contain the information found in this section.)
Club Information
CHANGING THE CLUB SETTINGS
The Club “custom” settings are accessed through specific codes that help eliminate
unauthorized access. Refer to Diagram 20 to locate the keys. Information that you
can access and features that can be customized are as follows:
• Language — Choose to display English, German, Spanish or French.
• Units of Measure — Select between U.S. Standard and Metric displays.
• Maximum Speed — Determines the maximum speed that a user can select.
Selections range between 0.5 to 12 mph (1 - 20 kph).
• Maximum Workout Time — Sets a maximum limit on workout time.
Note: Remember that the user will get up to 5 minutes additional cool down time
appended to a completed program. (Refer to
Custom Cool Down
.) So, adjust
the maximum time limit accordingly.
• Maximum Pause Time — Sets the maximum duration in which a person can
“pause” his or her workout.
• Cool Down Time — Sets the duration in which a person can “cool down”
during his or her workout.
• Fitness Test — Provides a Fitness Test for the user when “enabled.”
• Custom Programs 1 and 2 — Provides 2 programs that can be customized
for a specific user or general club purpose.
Numerical pad disabled while in
Club Custom mode.
Note: The CHANGE keys are not shown in this diagram.
Refer to Diagram 21 for its location.
Gently, press and hold the
▼ or ▲
key to view the
available selections.