7220/7221— 07/ 15 — USL Made in China for Prevue Pet Products, Inc., Chicago IL USA www.prevuepet.com 800 243-3624 customerservice@prevuepet.com
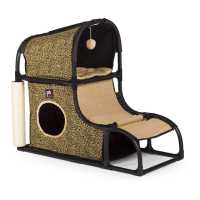
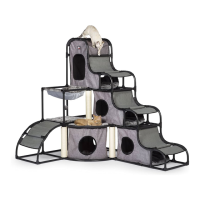
Catville
™
LOFT
Model: #7220 (Leopard) / #7221 (Gray)
read first REVIEW BEFORE ASSEMBLY
• Designed for hand assembly.
No tools required.
•Check regularly to ensure all
components are connected.
• Place finished unit in an area
with room for cats to play and
interact with all features.
For assistance or replacement
parts, please contact Prevue Pet
P
roducts:
PHONE 312.243.3624
ONLINE w
ww.prevuepet.com
EMAIL customerservice@prevuepet.com
very helpful tips
• Loosely lay out all parts for each step.
• Slide tubes into fabric sleeves first—then add connectors.
• Use appropriate force when assembling connectors and tubes
to avoid unnecessary damage.
connectors & parts
4 C
(6pcs)
3 C
(4pcs)
3 S
(6pcs)
A35
Long Tube
(12pcs)
A16
Short Tube
(6pcs)
M1
Plush Mat
(1pcs)
L2
Hideaway
with Ramp
(1pcs)
B40
Long Curved Tube
(2pcs)
B31
Curved Tube
(6pcs)
A1
Sisal Post
(1pcs)
R2
Hideaway
Arch
(1pcs)
3 C
3 S
3 S
3 S
3 C
3 S
3 C
C
3 C
After the base has been
assembled and firmly
tightened, add the vertical
tubes and Sisal post.
1
PARTS NAME QTY
S 3-Way Straight ( 4 )
3 C 3-Way Corner ( 4 )
A35 Long Tube ( 5 )
A16 Short Tube ( 4 )
To form the BASE, you will
need these pieces:
To finish the base, you will
need these pieces:
PARTS NAME QTY
A35 Long Tube ( 1 )
A16 Short Tube ( 2 )
A1 Sisal Post ( 1 )
Lay out the components on the
floor, then begin to assemble,
inserting posts into connectors
to form the base.