Do you have a question about the Prevue Pet Products F075 and is the answer not in the manual?
Assemble the cage body in an upside-down orientation, securing side panels to the front panel with screws.
Secure tray channel rails with long hex screws through the front and back panels, ensuring channels face inwards.
Flip the assembled cage body upright to continue the assembly process.
Install perches, food/water cups, trays, and grilles into the cage for completion.
Attach the roof panel and corner braces, securing it to the cage frame.
Insert cap covers into open frame corners on top and bottom for stability or as footers.
Instructions for connecting cage units using plastic connectors for stacking.
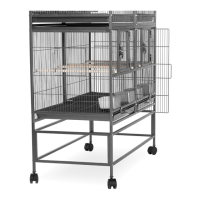
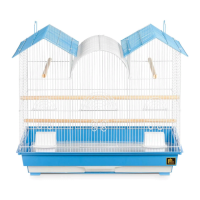
The Prevue Pet Products Hampton Deluxe Divided Flight Breeding Cage, Model # F075, is a versatile and spacious enclosure designed for breeding and housing small birds. Its primary function is to provide a secure and comfortable environment for birds, with the added benefit of a removable divider to separate birds or create two distinct living spaces.
The cage is engineered to facilitate breeding by offering ample space and the option to divide the enclosure. When the divider is in place, it effectively creates two smaller, independent cages, each with its own access to food, water, perches, and trays. This division is particularly useful for separating breeding pairs, housing different species, or isolating birds for health reasons. Without the divider, the cage transforms into a large flight cage, allowing birds more room for exercise and movement. The design incorporates multiple access points for easy interaction with birds and for maintenance tasks. The inclusion of grilles and trays at the bottom simplifies waste management, promoting a cleaner and healthier environment for the birds. Furthermore, the cage is designed with stackability in mind, allowing multiple units to be combined vertically to create a larger, multi-level housing system, which is ideal for breeders with numerous birds or limited space.
The Hampton Deluxe cage offers several features that enhance its usability and adaptability.
Maintaining the Hampton Deluxe cage is designed to be as simple and efficient as possible, ensuring a clean and healthy environment for the birds.
In summary, the Prevue Pet Products Hampton Deluxe Divided Flight Breeding Cage is a well-designed, functional, and user-friendly enclosure that prioritizes the well-being of birds through its adaptable configuration, ease of use, and straightforward maintenance. Its stackable nature and thoughtful features make it an excellent choice for both casual bird owners and dedicated breeders.
| Product Name | Prevue Pet Products F075 |
|---|---|
| Category | Pet Care Product |
| Type | Bird Cage |
| Color | Black |
| Material | Wrought Iron |
| Included Accessories | 2 stainless steel cups, 1 wooden perch |
| Exterior Dimensions | 31 x 20.5 x 53 inches |
| Dimensions | 31 x 20.5 x 53 inches |
| Bar Spacing | 1/2 inch |
| Features | removable bottom grille and tray |