3 S
3 S
3 C
4 C
3 S
3 S
3 C
B28
B28
5C
2S
Add the assembled
unit to Step 1b.
S
ecure the velcro sleeves around the
horizontal tubes. Across the center (from G1
to G2), wrap the velcro flap across the tube
and secure it to the matching velcro strip.
Made in China for Prevue Pet Products, Inc., Chicago IL USA www.prevuepet.com 312 243-3624 customerservice@prevuepet.com7240—12/14—A3
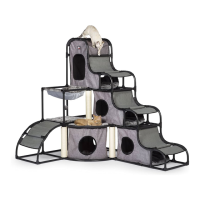
Catville
™
TOWER
Model: #7240 (Gray)
read first REVIEW BEFORE ASSEMBLY
• Designed for hand assembly.
No tools required.
•Check regularly to ensure all
components are connected.
• Place finished unit in an area
w
ith room for cats to play and
interact with all features.
For assistance or replacement
parts, please contact Prevue Pet
Products:
PHONE 312.243.3624
ONLINE www.prevuepet.com
EMAIL customerservice@prevuepet.com
CARE INSTRUCTIONS
• Do not immerse in water
or place near high heat or
open flame.
• Regularly check the stability of
all connections of components.
• Spot clean fabric and frame with
a moist towel. Allow to air dry
thoroughly.
• Supervise pet interaction with
the product. Inspect for wear.
Replace when worn.
connectors & parts
3
C
(7pcs)
4
C
(18 pcs)
5
C
(9pcs)
6
C
(2pcs)
3
S
(16 pcs)
2
S
(2pcs)
A1
Sisal Post
(3pcs)
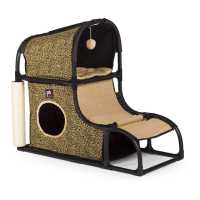
L2
Hideaway
Penthouse
(1 pcs)
D2
Hideaway Corner (1pcs)
M1
Square Plush Mat
(1pcs)
M2
Corner Plush Mat
(2pcs)
M3
Rectangle Plush Mat
(3pcs)
H
Hammock Floor (1pcs)
S1
Ramp (1pcs)
G2
Escape Floor
(1pcs)
A35
Long Tube
(56pcs)
L3
Hideaway Den
(2pcs)
A16
Short Tube
(18pcs)
B28
Short Curve
(8pcs)
B31
Long Curve
(16pcs)
G1
Play Floor
(1pcs)
1
a
1
b
PARTS NAME QT Y
3C 3-Way Corner ( 3 )
4 C 4-Way Corner ( 3 )
5C 5-Way Corner ( 2 )
A35 Long Tube ( 10 )
To form the BASE (pt.1), you
will need these pieces:
2
a
PARTS NAME QT Y
2 S 2-Way Straight ( 1 )
3 S 3-Way Straight ( 4 )
3 C 3-Way Corner ( 2 )
4 C 4-Way Corner ( 1 )
5C 5-Way Corner ( 1 )
A35 Long Tube ( 7 )
A16 Short Tube ( 4 )
B 2 8 Short Curve ( 2 )
To form the BASE (pt.2), you
will need these pieces:
PARTS NAME QTY
A35 Long Tube ( 5 )
A1 Sisal Post ( 1 )
To begin the 1st floor, you will
need these pieces:
Lay the components out on the floor,
then insert tubes into connectors to
assemble the base (pt.1).
Assemble the base (pt.2), and
add it to base (pt.1) to form the
complete base unit.
Assemble the unit, then
add it to the base.
1
c
PARTS NAME QT Y
4 C 4-Way Corner ( 1 )
5 C 5-Way Corner ( 3 )
6C 6-Way Corner ( 2 )
A35 Long Tube ( 7 )
G1 Play Floor ( 1 )
G2 Escape Floor ( 1 )
Then you will need these pieces:
2
b
2
c
PARTS NAME QT Y
4 C 4-Way Corner ( 1 )
5 C 5-Way Corner ( 1 )
A35 Long Tube ( 4 )
A1 Sisal Post ( 1 )
To continue the 1st floor, you
will need these pieces:
PARTS NAME QT Y
3 S 3-Way Straight ( 2 )
4 C 4-Way Corner ( 4 )
A35 Long Tube ( 2 )
A16 Short Tube ( 6 )
B31 Long Curve ( 4 )
L3 Hideaway Den ( 1 )
To form the 1st floor HIDEAWAY
DEN, you will need these pieces:
W
hen building sections with fabric pieces,
insert long tubes into the sleeves of the
fabric piece first, then add the connectors.
*
After the hideaway den is assembled, add it
to the base, and secure the velcro sleeves
around the horizontal tubes at top
and bottom as shown.