Do you have a question about the pro master Timer Remote and is the answer not in the manual?
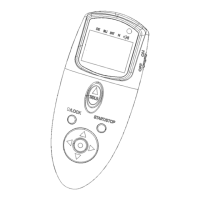
Overview of the remote's main interface elements.
Button used to trigger the camera's shutter.
Button for illumination and locking functions.
Buttons used for navigation and selection.
Visual indicator for remote status.
Button to start and stop the timer functions.
Button to confirm settings and enter menus.
Component that transmits signals wirelessly.
Port for connecting a wired remote cable.
Button to turn the remote on and off.
Indicator showing the current setting being adjusted.
Screen showing countdowns and settings.
Shows when the buttons are locked.
Alerts when batteries are low.
Shows when the timer function is running.
Setting for audio feedback.
Shows when the SET button is active.
Indicates when the shutter is released.
Displays the count of captured images.
Shows when multi-exposure mode is active.
Shows when an infrared signal is sent.
How to configure the remote for wireless communication with the camera.
Camera configuration required before using the remote.
Configuring the remote's delay, exposure, and interval functions.
Setting the initial delay before the first shot.
Setting exposure duration for long exposures.
Setting the time between consecutive shots.
Setting the total number of exposures to be taken.
Configuring the audio feedback for timer events.
Explains audio cues and visual indicators during operation.
How to manually stop the timed shooting process.
Using the remote for basic manual shutter control.
How to use the illumination and button lock features.
Setting up multiple exposures for HDR photography.
| Power Source | 2 x AAA Batteries |
|---|---|
| Compatibility | Canon EOS DSLR cameras with N3 connector |
| Timing Range | 0 s to 99 hrs, 59 min, 59 s in 1 s increments |
| Interval Range | 1 s to 99 hrs, 59 min, 59 s in 1 s increments |
| Exposure Count | 1 to 399 exposures |
| Display | LCD |