41
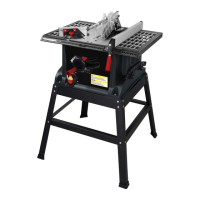
SAW ALIGNMENT
With base frame
Align the saw on the base frame and secure it using the 4 hexagonal
screws M8x34, washers and hexagonal nuts (W) (Fig. 1). Ensure
that the four rubber feet supplied are ¿WWHG under the saw (Fig. 2).
SAW ALIGNMENT
Without base frame
Ensure that the four rubber feet supplied are ¿WWHG (Fig. 2).
1. If not using the stand, the saw must be properly secured to a stur-
dy workbench through the four mounting holes that are located at
the base of the saw (Fig. 3).
2. The surface of the table where the saw is to be mounted must
have a hole that is large enough to facilitate sawdust fall-through
and removal.
3. Square the saw on the mounting surface, and mark the location
of the four 3/8’’ mounting holes (1).
4. Drill 3/8’’ hole in the mounting surface.
5. Mark an 11 x 11’’ square (2), centered between the four mounting
holes (1).
6. Cut out and remove the square.
7. This opening will allow sawdust to fall through the saw base.
8. Place the saw on the work surface, and align the mounting holes
of the saw with the holes that have been drilled through the
surface.
9. Fasten the saw to the work surface.
INSTALL THE PARALLEL STOP
1. Secure the stop (2) and the guide handle (1) using the two hexa-
gonal screws and washers (6).
Slide the clip (4) and then the compression spring (5) on to the
shaft (3) (Fig. 1).
¿J
¿J
6
5
437
¿J
SQUARE
CUTOUT
¿J
W
!
WARNING ! 'RQRWRSHUDWHWKLVVDZRQWKHÀRRr. Doing so is
very dangerous, and may cause serious injury.
ASSEMBLY AND ADJUSTMENTS
ENGLISH